Editor's note: This post was originally published in April 2019 and has been revamped and updated for accuracy and comprehensiveness. The latest update was in November 2021.
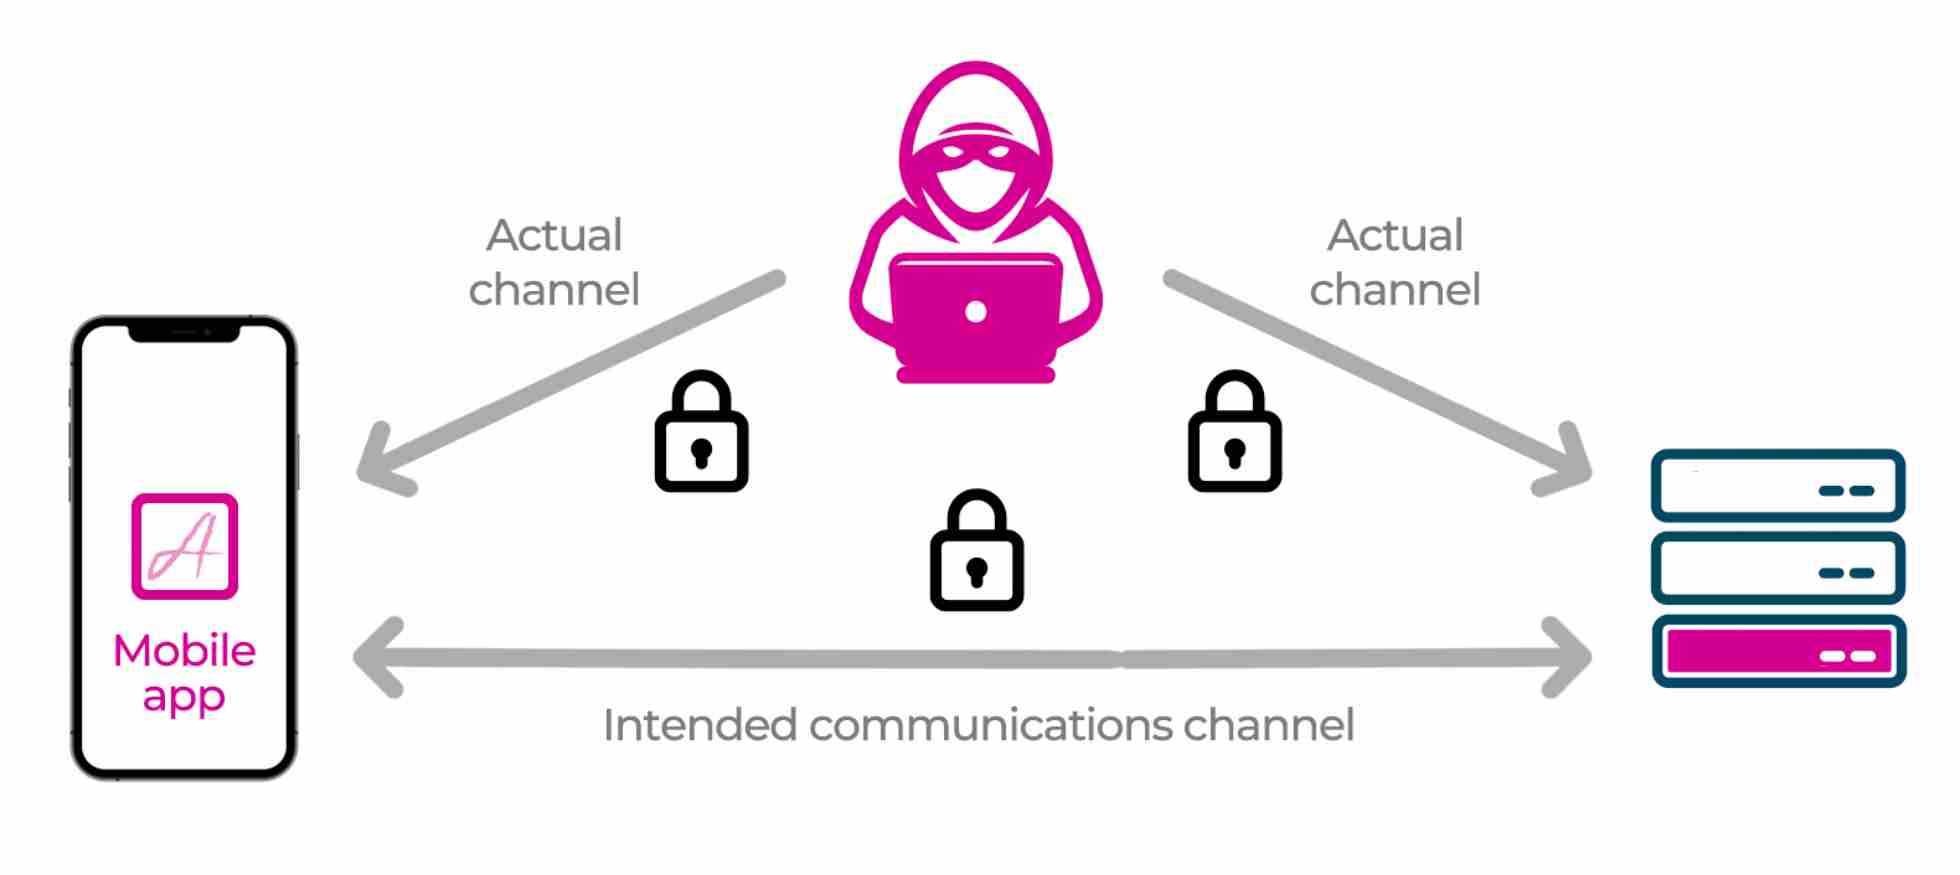
As I promised in my previous article, here is the follow up article about performing a man-in-the-middle (MitM) attack to steal an API key, and to follow this article you will need to become the man sitting in the middle of the actual channel, using mitmproxy to help you with the task of stealing the API key. Now it should be clear why MitM stands for man in the middle!
In order to help demonstrate how to steal an API key, I have built and released in Github the Currency Converter Demo app for Android, which uses the same JNI/NDK technique we used in the earlier Android Hide Secrets app to hide the API key.
So, in this article you will learn how to setup and run a MitM attack to intercept HTTPS traffic in an Android emulator, so that you can steal the API key. Finally, you will see at a high level how MitM attacks can be mitigated.
Setup for the MitM Attack
In order to perform the MitM attack you need to have mitmproxy installed, have both the computer and the Android emulator on the same WiFi network, set up the proxy on the emulator, have a free API key for the third party service that provides the currency rates, and then build and install the Currency Converter demo app on the emulator.
Clone the Currency Converter Demo
From Github you need to git clone the Currency Converter Demo app:
git clone --branch 0.1.4 https://github.com/approov/currency-converter-demo.git

cd currency-converter-demo
Mitmproxy Install
To perform the MitM attack you should use the open source tool mitmproxy which is an interactive HTTPS proxy that can be used from the command line or from a web interface, although if you are already using other tools, such as the Charles or Fiddler Proxy, feel free to skip the install and setup for mitmproxy.
If you don’t yet have the mitmproxy tool installed you should follow the official documentation to install it on your platform, but if you have Docker on your system then you can use their official image.
Using Docker
If you decided to use docker and don't want to type long commands, you can use the bash script (./stack) at the root of the demo:
./stack install
The output should look similar to this:
6.0.2: Pulling from mitmproxy/mitmproxy
05e7bc50f07f: Pull complete
00eb45722879: Pull complete
97bfbf48a937: Pull complete
5b8302d2fac6: Pull complete
Digest: sha256:82bb3e80992ab469f11087522fdecdcc621b5e0cf1aba2906030ba6b57b9d3b3
Status: Downloaded newer image for mitmproxy/mitmproxy:6.0.2
docker.io/mitmproxy/mitmproxy:6.0.2
Now it’s time for a smoke test to check that mitmproxy is working:
./stackmitmproxy --version
The output:
Mitmproxy: 6.0.2
Python: 3.8.5
OpenSSL: OpenSSL 1.1.1i 8 Dec 2020
Platform: Linux-5.4.0-89-generic-x86_64-with
All mitmproxy commands in this demo will be prefixed with `./stack`, because we will run them within docker containers, but if you have mitmproxy installed in your computer just remove the prefix `./stack` when executing each command.
The WiFi Network
In order to be able to perform the MitM attack, you need to connect the computer and the Android emulator to the same WiFi network.
Next, you need to know the IP address for the WiFi network and from your terminal, you can execute:
ip address | grep -i wlp -
The output will be similar to this:
3: wlp3s0: <BROADCAST,MULTICAST,UP,LOWER_UP> mtu 1500 qdisc noqueue state UP group default qlen 1000
inet 10.0.3.55/24 brd 192.168.0.255 scope global dynamic noprefixroute wlp3s0
You can also do it from the user interface. For example in Ubuntu 18.04 you can find it by going to Settings > Wi-Fi > Visible Networks and clicking on settings for the WiFi network you are connected to:
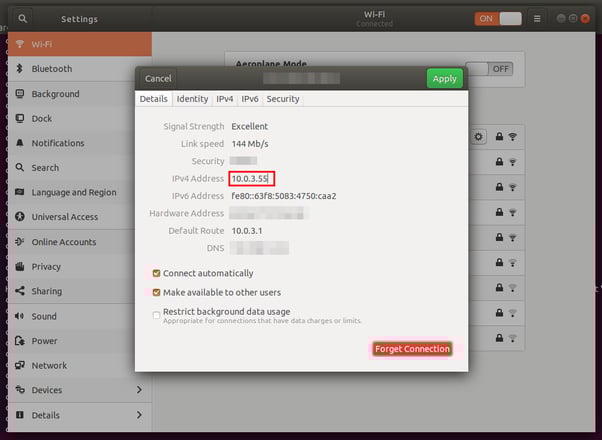
You should take note of the IP address 10.0.3.55 in order to later use it to set up the proxy in the emulator and to start the mitmproxy CLI interface.

Starting the mitmproxy
Now that you know the WiFi IP address, it’s time to launch the mitmproxy CLI interface to listen to all requests made in the WiFi network, on port 8080, by issuing the following command:
./stack --wifi-ip-address 10.0.3.35 mitmproxy --showhost --view-filter "currencyconverterapi"
Then you should see the mitmproxy CLI interface:

Now that mitmproxy is listening in to all traffic that goes through the wifi, on port 8080 (10.0.3.35:8080), it's time to set up the Android emulator to send all traffic through it and allow it to be intercepted.
The mitmproxy needs to be launched before you setup the Android emulator, because when the mitmproxy CLI interface starts, a custom authority certificate is auto-generated that we will later be required during the emulator setup.
Setup for the Android Emulator
To setup the Android emulator you need to follow this Github gist for the following steps:
Step 2 is required in order for mitmproxy to be able to intercept all the HTTPS traffic. For that you added to the Android emulator a custom certificate authority that was auto-generated by mitmproxy when you started the proxy, thus is unique to this mitmproxy installation.
Proxy Setup on the Android Emulator
The easiest way to do this is to start the emulator with the proxy set via an optional flag, but first you need to stop the emulator you have running:
adb emu kill
Now you can start the emulator again but this time you will set the proxy with the -http-proxy flag:
emulator -avd pixel-android-api-29 -writable-system -http-proxy 10.0.3.55:8080 &> /dev/null
Replace the IP address10.0.3.35 with your WiFi one, the same you used previously to start the mitmproxy.
Install the Mobile App
For this step, you first need to get an API key for the third party service that will provide the currency rates used in the mobile app in order to perform the currency conversion. Just visit this page to get your free API key.
Now, before you can build the app, you need to copy/paste the free API key into the file app/src/main/cpp/api_key.h. This file does not exist yet in the project and is not tracked by git, but you can use app/src/main/cpp/api_key.h.example as a template:
// app/src/main/cpp/api_key.h

#ifndef CURRENCY_CONVERTER_DEMO_API_KEY_H
#define CURRENCY_CONVERTER_DEMO_API_KEY_H  "place-the-api-key-here"

#endif
You can now build the app and install it on the pixel-android-api-29 emulator and you should be presented with this screen:

This was the final step in the setup for the MitM attack, so now we just need to play with the app and watch the mitmproxy CLI interface for the intercepted requests. Read our white paper on "How to prevent MitM attacks between mobile Apps and APIs".
The MitM Attack in Action
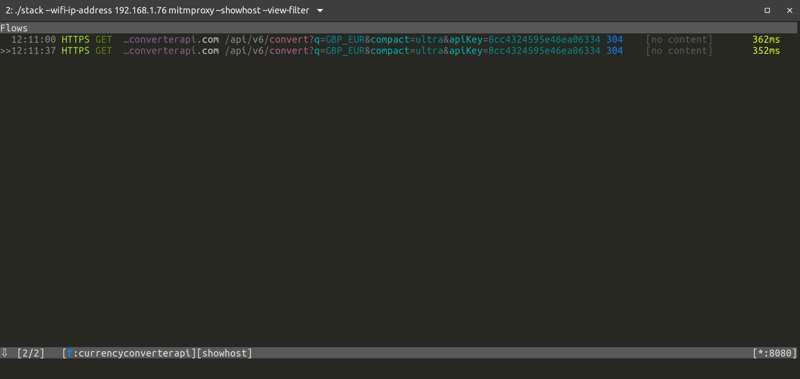
Assuming that you still have mitmproxy running from the setup process, just start playing with the android app in order to see the API requests being used to get the currency rates from a third party API being intercepted in the mitmproxy CLI interface.
So, let's try to convert £1000 into euros and see if we can intercept and steal the API key when the app calls the third party service to get the currency rate for exchanging pounds for euros.

Well I got €1,165.50 for £1000, and if I look into the mitmproxy CLI interface I can see that the HTTPS request to get the currency rate for the exchange was intercepted:
Can you spot where the API key is in the intercepted HTTPS request?
Well, I bet that you quickly found the API key as a parameter in the URL, but if you haven’t, then just look a bit closer or click in the entry to expand it and see the details of the request and response:
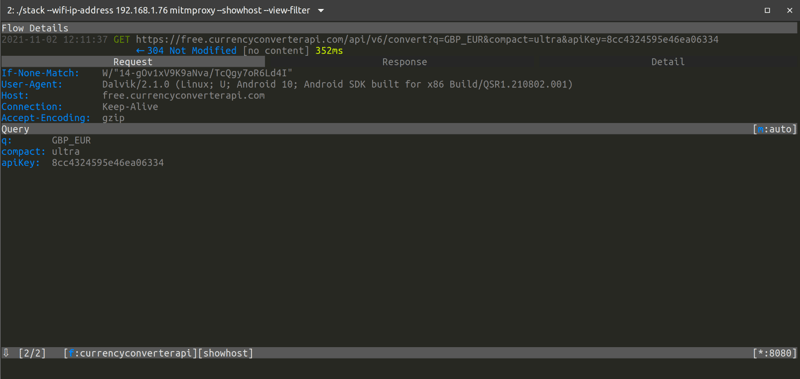
Congratulations, you have been able to steal the super-secret API key that the developer thought to be very well protected. So just to be clear, this is the same API key you copy/pasted into the file app/src/main/cpp/api_key.h and then hid in the mobile app binary through the use of the advanced JNI/NDK technique. This technique makes it difficult to reverse engineer the binary using static analysis, but as you have seen the API key can easily be extracted with a MitM attack.
An attacker using a MitM attack to steal an API key can then create huge commercial damage to a company. They can abuse the API resources in the name of the API key owner, thus increasing their usage costs, or they can exfiltrate and exploit the data exposed by the API.
What is the difference between HTTPS and HTTP requests intercepted by mitmproxy?
The difference is that to intercept the HTTPS request you need to add to the emulator or device the mitmproxy certificate authority and proxy the requests through the mitmproxy, while for intercepting HTTP only the latter is necessary.
If until now you thought that HTTPS was enough to protect your API key, you will now see that during a MitM attack it does not offer any protection at all because of the custom mitmproxy certificate authority you installed during the emulator setup that allows for mitmproxy to intercept the requests and decrypt them to allow for introspection, modification and replay.
In real-world scenarios, a user can be tricked into installing this type of custom certificate authority certificates on his/her own device via fake captive portals to get free WiFi in public places, because some users will click on anything just to have free WiFi. If the user is on a device with Android API 24 or newer it will be protected by default, because the operating system only trusts in user-provided certificates when the mobile app developer enables such trust via the network security config file. Unless of course the user is tricked into installing a modified version of the mobile app that has this trust enabled.
Mitigating MitM Attacks
We can mitigate the MitM attack by using certificate pinning on the connection between the mobile app and the API server, and we have an excellent article on this topic, Securing HTTPS with Certificate Pinning on Android. Therefore I will not go into detail here, but I want to let you know that pinning can be an operational challenge, and unfortunately it can be bypassed, but if you read the article about How to Protect Against Certificate Pinning Bypassing you will understand how to detect and prevent it from happening.
We also have the webinar Make MitM Attacks a Thing of the Past that goes in detail about what they are, how you can perform one and how you can defend against it, thus I invite you to watch it now.
So now you may be wondering what more can be done in terms of mobile API security. I would recommend a deep dive into this series of articles to understand several other security techniques that can be employed to protect a mobile API.
Conclusion
While we can use advanced techniques, like JNI/NDK, to hide the API key in the mobile app code, it will not stop someone from performing a MitM attack in order to steal the API key. In fact a MitM attack is easy to the point that it can even be achieved by non-developers.
We have highlighted some good resources that will show you other techniques to secure mobile APIs, like certificate pinning, even though it can be challenging to implement and to maintain. We also noted that certificate pinning by itself is not enough since it can be bypassed. Therefore other techniques need to be employed to guarantee that no one can steal your API key, and, if you have completed the deep dive I recommended, you will know by now that in the context of a mobile API, the API key can be protected from being stolen through a MitM attack. So if you have not already done it, please read the articles I linked to in the section about mitigating MitM attacks.
You can read more about other techniques to perform MitM attacks in the articles How to MitM Attack the API of an Android App and How to Bypass Certificate Pinning with Frida on an Android App.
Now, if you have not done it already, I invite you to read my next article about Securing HTTPS with Certificate Pinning on Android.