

Editor's note: This post was originally published in June 2019 and has been revamped and updated for accuracy and comprehensiveness. The latest update was in November 2021.
In a previous article we saw how we could steal an API key by performing a man in the middle (MitM) attack to intercept the HTTPS traffic between the mobile app and the API server. In this article we will learn how to mitigate this type of attack by using a technique known as certificate pinning.
In order to demonstrate how to use certificate pinning for protecting the HTTPS traffic between your mobile app and your API server, we will use the same Currency Converter Demo mobile app used in the previous article.
In this article we will learn what certificate pinning is, when to use it, how to implement it in an Android app, and how it can prevent a MitM attack.
What is Certificate Pinning?
Certificate pinning is the mechanism of associating a domain name with an expected SSL/TLS certificate, technically and more accurately known as an X.509 certificate.
Whenever the user clicks on a link, the device needs to establish a connection with the server hosting that domain name, and for this to happen, a TLS handshake takes place in order that both parties can exchange messages, so that they can verify each other, establish the encryption algorithms to use, and finally to set the session keys to be used thereafter. During the TLS handshake, when the device receives the server certificate, it only establishes the connection if it trusts that specific certificate, hence it is said that the connection is pinned.
What to Pin?
The process of performing certificate pinning can be achieved by pinning against any of the certificates presented in the chain of trust for the domain of the API server as shown below. Normally it is preferable to pin against the leaf certificate, in the below picture it is referred to as the end-entity certificate.
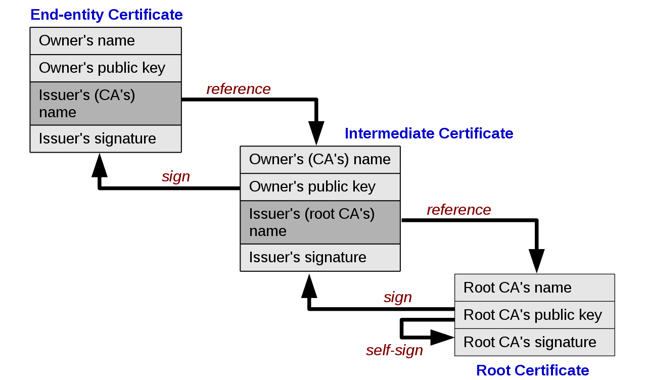
Source: Wikipedia — chain of trust: image originally via Gary Stevens of HostingCanada.org
The easiest way to pin is to use the server’s public key or the hash of that public key. The hashed public key is the most flexible and maintainable approach since it allows certificates to be rotated in the server by signing the new one with the same public key. Thus the mobile app does not have to be updated with a new pin because the hash of the public key of the new certificate will continue to match the pin provided in the network security config file. We will see an example of this later when we talk about how to set up certificate pinning.
Why do we Need Certificate Pinning?
While HTTPS gives you confidentiality, integrity and authenticity in the communication channel between the mobile app and the API server, certificate pinning will protect these same guarantees from being broken.
To Prevent Trust Based Assumptions
Incorrectly issuing leaf certificates to the wrong domain names by Root and Intermediate Certificate Authorities (CAs) would allow an attacker to intercept any HTTPS traffic using them, without the end user noticing anything.
This is possible because any mobile device comes pre-installed with the root certificates for all known Root CAs, which are then trusted by all other Intermediate CAs, thus we now have a chain of trust that is used by the devices to validate the certificates presented in the handshakes which take place to establish a secure connection with an API server. This means that if any of the CAs in the chain get compromised or issue certificates incorrectly, the chain of trust is tainted and broken, just like in the famous cases of DigiNotar, GlobalSign and Comodo.
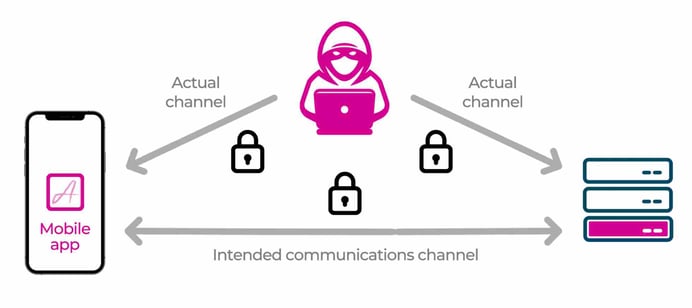
To Protect Against Use in Hostile Environments
A good example of a hostile environment is public WiFi, where users can be tricked by an attacker into installing a self signed root certificate authority into the trusted store of the device as a requirement for them to have internet for free. This will allow the attacker to perform a MitM attack and intercept, modify or redirect all HTTPS traffic, because the device will now accept all intercept traffic which is now signed by the root CA of the attacker - now trusted by the device. From Android 7 onwards, the operating system no longer trusts user supplied certificates unless the app developer explicitly opts-in to trust them in the network security config file. Even with this huge improvement in security, it is still important to pin the leaf certificate to protect against certificates issued by an attacker’s self signed root certificate - if the developer has opted-in to trust user provided certificates - and to protect against compromised CAs that have incorrectly issued certificates to an attacker.
Other hostile situations certificate pinning can protect us from are DNS cache poisoning and DNS spoofing. In simple terms this is where your device asks where it can find a certain domain name but it gets the wrong reply, for example that google.com is at an attacker’s servers and not at Google’s servers, as in this incident. This is not an isolated incident and DNS Hijacking attacks are becoming more frequent and with harmful consequences.
When to Use Certificate Pinning?
The OWASP page on certificate pinning has a good answer for this question:
You should pin anytime you want to be relatively certain of the remote host's identity or when operating in a hostile environment. Since one or both are almost always true, you should probably pin all the time.
So if your mobile app is dealing with Personal Identifiable Information (PII) and/or other sensitive data, which is pretty much true in any mobile app, then you should absolutely pin.

Preventing MitM Attacks with Certificate Pinning
Now that you know what certificate pinning is and when you should use it, it’s time to learn how to implement it in an Android mobile app. For this we will use the Currency Converter Demo app, and if you remember from the previous article, the mobile app retrieves the currency rates directly from a free API which is rate limited, and which requires an API key to access it. Therefore we note that if we needed to replace the API key we would need to release a new version of the mobile app and expect all users to update it.
A smart and more secure approach is to always delegate any access to third party services to an API server under your control. This approach allows us to keep all secrets secured in a private place, instead of having them shipped with the mobile app and making them vulnerable to extraction by reverse engineering techniques or by a MitM attack.
The Currency Converter Demo app has been upgraded to extract all the currency conversion logic to a dedicated API server which is under our control, and at the same time allows us to have more control over the certificates we will pin against.
Now that you are aware of the changes made to the Currency Converter Demo app used in the previous article, it is time to see how certificate pinning was implemented in it. To learn how to do it I invite you to follow along the implementation and testing steps on your computer.
Setup
The setup assumes that you are running on a Linux desktop machine with Android Studio installed and configured. If you are running on Mac or Windows consider running the steps in a Virtual Machine with a desktop edition of Ubuntu 20.04, the same one used to produce this project.
Clone the Project
To follow along with the certificate pinning implementation, just clone the project from Github:
git clone --branch 0.2.2 https://github.com/approov/currency-converter-demo.git

cd currency-converter-demo
Install the Mobile App
Before you can build and install the mobile app it’s necessary to first configure it with the correct API key for the new API server which is accepting requests for currency conversions in this endpoint. So if your curiosity was strong and you clicked on the endpoint link, you probably got an empty response. Remember that we need an API key to query this endpoint.
To set the API key for the mobile app, you will need to execute from the root of the Currency Converter Demo repo:
./stack setup
The output:
'.env.example' -> '.env'
'./mobile-app/android/app/src/main/cpp/api_key.h.example' -> './mobile-app/android/app/src/main/cpp/api_key.h'
As the output suggests, you now have two new files, but for running the mobile app, we only care about this one ./mobile-app/android/app/src/main/cpp/api_key.h, which contains the API key to be sent in the header of each request to the API server:
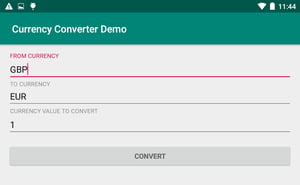
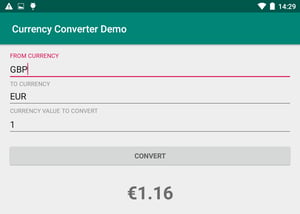
Time to build and install the Currency Converter demo app by using Android Studio, and one of its emulators or your real device. When you are done with it, you should be presented with this screen:
Mitmproxy and Android Emulator
To test the certificate pinning implementation it will be necessary to run the mobile app in a controlled environment, and for that, we will build from the command line an Android emulator with a writable file system. To this we will add to its trust store a custom certificate authority from the proxy server that we will use to perform the MitM attack.
Let’s start by following the Setup for the mitmproxy and the Setup for the Android Emulator instructions from my previous article. Only return here after the mitmproxy server is running, and the mitmproxy setup in the Android emulator is completed, including having the emulator running with the proxy settings configured to the same WiFi IP address and port where mitmproxy is listening for requests.
How to Implement Certificate Pinning on Android API 24 and Above
From Android Nougat onwards, implementing certificate pinning for any mobile app that targets API level 24 and above was made easier with the introduction of the network security config file, as detailed in this blog article by Google.
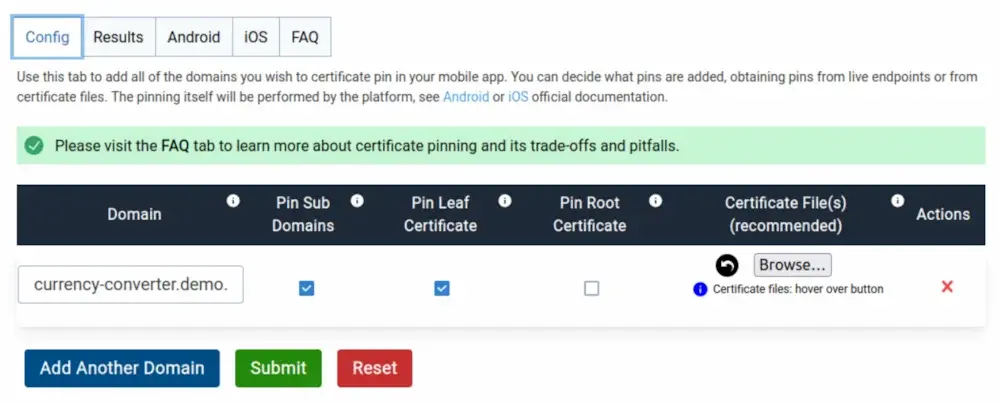
So, all that is needed is to create the file src/main/res/xml/network_security_config.xml and for that, we will use the Mobile Certificate Pinning Generator, which requires us to fill a form with the domains we want to pin:

After we click on the submit button we will land in the Results tab, and if we then click in the Android tab we will see a ready to copy Android network security configuration:

Now, click on the Copy button to add the configuration to your clipboard and then paste it into the file at src/main/res/xml/network_security_config.xml.
Next, open the AndroidManifest.xml file and inside the <application ..> tag add the following code snippet:
android:networkSecurityConfig="@xml/network_security_config
If your mobile app is only targeting Android API level 24 or above, then you are done with your certification pinning implementation.
A Quick Smoke Test
Let's use Android Studio and one of its emulators or a real device just to be sure that the app is working properly without a MitM attack in progress by rebuilding the app, launching it and then tapping on the convert button, after which we should get something like this:
Now that we know it works as it should when not under a MitM attack we need to test it under the opposite scenario. In this way we can see how certificate pinning is protecting the secure communication channel between the mobile app and the API server.
Testing Certificate Pinning via the Android Network Security Config File
We will perform a MitM attack against the mobile app running in the emulator for Android Nougat (Version 7.0 / API 24), the one that you created while following the instructions in the Setup section. The emulator needs to use at least the Android API 24, because the network security config file is not supported below it, therefore if we run in an Android emulator below API 24, the certificate pinning implementation via the network security config file will be ignored and the MitM attack will succeed.
Now if you launch the app in the Android emulator that you have just created for Android API 24 you will see this error:

We get the pin verification exception because the Android operating system is not able to match the pin we provided in the network security config file with the one it extracted from the certificate presented by mitmproxy during the TLS handshake. Therefore the connection is not established between the mobile app and the API server to protect the user from the ongoing attack and/or to make an attacker's life harder. If we look in the mitmproxy CLI interface we should not be able to see any intercepted request on it:

Now we know that certificate pinning can indeed prevent MitM attacks from succeeding, but as already mentioned this approach only works from Android Nougat (version 7.0 / API 24)) onwards, therefore we need a solution for when we need to support users on older versions of Android, and the next section will cover that.
How to Implement Certificate Pinning Below Android API 24
Until now the certificate pinning has been agnostic of the HTTP transport layer being used, but to handle certificate pinning below API level 24 we need to get our hands dirty. Specifically, we need to code in the chosen HTTP stack, with the risk that we introduce security flaws that will render certificate pinning useless and worst-case turn HTTPS into an insecure channel.
In order to avoid all the pitfalls, bugs and security risks that we might introduce with our own implementation, it is best to delegate that responsibility to a community trusted package, and here is where the TrustKit package comes into play, ensuring a secure and well-maintained certificate pinning implementation for your mobile app.
Adding TrustKit to an Android App
Unfortunately the README for TrustKit does not include instructions on how to use it with Volley, but it turns out that it's not that hard.
So the Currency Converter Demo app is using the Google official Volley library with the request queue singleton pattern, which in their words allows for a more efficient handling of all network activity in the mobile app.
In order to add TrustKit into a mobile app we need to:
- add a network_security_config.xml file (we already did this in the previous step)
- load the network_security_config.xml file on the Android manifest (we already did this in the previous step)
- add the TruskKit dependency to the build.gradle file
- change the VolleyQueueSingleton class to use TrustKit
We already have a src/main/res/xml/network_security_config.xml, but we need to add to it the TrustKit configuration, therefore add after the </pin-set> closing tag the following code:
<trustkit-config enforcePinning="true" disableDefaultReportUri="true">
<!-- Add a reporting URL for pin validation reports.In your mobile use your own URL or comment out the below line. -->
<report-uri>https://report.currency-converter.demo.approov.io/pinning-violation/report</report-uri>
</trustkit-config>
TrustKit also uses the network security config file to read the pins to use in its own certificate pinning implementation for pre Android API 24 devices, but allows for additional configuration, like setting a custom report-uri.
Next, ensure that you are still loading the network_security_config.xml file on the AndroidManifest.xml file by confirming that you have inside the <application ...> tag the following:
android:networkSecurityConfig="@xml/network_security_config"
Now, add to the app build.gradle file the TrustKit dependency:
implementation 'com.datatheorem.android.trustkit:trustkit:1.1.1'
Next, synchronize the project and afterwards update the VolleyQueueSingleton class to change this method:
public static synchronized RequestQueue getRequestQueue() {
if (requestQueue == null) {
requestQueue = Volley.newRequestQueue(appContext);
}
return requestQueue;
}
To look like this:
public static synchronized RequestQueue getRequestQueue() {
if (requestQueue == null) {
// TRUSTKIT
TrustKit.initializeWithNetworkSecurityConfiguration(appContext);SSLSocketFactory socket = TrustKit.getInstance().getSSLSocketFactory("currency-converter.demo.approov.io");
HurlStack httpStack = new HurlStack(null, socket);requestQueue = Volley.newRequestQueue(appContext, httpStack);
}
return requestQueue;
}
So, the differences are highlighted in bold, where the main difference is in how we instantiate Volley through the VolleyQueueSingleton class. We need to go from instantiating it with only the current context to instantiating it with an additional second parameter to define the HTTP stack we want to use. This in turn lets us define which socket implementation to use, namely the TrustKit one. This will allow TrustKit to take control of all network requests in order to perform the certificate pinning validation.
Before we were instantiating Volley from the VolleyQueueSingleton class like this:
requestQueue = Volley.newRequestQueue(appContext);
Now with TrustKit, we do it like this:
SSLSocketFactory socket = TrustKit.getInstance().getSSLSocketFactory("currency-converter.demo.approov.io");
HurlStack httpStack = new HurlStack(null, socket);
requestQueue = Volley.newRequestQueue(appContext, httpStack);
So, adding TrustKit to your app is only required for supporting certificate pinning if you are targetting users below Android API 24.
Testing Certificate Pinning via TrusKit on Android API 22
If you accepted the challenge of adding TrustKit yourself then proceed to recreate the MitM attack in an emulator pre Android 7, like one using Android API 22.
Let's create another emulator for Android API 22 by repeating all the steps in the Setup for the Android Emulator instructions, where you will need to replace all occurrences of android-29 with android-22 and pixel-android-api-29 with pixel-android-api-22. Please remember to only return here after the Android API 22 emulator setup is completed, including adding the mitmproxy certificate authority to the emulator trust store and having the emulator running with the proxy settings configured to the same WiFi IP address and port where mitmproxy is listening for requests.
By now we should have the emulator running for Android API 22, which was started with a command like this one:
emulator -avd pixel-android-api-22 -writable-system -http-proxy http://YOUR.WIFI.IP.ADDRESS:8080 &> /dev/null &
Now if we launch the app in the Android API 22 emulator and tap in the convert button we should be presented with this:

As we can see in the image, the exception message clearly states that the pin verification has failed, and even tells us the pins it used to perform the verification. Hurray, it’s working! Now, please do not display the exception message in a production app. I am doing it here to make it easier to see that pinning is working.
The exception message does not tell us that it was TrustKit that has thrown an exception, but if we are in a pre Android 7 device and if we look into the mitmproxy CLI interface, we should see a report like this being sent with the certificate pinning failure:
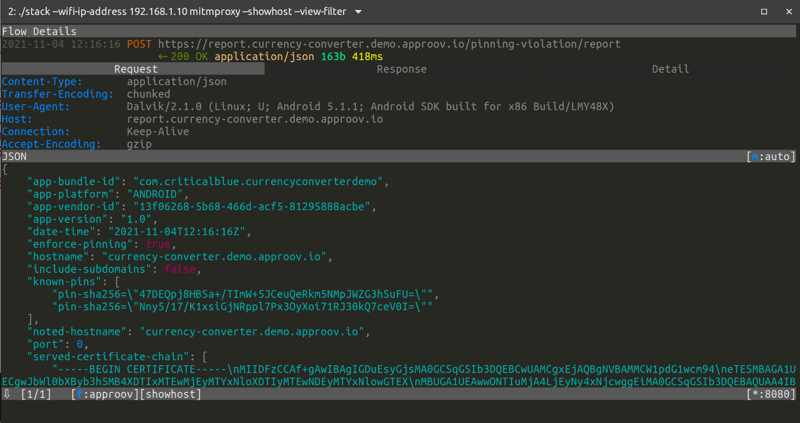
The report-uri is a very nice feature that allows us to know each time our mobile app is under a MitM attack, and this also works when we are using TrustKit on Android API 24 and above. You can test it by yourself by killing the current emulator and starting again the one for Android API 29, launching the app with TrustKit on it and tapping again in the convert button.
Conclusion
In this article you have learned that certificate pinning is the act of associating a domain name with their expected X.509 certificate, and that this is necessary to protect trust based assumptions in the certificate chain. Mistakenly issued or compromised certificates are a threat, and it is also necessary to protect the mobile app against their use in hostile environments like public wifis, or against DNS Hijacking attacks.
You also learned that certificate pinning should be used any time you deal with Personal Identifiable Information or any other sensitive data, otherwise the communication channel between the mobile app and the API server can be inspected, modified or redirected by an attacker.
Finally you learned how to prevent MitM attacks with the implementation of certificate pinning in an Android app that makes use of a network security config file for modern Android devices, and later by using the TrustKit package which supports certificate pinning for both modern and old devices.
I hope that by now you are convinced that certificate pinning is very important to implement in your mobile app in order to strengthen and harden its security. If you aren't convinced yet then I invite you to watch the webinar Make MitM Attacks a Thing of the Past and by the end of it you should be convinced why you need to adopt certificate pinning in your mobile app.
So, see you in my next article, which will be about bypassing certificate pinning in some specific scenarios. Wait, I hear you cry, it can be bypassed? Well, you need to be patient and wait for my next article to understand the limitations and what you can do about it. (Spoiler alert: there is a happy ending!) .


