Editor's note: This post was originally published in August 2019 and has been revamped and updated for accuracy and comprehensiveness. The latest update was in November 2021.
In a previous article we saw how to protect the HTTPS communication channel between a mobile app and an API server with certificate pinning, and in this article we will now see how to bypass that certificate pinning.
To demonstrate how to bypass certificate pinning we will use the same Currency Converter Demo mobile app that was used in the previous article.
In this article you will learn how to repackage a mobile app in order to disable certificate pinning and in the process you will also learn how to create an Android emulator with a writable system to allow for adding the custom certificate authority for the proxy server into the Android operating system trust store. This will allow us to bypass certificate pinning and intercept the requests between the mobile and its backend with a MitM attack.
Certificate Pinning Bypass Context
An attacker may want to intercept the communications between your mobile app and your API server in order to collect enough data to automate attacks against it, or just to modify or redirect your data on the fly. In my previous article you learned how to protect the HTTPS communication channel between your mobile app and the API server by implementing certificate pinning to keep the prying eyes of attackers at bay. However, luckily for them and unfortunately for us, it is possible to get around certificate pinning.
Bypassing certificate pinning in a mobile app can be achieved with the use of Instrumentation frameworks like Frida (see how in this article) or Xposed, or by downloading the original APK and modifying the network security config file to trust user supplied certificates and to disable certificate pinning. After this modification it is necessary to repackage the app and install it again on the device, after which it is possible to intercept the traffic again with a MitM attack.
Attackers do not only repackage an app to use in their own devices, they also upload them to the Google Play store. A good example of this is a repackaged app which is the original, and which uses the original API server, but will display ads where generated revenue will go to the attacker, not to the app author. A more sophisticated example is a repackaged app that will redirect the payments for in-app purchases to the bank account of the attacker.
Setup
The setup assumes that you are running on a Linux desktop machine with Android Studio installed and configured. If you are running on Mac or Windows consider running the steps in a Virtual Machine with a desktop edition of Ubuntu 20.04, the same one used to produce this project.
Clone the Currency Converter Demo
From Github you will need to git clone the Currency Converter Demo app:
git clone --branch 0.3.4 https://github.com/approov/currency-converter-demo.git
cd currency-converter-demo/mobile-app/android
Mitmproxy and Android Emulator
To bypass the certificate pinning implementation it will be necessary to run the mobile app in a controlled environment. Therefore we will build from the command line an Android emulator with a writable file system and we will add to its trust store a custom certificate authority from the proxy server that we will use to perform the MitM attack.
Let’s start by following the Setup for the mitmproxy and the Setup for the Android Emulator instructions from my first article on this series. Only return here after the mitmproxy server is running, and the mitmproxy setup in the Android emulator is completed, including having the emulator running with the proxy settings configured to the same WiFi IP address and port where mitmproxy is listening for requests.
Java
Some of the tools will require Java to be installed and in the PATH.
Check it's installed with:
java --version
If it says that it cannot find the command then add it to your PATH by using the Java bundled with Android Studio.
Let's find where Java is installed with:
sudo find /usr /opt /snap /bin -name 'java' | grep -i 'android-studio/jre' -
On my machine it was found at:
/snap/android-studio/115/android-studio/jre/bin/java
/snap/android-studio/114/android-studio/jre/bin/java
In this case, Android Studio is installed as a Snap package and each version is identified by a number, such as 115. The active version for a Snap package is always symlinked with the number replaced by current, therefore we will take the same approach when adding Java to the PATH.
To add the Java to your path just execute this command:
export PATH=/snap/android-studio/current/android-studio/jre/bin:$PATH
In case you have installed Android Studio by other means then replace /snap/android-studio/current/android-studio/jre/bin with whatever location you have installed Android Studio in.
Keystore
To repackage the mobile app we will need to sign it and for that we will need a Keystore that will be created via a bash script helper, but to create it we need to ensure that the Keytool is installed and available on your PATH.
Check it's installed with:
keytool --help
If it says that it cannot find the command then add it to your PATH by using the Keytool bundled with Android Studio.
Let's find where Keytool is installed with:
sudo find /usr /opt /snap /bin -name 'keytool'
On my machine it was found at:
/snap/android-studio/115/android-studio/jre/bin/keytool
/snap/android-studio/114/android-studio/jre/bin/keytool
To add the Keytool to your path just execute this command:
export PATH=/snap/android-studio/current/android-studio/jre/bin:$PATH
Now, you can try again Keytool and you should see the help output for the tool, therefore you can go ahead and create the Keystore by running this bash script:
./bin/create-keystore.sh
The output should look like this:
... some output omitted ...
---> Adding, if not already present, properties to your ./local.properties file
---> Edit your ./local.properties file and add the passwords you have used when you first created the keystore.
As mentioned in the previous output, you need to add the required passwords that will be used to sign the release by editing your ./app/local.properties file. Now edit the file and add the password you entered for Enter keystore password: to the ANDROID_KEYSTORE_PASSWORD and ANDROID_PRIVATE_KEY_PASSWORD properties.
Install the APKTOOL
The Apktool is one of the most popular tools used to decompile Android APKs, and it will be the one we will be using too. Just follow their official documentation to install it or use this bash script:
./bin/install-apktool.sh
Test it works with:
apktool -version
Now you are ready to jump to the next section to build an app release and then learn how to decompile it with the Apktool.

Tampering with the Mobile App
To bypass certificate pinning we will need to tamper with the mobile app, therefore we will build a release, then we will unpack it, modify it, and finally, we will repackage it.
Building a Release
Before we can repackage the mobile app we will need to build it and optionally test it works as expected with certificate pinning doing its job.
After you have concluded the setup you should be in the folder currency-converter-demo/mobile-app/android, from where you will use a bash helper script to build the mobile app release:
./bin/build-release.bash
Before we repackage the mobile app I recommend you follow these instructions to make sure that pinning is working with the release you have built.
Unpack the Mobile App
In order to repackage a mobile app we need to have its APK, and for that you can use adb to extract it directly from your device or you can use an online service to download it for you (not recommended for security reasons), but because we have access to the source code we will just use the APK from the release we have just built in the previous step.
Once we have our APK we need to unpack it, and for that, we will use the Apktool from a bash script, like:
./bin/unpack-apk.sh
If you are curious about how this works just take a sneak peek of the bash script.
Modify the Mobile App
In the previous article you have seen two different ways of pinning and here we will also show you how to bypass certificate pinning for both of them.
When pinning without TrustKit
To disable certificate pinning we need to remove from .local/apktool/decoded-apk/AndroidManifest.xml the attribute that loads the network_security_config.xml file:
android:networkSecurityConfig="@xml/network_security_config"
The network security config file doesn't need to be deleted, because it will be ignored since it's not referenced anywhere.
When pinning via TrustKit
When using TrustKit we cannot remove the load of the network security config file, because it will throw an exception about it not being present. Instead, we need to modify the pin, and for that, we need to first get the pin for the mitmproxy server certificate.
To get the mitmproxy certificate pin:
./../../bin/hash-certificate-public-key-from-file.bash ~/.mitmproxy/mitmproxy-ca.pem
The output should be similar to this:
CERTIFICATE PUBLIC KEY HASH:
kYUbTcIOE8ww1rJaUdJp82ybs8a8RC+Zm4jnwStjY50=
Note: the public key hash will be different for you because the mitmproxy certificate is unique to each installation.
Now, we need to open the file at ./.local/apktool/decoded-apk/res/xml/network_security_config.xml and replace one of the pins with the one we got for the mitmproxy certificate, that in this case is the pin kYUbTcIOE8ww1rJaUdJp82ybs8a8RC+Zm4jnwStjY50=.
Repackage the Mobile App
Now that we have modified the mobile app to be able to bypass pinning we are ready to repackage it, and we will use a bash script to help us with the task:
./bin/repackage-apk.sh
Note: the script will prompt you for the Keystore and private key passwords.
The repackaged APK should be now found at:
ls -al .local/apktool/decoded-apk/repackaged-and-signed.apk-rw-r--r-- 1 approov approov 1602366 Jul 15 16:03 .local/apktool/decoded-apk/repackaged-and-signed.apk
Certificate Pinning Bypass in Action
Now that we have repackaged the APK, we will install it and perform a MitM attack to intercept the HTTPS requests that are no longer protected by certificate pinning.
Install the Repackaged App
First, let's uninstall the original version of the mobile app, otherwise adb will say that the signature doesn't match with the previously installed version.
To uninstall execute the command:
adb uninstall com.criticalblue.currencyconverterdemo
Now you can install the app with:
adb install .local/apktool/decoded-apk/repackaged-and-signed.apk
The MitM Attack
If you followed all the setup steps you should have now mitmproxy running and listening on port 8080 of your WiFi IP address and the android emulator for API 29 started and set to proxy the requests through mitmproxy.
Now that is all set, for the MitM attack to succeed it's time to start the app with this command:
adb shell am start -n com.criticalblue.currencyconverterdemo/com.criticalblue.currencyconverterdemo.MainActivity
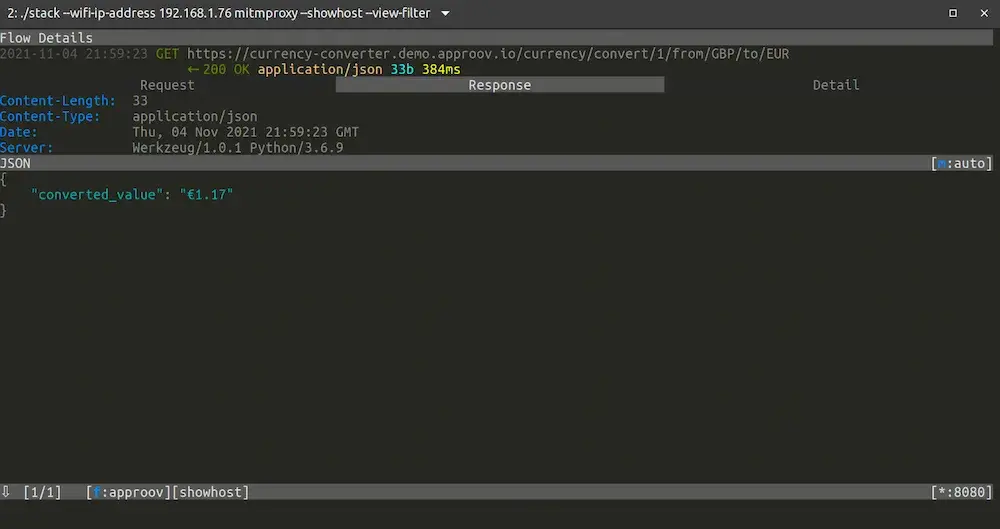
Next we will try to make a conversion:

We were able to make the conversion without raising any pinning exceptions, while at the same time we have intercepted the traffic between the API server and the mobile app:

Therefore, even though we have learned in a previous article how to implement certificate pinning to protect against MitM attacks, we have now seen how to bypass pinning in a device that the attacker controls. Bypassing pinning is also achievable when an attacker tricks a user into installing the repackaged mobile app, and this is an issue that the official Google Play Store and the App store are still struggling with, because you can still find repackaged versions of some of the most popular apps there.
Conclusion
Protecting your mobile app and API server from attackers is not an easy task, and is done in incremental steps. It starts with good and secure coding practices as recommended by the OWASP Mobile Security Project, and will end up with In-App and API defense solutions. You can go a step further and read the Whitepaper on How to Prevent MitM Attacks between Mobile Apps and APIs for a deep dive in how everything works and how it can be prevented.
In the next article I will walk you through a solution that will secure certificate pinning from being bypassed, and will allow you to update the certificate pins without releasing a new version of your mobile app. This mobile app attestation solution is both an In-App and API defense tool. It will protect your mobile app from being repackaged, tampered with at runtime or MitM attacked, and at the same time will guarantee that the API only serves requests from your genuine mobile app.
These are bold claims, but once you see how easy it is to implement and how effective it is, you may wish you had discovered it earlier.
See you in my next article How to Protect Against Certificate Pinning Bypassing.