Table of Contents
Approov Reference Guide
Getting Started With Approov
This documentation provides a detailed reference manual for using Approov. If you are new to Approov then to get up and running quickly, we highly recommend using one of the available Quickstart Integrations for the app and backend API. You can then return to this manual as needed for detailed usage guidance.
Once you have performed the app integration and installed the Approov CLI Tool there are a few more steps to get your app to pass attestation:
- Familiarize yourself with the Approov Architecture
- Understand Account Access Roles in the Approov CLI
- Add the API domain(s) to be protected by Approov
- Add the signing certificate used to sign your app
- If you are using API Protection then modify your API backend to verify that valid API tokens are present. If you are using Runtime Secrets Protection then add secure strings to migrate your existing secrets to be managed with Approov.
If you have technical support enquiries then please use support@approov.io. Note that if you have a paid plan then you can use the Approov CLI command approov support to get emergency contact information. This will allow you to contact our 24 hour support for critical production issues.
You can reach your subscription portal at https://approov.chargebeeportal.com. You will have received login details when you converted to a paid plan. The portal allows you to change your subscription plan, update your payment details, terminate your subscription, etc. For further sales-related enquiries please contact sales@approov.io
Exploring Other Approov Features
Some other Approov features you might want to try are:
- Update your Security Policy to change the conditions under which an app will be given a valid Approov token.
- Learn the additional features around Managing App Signing Certificates for signing identities used to sign your apps. This allows apps to be auto-registered for use with Approov, and can be used to automatically recognize development apps.
- Learn how to Manage Devices to apply custom policies to specific devices, or to force specific devices to always pass or fail attestation.
- Learn how Manage Dynamic Pinning is managed and how it ensures that API communications are secured against interception.
- Consider the use of Approov Runtime Secrets protection using Secure Strings to provide protection at rest, as well as in transit, for any remaining app secrets.
- Learn how to Manage Key Sets to managing additional keys for signing or encrypting Approov tokens, and to allow access to a wide range of JWT algorithms beyond the default
HS256signing method. - Understand User Management so you can add and remove access for others to your Approov account.
- Employ Automated Approov CLI Usage to enable integration of Approov with Continuous Integration (CI) systems.
- Use a Development Key to force particular app builds to pass attestation when they might be resigned when running in remote test environments.
- Use the Metrics Graphs to see live and accumulated metrics of devices using your account and any reasons for devices being rejected and not being provided with valid Approov tokens. You can also see your billing usage which is based on the total number of unique devices using your account each month.
- Use Service Monitoring emails to receive monthly (or daily) summaries of your Approov usage. You can also manage the API domains to be continuously monitored to ensure they are accessible and that the pins match those added to your account.
- Use Token Binding to bind Approov tokens to other data, especially user authorization tokens, to ensure that a given Approov token can only ever be used in the context of the user to which it was issued.
- Use Application Installation Attributes to be able to set specific attributes for an app installation, where those attributes will appear in any further Approov tokens issued for it.
- Use Device Filters to highlight devices with particular characteristics in your Metrics Graphs.
- Use Installation or Account level message signing to ensure every single networking request is signed to provide even higher levels of integrity guarantees when used alongside Approov tokens.
- Create Custom JWTs where the payload can be constructed by your app’s logic but the signing process occurs on Approov servers, so that the signing keys never have to be held inside your app.
- Add Android Automated Launch Detection to determine if your app is being launched automatically, rather than by a human user.
- Employ platform level attestation features such as Apple DeviceCheck Integration, Apple App Attest Integration or Google Play Integrity Integration which are directly integrated into Approov. This allows you to continue to benefit from the ease of integration of cross-platform Approov tokens.
- Add support for calling Approov protected APIs using Web Protection Integration, using one of the supported 3rd party web protection services FingerprintJS, Google reCAPTCHA or hCaptcha.
Depending on your Approov subscription, not all these features may be enabled in your account. See Enabled Features and Limits for how to view the features enabled in your account.
Account Access Roles
When you initialize access to your Approov account through the CLI a number of different access roles may have been installed. Typically these will have been dev and admin. The dev role is automatically made active on installation.
Most operations can be carried out using the dev role, but certain more security sensitive operations are reserved so that they can only be executed when you have assumed an admin role. To assume the admin role you can type:
eval `approov role admin`
When you issue the next approov CLI command you may be invited to provide the password. You should only assume the admin role for the period that you need it and then you should assume the dev role again. Note that on Windows you must use the form set APPROOV_ROLE=admin:your-account where your-account is the name of your Approov account.
To see a list of all the roles available use:
approov role
This lists all of the user roles you have installed on your machine, and the command required to assume that role, e.g:
available role selection commands for account your-account:
  eval `approov role admin`
  eval `approov role dev`
  approov role .
The command you actually need to issue is eval which evaluates the return from the approov role command itself. This is a string for exporting the APPROOV_ROLE environment variable, which selects the active role. This ensures that each individual shell, which can have a different APPROOV_ROLE values, may have a different role selected. This prevents any unwanted interaction between terminal shells when you select a different role as the selection is only for the current shell. Any newly created shell will default to using the dev role, if that is available.
Note that on the Windows platform the role commands look slightly different, such as the following:
available role selection commands for account your-account:
  set APPROOV_ROLE=admin:your-account
  set APPROOV_ROLE=dev:your-account
  approov role .
Thus you must issue these set commands directly to change the current role.
User role sessions are controlled by the Approov cloud. This means that if you have initialized the same access on multiple machines, operations that end a session on one machine will impact all other machines using the same user roles.
If you explicitly select a role again, after you have provided a password, then this ensures that the session is refreshed to be a full hour long. You can use this if you wish to perform some scripted operations using the Approov CLI and you do not want the session to time out during this time. You can use the form approov role . to extend the session for the currently active role without have to explicitly select it.
It is possible to see which role is selected at any time as follows:
approov whoami
Which will generate something like:
admin: https://admin-something.approovr.io
configuration: /home/you/.approov
account: your-account
role: dev
ID: dev-1016
name: your name
email: you@your.domain
expiry: 2020-12-04 14:00:30
The shows both the role and account, as well as other relevant information.
Note also that it is also possible to initialize access to multiple different Approov accounts if you have them, e.g.:
available role selection commands:
  eval `approov role admin your-account`
  eval `approov role dev your-account`
  eval `approov role dev your-other-account`
  approov role .
In this case an additional parameter is always required to specify the account as well as the role required.
If the access provided expires or is revoked then the role will remain on your machine but you will no longer be able to use it. If you execute an approov init with revised access then that will replace any expired or revoked user role. You can remove all current roles using the approov init remove-all command, but then you will need to reinitialize access via the access recovery flow.
Passwords
Password protection improves your security posture and dramatically reduces the risk of your account being compromised. Approov access information is held in the .approov configuration in your home directory and this will only have access permissions for your user identity. However, if your machine account is compromised then so could access to your Approov account. This could allow an attacker to generate valid Approov tokens or prevent your apps from doing so. Password protection of Approov user roles prevents this. Sessions time out after a maximum of one hour and after this time the password is required again for access. The password itself is never stored by the Approov CLI on your machine.
Communication between the Approov CLI and the Approov cloud service is always conducted using TLS, but its security is subject to the certificate trust store installed on your local machine. Ordinarily if this were to be compromised then it would be possible for a Man-in-the-Middle (MITM) attacker to intercept, modify and then spoof requests to the Approov cloud service. The password mechanism also provides protection from such compromises, as it provides an additional level of message integrity over and above TLS. It employs asymmetrically encrypted integrity tokens with a proof of password possession protocol to transmit this information, ensuring that an attacker cannot spoof these integrity tokens without knowledge of the password.
If a CLI command is issued that uses a password protected role, then the user will be invited to provide the password before they can continue. Once the password is correctly entered this initiates an active session that lasts for one hour. During that time it is not necessary to enter the password again in order to issue CLI commands. The current session information is stored in a .approov file in your home directory.
Different users should not share user roles, you should add new user roles as required, allowing each user to set their own passwords.
If you wish to reset the password for a user role then first select the role. Then use the following command:
approov password -sendCode
Which will generate output like the following:
password reset code for dev role in account your-account sent to you@your.domain
use the command "approov password -setWithCode <emailed-code>" to set the password
This sends the reset information to the email associated with the user role. The email provides a long base64url encoded reset code string that is valid for at least 30 minutes. This long code is used to encrypt the new password information sent to the Approov cloud. This ensures that no MITM can possibly intercept the password information, or set their own passwords, without access to the code in the email.
You can then set the password as follows (use the code received in your email, not the one provided in the example below):
approov password -setWithCode Gbf4erRmu3lrWAGAIW60kMXlkSYK1jJmtqRicMFAZCg
You will be asked to enter a password (of at least six characters) and then re-enter for confirmation. It is not echoed to the terminal:
setting password for dev role in account your-account
enter password:
confirm password:
new password set for dev role in account your-account
After a password has been set, you will be asked to enter it the next time you assume the role, or when the session has timed out with the role active and you issue another command.
Note it is also possible, although not recommended, to remove the need to use a password for a particular user role. Go through the procedure of obtaining a reset code and then issue the following, substituting in the code you were provided with:
approov password -clearWithCode Gbf4erRmu3lrWAGAIW60kMXlkSYK1jJmtqRicMFAZCg
This will require confirmation as follows:
WARNING: we recommend that you protect your access using passwords
ATTENTION: If you wish to continue then please type YES and return: YES
password cleared for dev role in account your-account
It may take up to 30 seconds for the new password state to be fully updated.
Installing on Another Machine
If your onboarding email code has not expired then you can easily initialize the Approov CLI on another machine using the normal flow.
If the onboarding email has expired then you can obtain a new one by [resending an onboarding email] (#resending-onboarding-emails), assuming you have admin role permissions. If you don’t have these permissions then you will to ask somebody in the team who has those permissions to do this for you.
Account Access Recovery
If all admin level access to your Approov account is somehow lost, then you will need to use the recovery flow. This will send a new onboarding email to your email address with a refreshed onboarding code allowing you to run approov init again.
If somebody else in your team still has admin role access to the Approov account then they can simply [resend an onboarding email] (#resending-onboarding-emails) to enable you to initialize the Approov CLI.
For security reasons, you must have a record of the recovery PIN that was provided during the original initialization. This is to prevent an attacker gaining access to your Approov account if they are able to gain access to your email account. If you do not have this PIN number then you will need to contact Approov support.
The recovery command is similar to the original onboarding command in your original onboarding email, but with an email address used instead of an onboarding code. You must specify the account name and the email address to which the access was issued. The command will be similar to the following:
approov init your-account you@your.domain
You will also be asked for the recovery PIN:
you must provide the recovery PIN that you were given when you first initialized Approov access for this account
enter PIN and return: 123456
onboarding email for account your-account to you@your.domain will be sent if this combination is valid (wait 5 minutes before retrying)
If all this information is correct then you will receive an Approov Onboarding email. This email will only ever be sent to the address to which the role was assigned. Thus you can’t use this to recover access if your email address has changed.
For security reasons, no indication is given if the provided information is incorrect. The command will just silently fail. Note that, if you think some of the information is incorrect on one attempt, you must wait 5 minutes before retrying due to the protections in place against the brute forcing of the PIN value.
Approov Architecture
This describes the overall architecture of Approov and familiarizes you with the key concepts required to understand the steps in the Approov integration.
Key Components
The key components of Approov are detailed in the following diagram:

The steps required to obtain an Approov token are as follows:
- You will be able to administer the properties of your account using the
approovcommand line tool and Approov account access you were issued upon sign up. A key aspect of this administration is to add the app signing certificates associated with your apps to the Approov account. This enables Approov to recognize those apps as being official. It is also possible to register individual versions of the app as being official on a more ad hoc basis if necessary. - The integrity check process requires the SDK and the Approov cloud service to work together. The process is initiated when you make an API call that requires an Approov token to be added. The SDK analyzes the runtime environment of the app and the authenticity of the app that is being measured. These checks are implemented in hardened code and communications are protected both by TLS and also by a secondary level of request integrity signing.
- The Approov cloud service performs analysis on the data provided by the SDK and makes a decision based on this and the security policy criteria you set for your account. If the criteria are met then the Approov cloud provides a short lived token signed with a symmetric secret allocated randomly during your account sign up. If the criteria are not met then a token is still issued, but it is not signed with the correct secret. Options are also available to use other secrets or other signing algorithms, including those with asymmetric keys.
- The obtained Approov token should be transmitted with a backend API request. This is done automatically using our Mobile App Quickstarts. Typically the token is added as the additional header
Approov-Token, but the approach can be customized. It is important that all communications made by these APIs are pinned so that no Man-in-the-Middle (MitM) interception is possible that could make a copy of the short lived token. Pinning TLS connections is good security hygiene anyway, as it prevents customer data being intercepted in the same way. The Approov quickstarts automatically perform this pinning. Note that once an Approov token has been obtained it is cached by the SDK for up to 5 minutes so that subsequent API calls do not require additional communication with the Approov cloud service. - Your backend API is able to check the validity of the Approov token by checking it has been correctly signed with the secret. If it is, then you know that the API request is really coming from an official registered version of your app; it is not being spoofed by some other entity. Moreover, a valid Approov token also indicates that the checks on the runtime environment have passed, as controlled by the security policy you have set in your account. Since the signing key is never put inside the app, an attacker cannot reverse engineer it in order to create their own signed Approov tokens without going through the integrity measurement process.
Backend Integration Options
There are different backend integration options depending upon whether you are protecting your own API backend, or are using Approov to protect API keys used to access 3rd party APIs. In either case an attestation is performed and a decision is made about whether the app and runtime environment are valid.

If you have your own backend then we recommend that you use our Backend API Quickstarts. These provide examples for checking JWTs across a wide range of different backend technologies. If the provided JWT is incorrectly signed, has expired or if no JWT is presented at all, then the request can be rejected. If the app and/or environment have failed attestation then an incorrectly signed JWT is sent to the backend. Thus if there is a valid JWT you can be sure that the request is coming from an attested app.
Even if you don’t want to, or can’t, modify the backend you can still use Approov for enhanced protection. Approov is able to protect API keys and only deliver those just-in-time to apps that pass the attestation. This feature uses predefined secure strings so that they can be held securely in the Approov cloud and rotated at will. Our Mobile App Quickstarts provide facilities to automatically substitute the actual API key values dynamically into headers or query parameter values as the API calls are made.
Detection Capabilities
Approov is able to determine various properties of the app and the environment in which it is running. The individual detections are mapped to individual property flags that are determined each time an Approov token is fetched. It is possible to set security policies that determine, at a fine grain level, whether a given detection should result in a valid Approov token being issued or not. The summary below may change at any time as new threats are recognized, but we will endeavor to keep this table as up to date as we can.
| Type | Description |
AppAttest
|
Approov provides an optional integration with Apple's AppAttest capability. This provides an additional security layer for iOS devices that support this to prove that requests are from the authentic version of your app. |
Authenticity
|
Analysis of the app to ensure it is one that has been officially signed with the app signing certificate or others registered with Approov. Failure may indicate that a fake or tampered app is being used. |
Automation
|
Detections of the app being automated in some way. For a production app this is a strong indicator of automation that may be associated with some nefarious use of the app. Basic detection is in place for Appium iOS and monkeyrunner on Android. |
Banning
|
Mechanisms are provided to ban particular devices so that they no longer receive valid Approov tokens. |
Cloning
|
Android app cloning is detected, which allows an app to be effectively installed inside another app, typically to allow multiple accounts on the same device. Permitting apps to run this way may have significant implications for the users security and privacy. Approov detects a multitude of these cloning apps, a popular example being Parallel Space. | Debugging
|
Various levels of detection are used to determine if the app is running in a debug environment. |
DeviceCheck
|
Approov provides an optional integration with Apple's DeviceCheck capability. Various properties can be extracted from the results of this and used to determine device rejection. This may also be used to provide permanent banning of specific devices. |
Emulation
|
Detection that the app is running on an Android emulator or iOS simulator. For Android, if the SDK is running on x86, then it is more likely to be an emulator, so only an internal list of known real 32-bit x86 devices are allowed through. Currently all 64-bit Android x86 devices are categorized as emulators. |
Frameworks
|
Detections for various framework and modding environments. For iOS specifically Cycript and Cydia are detected. Android specifically detects the Xposed, EdXposed, Riru or Zygisk frameworks. The Frida framework is detected on both Android and iOS, with protections to prevent attachment to the app while it is running. |
Filtering
|
Capabilities are provided for filtering devices based on various characteristics. This may be for information only or it may be used to reject or permanently ban certain devices. |
Jailbreaking
|
Detection that the iOS device the app is running on has been jailbroken. |
Memory Dumping
|
On Android, specific detections related to attempts to dump the memory of the running app process. |
Modding Apps
|
Detection of apps associated with hacking or modding, such as GameGuardian on Android. |
Play Integrity
|
Approov provides an optional integration with Google's Play Integrity. Various properties can be extracted from the results of this and used to determine device rejection. |
Rooting
|
Detection that the Android device the app is running on has been rooted. This includes detection of the Magisk root manager, even when it is being actively cloaked. |
Spoofing
|
Approov provides integrity guarantees for the data transfer between the protected core of the SDK and the Approov cloud service. Any tampering is detected and causes failing Approov tokens to be issued. |
Tampering
|
Various checks are performed to ensure the runtime integrity of the app. The overall app memory layout is also monitored looking for suspicious changes or configurations indicating that the app is being monitored or attacked. |
Unpinning
|
Detection that pinned connections between the app and the backend API are being compromised. Approov can perform continuous pinning testing and there is detection of certain frameworks designed to compromise the integrity of pinning. |
Dynamic Pinning
This section describes how certificate public key pins can be dynamically managed by the Approov SDK.
What is Pinning
Pinning is necessitated by the fact that an attacker may be able to control both the device and also the channel over which it communicates. In the absence of pinning, attackers are able to install additional certificates on the device as being trusted, and then use a proxy to decrypt any traffic from the mobile app to the API endpoints. This method can then be used to steal valid Approov tokens or API keys from the communication channel in order to make spoofed requests, as though they were coming from the app.
Pinning represents good security hygiene. It prevents real users from having their traffic intercepted if an attacker is able to trick them into installing an additional certificate on their device that then becomes trusted for TLS communication. Pinning ensures that the app avoids completely delegating its trust to the device.
There are various existing mechanisms to implement pinning in an app. Although conceptually identical, there are significant implementation differences between Android and iOS:
- Android: There is a good overview on TLS more generally here. This article provides specific information on how pinning can be implemented for various different HTTP stacks that might be used in an app. Android have also added a network security configuration feature that allows pins to be specified at the manifest level for an app. Pinning with the
OkHttpstack is straightforward using the CertificatePinner class. - iOS: There are fewer resources targeting iOS, but this is a good place to start. TrustKit is a popular library used to implement pinning, and there is also a version for Android. iOS has also introduced an Identity Pinning configuration capability.
These standard methods can be used to pin an app’s connections with the backend API server. However, they implement static pinning which require the app itself to be updated to change the pins.
Note that the Approov SDK uses its own methods to pin the connections it makes with the Approov cloud service, so you can be sure that this channel is defended without any further implementation work.
Static Pinning Issues
Under normal circumstances public key pins do not have to be changed very often. Approov uses public key pinning rather than certificate pinning. This means that the pin is actually to the public key of the certificate rather than a hash of the whole certificate contents. The advantage of this is that, if certificates are changed simply because they are expiring and need to be renewed, then the same public/private key pair may be used to generate the new certificate without invalidating the pins.
The difficulty arises when a certificate has to be revoked and replaced if there is a concern that the private key has been compromised (or lost). This could allow an attacker to generate fake certificates and spoof the endpoint, intercepting traffic from the app if they are able to insert themselves as a Man-in-the-Middle (MitM) in the network.
Such an event necessitates a change in the public key pin for the certificate, as a new private key needs to be generated. If this is simply changed immediately then it would prevent apps with the public key pin from connecting to the API. The app would no longer work. It is recommended practice to also include a backup pin inside in the app that could be used in such an emergency. But this requires careful management and also relies on the backup’s private key not being compromised at the same time.
Thus the disadvantage of the static pinning methods described in the previous section is that they fix the set of valid pins into the app itself as part of its configuration. This means that for an app to get a new set of pins a new version of the app must be released and be installed on a user’s device. In reality this can take many days, or even weeks, for most of the apps to update and there may always be a stubborn cohort whose apps are never updated. These would be denied access once the pins are changed, and may end up as either permanently lost users or ones which increase user support load.
Static pinning causes problems both with the speed of incident response and user retention. Ideally what is required is a means to transmit the updated pins over-the-air immediately to invocations of the app without any need for an app update. Moreover, this needs to be done in a secure manner to prevent an attacker using this as a back door to inject their own pins to undermine the pinning protection. Approov offers a dynamic pinning solution that fulfils these requirements.
How Dynamic Pinning Works
When the Approov SDK connects to the Approov cloud the set of public key pins for API domains being protected are downloaded automatically. These will then be stored in the dynamic configuration and thus be available immediately the next time the app starts up. This is convenient for apps developed using frameworks that require any public key pins to be presented very early during the initialization of the app.
The overall architecture is as follows:

The SDK configuration is signed using Elliptic Curve Cryptography (ECC), with a hash of the public key held in the initial SDK configuration string used and the private key held securely in Approov’s servers. This allows over-the-air dynamic updates to the configuration to be sent to running apps that can be verified as being untampered and authentically issued by the Approov servers. This is guaranteed even if the update is transmitted over a channel already compromised by a MitM attack. An attacker cannot know the public/private key pair which is necessary to validly modify the update. The SDK only accepts updates consistent with the public key hash it is provided with in its startup configuration.
The pins are also held in persistent storage for the app so they are always available as soon as the app is restarted. If any change is made to the API domains and/or their pins using the approov CLI then an updated dynamic configuration will be transmitted to all apps the next time they request an attestation. This dynamic pinning is primarily designed to protect the channels over which Approov tokens or secure strings are being transmitted. However, it can also be used to protect other domains.
Approov provides two different mechanisms to ensure that the app’s communication channels cannot be compromised:
- Managed Trust Roots: This is applied by default. Managed Trust Roots provides a set of trusted certificate roots that have been issued by certificate authorities. Only connections with certificates in a chain leading to one of these trusted roots will be allowed. This means that any self-signed Man-in-the-Middle (MitM) certificate will be rejected. The advantage of Managed Trust Roots is that there is absolutely no operational dependence on the specific leaf certificates that are in use on an API endpoint, and they can be rotated by the provider with no impact.
- Explicit Pinning: This allows the connection to be pinned to specific public key(s) for a certificate. This may be a leaf certificate, but it is also possible to pin to a specific intermediate or even root certificate if required. This provides even stronger protection than Managed Trust Roots. The only restriction for any domain is that there must be a process in place to provide notification of an upcoming change that may impact the public key, otherwise this will cause pinning to fail until updated pins are configured in Approov.
Security Rules Updates
The Approov SDK is able to execute security analysis rules that are supplied dynamically by the Approov cloud service as illustrated below:

You may set your security policy and Approov researchers are continually updating the set of rules and security signatures that are being detected to indicate malicious intent inside the app’s runtime environment. When the first Approov fetch is made in the app, the latest set of security rules are transmitted from the Approov cloud to the SDK. These rules specify the data to be gathered by the SDK and the checks to perform to identify particular threat signatures. The security rules are automatically updated for running apps whenever they are changed on the server.
When an attestation is performed, a predetermined subset of the gathered data and the results of signature analysis are transmitted securely to the Approov cloud. Data analysis is then performed before determining if the particular app instance should be issued with a valid or an invalid Approov token.
This mechanism is also used by Approov researchers to gather intelligence on specific devices that are associated with malicious behavior. It enables a highly reactive security stance without the requirement for SDKs within apps to be updated.
Cloud Server Redundancy
To enable a highly reliable Approov service, the backend is implemented in two different cloud service providers, as illustrated below:

When an Approov fetch is requested, the initial transmission is sent to a primary service hosted in the AWS cloud. The primary service has multiple frontend servers deployed across the availability zones of a region and is setup to automatically scale with the service load. The particular geographic data center utilized is allocated upon sign up. Some accounts may also have support in multiple different geographic data centers to lower latencies in different parts of the world and to offer further enhanced redundancy.
If communication cannot be established with the primary service (or errors are continually returned) then the SDK attempts to make contact with the secondary (aka failover) system. This is available on a different domain name using a different TLD (Top Level Domain) to further enhance redundancy. The secondary failover system is implemented in Google Cloud to provide complete isolation from large scale failures that may occur in AWS. The failover system only provides a subset of the full analysis capability of the primary system, but it will ensure your apps should continue to receive valid Approov tokens in the event of a catastrophic primary system failure.
The failover system only provides service if it is enabled. It continually checks the primary system on a minute-by-minute basis and automatically enables itself if a primary failure is detected, with no need for any manual intervention in the switch over process.
Frontend App Integration
This section details additional information associated with the frontend integration of Approov into your app. You should follow one of our Mobile App Quickstarts to do this. If your particular frontend is not supported then you can integrate the Approov SDK directly following the instructions in Direct SDK Integration.
Android Specific
This section provides specific additional information related to Android app integration.
Targeting Android 11 and Above
This section is relevant if your app uses a targetSDKVersion of 30 (Android 11) or above.
An isolated process is provided for Magisk detection. It is suggested that you employ this method for detection by making the indicated changes to the App manifest.
If you wish to have the most extensive root analysis capability while targeting API level 30 or above then you can use the special QUERY_ALL_PACKAGES permission in your manifest:
<uses-permission android:name="android.permission.QUERY_ALL_PACKAGES" />
However, Google consider this to be a sensitive permission and you will be required to declare this in a declaration form in the Play Console. You must justify this on the basis of the security importance of detecting root for your application, and that the feature will not be used for any form of user fingerprinting. Google already suggest that exceptions will be forthcoming for “Apps that have a verifiable core purpose involving financial transaction functionality (e.g. dedicated banking, dedicated digital wallet) may obtain broad visibility into installed apps solely for security-based purposes.”
Analysis afforded by QUERY_ALL_PACKAGES that relies on PackageManager visibility is only used for the purposes of scanning for rooting apps on the device. It is never used for any fingerprinting or tracking of the devices themselves. Approov does not retain any information regarding the packages installed on particular devices and, under normal circumstances, all processing of the package information is performed on the device itself. Package visibility is restricted if your app targets Android 11 (API level 30) or above.
You will obtain the device property flag no-package-query if your app is unable to perform a full query of app packages. This does not cause a failure, but is simply a reminder that Approov does not have full visibility of packages so some checks cannot be performed.
Isolated Process Capability
An additional optional method is provided by the Approov SDK to detect certain rooting tools such as Magisk. If your app is able to query all packages (see Targeting Android 11 and Above) then this is unnecessary, but does provide an additional layer of protection. The method works by allowing the Approov SDK to create a lightweight Service in an isolated mode, which allows it greater system visibility.
The Approov SDK starts this service on the first Approov token fetch and then communicates with it in order to provide enhanced detection capability. This can add up to 500ms of additional delay on the first token fetch. An Isolated Process Prestart capability is provided to allow the service binding to be initiated when the SDK is initialized to reduce the effective latency.
The following needs to be added to the app’s manifest (AndroidManifest.xml) to use this facility, inside the application tag:
<service
    android:name="com.criticalblue.approovsdk.isoproc.IsolatedService"
    android:enabled="true"
    android:isolatedProcess="true" />
Note that if you use this option then any custom onCreate() method declared in the Application class will be called when the service is created. Since an isolated process has a vastly reduced set of permissions this can, in some circumstances, cause exceptions on startup. We suggest you look at your logcat output around the first Approov fetch to ensure that this is not happening.
If there is a problem then you may need to add conditional code in your onCreate method to avoid calling code requiring file access, and some other extended, permissions. This can be done using the isIsolated method defined on Process. You can implement something like the following:
public class YourApp extends Application {
    @Override
    public void onCreate() {
      super.onCreate();
      if (!android.os.Process.isIsolated()) {
          // permission requiring code that should not be called when creating an isolated process
      }
    }
}
Note that although isIsolated was only officially added at API level 28, it has actually been available since API level 16. For a discussion of this topic, and some alternative methods to detect if your app is running an isolated process, see How can I tell if I am running in android:isolatedProcess?
Note that if you are initializing the Approov SDK or ApproovService in your Application’s onCreate method then you should avoid calling it when running in an isolated process.
Isolated Process Prestart
The default behavior of the Approov SDK is to delay the start of the isolated process until the first token fetch request and then wait until the service is fully bound before completing the associated attestation. In some cases, this approach delays the time it takes to perform the first attestation as the Approov SDK has to wait until the service is fully bound. To offset this additional latency, an option to prestart the process can be configured through the Approov CLI. When enabled, the SDK launches the isolated process as part of its initialization flow and the process starts up in parallel with other app initialization procedures. This alternative behavior reduces or eliminates the impact of isolated process startup on the initial token fetch latency at the cost of a small increment to system load at app startup. In normal cases this tradeoff should be beneficial and so isolated process prestart should be turned on.
To enable isolated process prestart, use the following command:
approov sdk -setConfigOptions PrestartIsoProc
This will output the following if completed successfully:
config options were set successfully
To disable all config options, use the following command:
approov sdk -setConfigOptions none
If you have multiple options selected and wish to remove the PrestartIsoProc entry, reissue the original command to set all the options with a comma separated list of entries but omit the PrestartIsoProc value.
Setting this configuration option only has an impact after the very first launch after initial app installation, unless you are using an extended configuration. Alternatively there is an SDK Option that can be used to enable the prestart from the very first launch even when using a standard configuration string.
The prestart option only has an impact on 3.2.1 and later SDKs.
Android Obfuscation
Note that since the Approov SDK is already obfuscated with Proguard so you should not attempt to obfuscate it again (with Proguard or R8) as this will cause it to stop working. Add the following exemption to your proguard-rules.pro:
-keep class com.criticalblue.approovsdk.** {*;}
Use on Emulator
We recommend using a physical device for testing your apps. However, you can use an Android Virtual Device (AVD) in Android Studio. Normally the Approov service will not generate a valid Approov token or provide secure strings when running in the emulator and will indicate a rejection wih the emulator property. However, if the app signing certificate used is marked for development then valid attestation is enabled.
Another way to obtain a valid attestation on an emulator is to force pass a device ID. This requires extracting the device ID. We suggest that the approov forcepass -addDevice latest is the easiest method when first trying Approov.
iOS Specific
This section provides specific additional information related to iOS app integration.
Use on Simulator
We recommend using a physical device for testing your apps, however, the simulator architectures are provided for you to use when this is not possible. Normally, the Approov service will not generate a valid Approov token or provide secure strings for a simulator device. The Approov service will indicate a rejection wih the ios-simulator property.
The best way to obtain a passing attestation on a simulator is to force pass a device ID. This requires extracting the device ID. We suggest that the approov forcepass -addDevice latest is the easiest method when first trying Approov. Please note, using the command line to install or remove applications on the simulator may produce a different device ID. This is also the case when the simulator is reset which erases all settings and applications.
Please note, if targeting a simulator device and using xcframework SDK, Approov does not provide support for the i386 architecture. Since Xcode might try building all the simulator architectures by default this will produce an error. You can disable any unavailable architecture in your target build options, Architectures section as follows:

Note that if you are using an SDK version between 2.7.0 and 3.0.0 in some cases you might experience an exception when trying to run on the simulator. This is because the Approov framework contains a previously used signature within it. You can simply remove this signature from the Approov.xcframework using the MacOS codesign command codesign --remove-signature Approov.xcframework/ios-arm64_x86_64-simulator/Approov.framework/Approov. The location of the Approov.xcframework varies depending on which package manager was used. For pod installs, the location will be within the Pods directory in your Xcode project. For the Swift package manager, the location will be within your project’s derived data (typically within ~/Library/Developer/Xcode/DerivedData/<YOUR_PROJECT-HASH>/SourcePackages/artifacts).
Getting the Initial SDK Configuration
In order to initialize the SDK a configuration string must be obtained using the approov CLI as follows:
approov sdk -getConfigString
This will output a configuration string such as this:
#your-account#+kv3bSO3x11jB25QN7/IdP3INz7WTpg+ScXG3vyLOJU=
The provided string is the config parameter to initialize Approov as described in the Mobile App Quickstarts. The information consists of the account identifier and public key string that uniquely identifies your account.
Getting the Extended SDK Configuration
In some special circumstances Approov support configure your account so that a special configuration string needs to be used. For instance, this might be required if the configuration requires communication with Approov servers to be proxied using a different DNS address, rather than using the addresses embedded in the SDK itself. To facilitate this, an extended form of the SDK configuration must be used. This is a much longer configuration string that is actually a base64 encoded JSON Web Token (JWT).
An extended SDK configuration can be obtained using the approov CLI as follows:
approov sdk -getConfig extended.config
In this case the configuration is written to the file extended.config. Copy the contents of this file and use it for the Approov initialization.
Handling Multiple Accounts
You may have access to multiple Approov accounts. Each account will have a different user roles in your Approov CLI. Furthermore, each account will have a different initial configuration for the SDK. This configuration will embed a different account name and also a different public key, since each account is allocated a different public/private key-pair. This prevents a configuration for one Approov account being valid for another.
These different initial configurations will need to be carefully managed in your app development and build environments. Note that, the account name that is read from the configuration is always logged as part of the Approov SDK initialization, e.g. an example from Android logcat:
2019-05-23 16:41:43.139 32592-32592/com.criticalblue.demo I/Approov: test-account, com.criticalblue.demo, 2.0.4(1033), h4gubfCFzJu81j/U2BJsdg==
Approov Fetch Status
When some operation are performed that interact with Approov a fetch status is returned that may be output in the logging. The possible status results are enumerated in the table below. Note that all iOS errors are prefixed by ApproovTokenFetchStatus..
| Status (Android / iOS) | Description |
SUCCESS / success
|
Indicates that a fetch call to the SDK was successfully completed. If you are fetching an Approov token then if it was successfully fetched it still might not be valid if the app does not pass its rejection policy. Common reasons for unexpected invalid tokens include forgetting to register new app builds, see registering an app, or because a debugger is attached to the device when a token is requested. Note that you can set a device specific custom always pass security policy to get valid tokens in both the previous scenarios but, if you do, you must take extra care to test your app on a variety devices without a custom policy before release. |
UNPROTECTED_URL / unprotectedURL
|
Indicates that the provided URL is valid but is not one for an API domain that needs to be provided with an Approov token. The request should continue without adding an Approov token. You get this on API domains that have been added with the -noApproovToken option.
|
UNKNOWN_URL / unknownURL
|
Indicates that the provided URL is valid but is is not an API domain configured for use, and wildcard mode has not been enabled. You should add the API domain if necessary. The request should continue without adding an Approov token. |
NO_APPROOV_SERVICE / noApproovService
|
Indicates that a fetch operation could not be completed due to the unlikely event that Approov cloud services are completely down (including the failover service) or, more likely, that the account has been cancelled. The error might also occur in some cases of poor network connectivity. In the case of an Approov token fetch we suggest you continue without adding any Approov token to the API call, so that requests can still reach your backend. This is to guard against some catastrophic failure or cancellation of your Approov service. In the case of secure string or custom JWT fetches it is not possible to continue, and you must retry. |
NO_NETWORK / noNetwork
|
Indicates that a fetch operation could not be completed because there is no network connectivity. The SDK checks for network connectivity before making a fetch attempt. This allows a rapid return from the fetch if there is no connectivity. If this error is received then there is no point in proceeding with any following API call which will also require network access. A timed, or user initiated, retry is required. |
POOR_NETWORK / poorNetwork
|
Indicates that a fetch could not be completed due to poor network connectivity. If this error is received then there is no point in proceeding with any following API call which will also require network access. A timed, or user initiated, retry is required. |
MITM_DETECTED / mitmDetected
|
Indicates that there is a Man-In-The-Middle (MITM) in the communication with the Approov cloud service. This may be malicious or may simply indicate that the end user is using a network with a firewall that intercepts all traffic for inspection. If this error is received then there is no point in proceeding with any following API call which will also require network access. A timed, or user initiated, retry is required. |
REJECTED / rejected
|
Indicates that for a secure strings or custom JWT usage the app does not pass the selected rejection policy, so the operation cannot be completed. A suitable message must be presented to the user about why it is not possible to proceed. Common reasons for this include forgetting to register new app builds, see registering an app, or because a debugger is attached to the device when the fetch request is made. Note that you can set a device specific custom always pass security policy but you must take extra care to test your app on a variety devices without a custom policy before release. |
BAD_URL / badURL
|
Indicates that the provided URL is not in the correct format. The URL should just be provided as a domain, although a full URL path may be specified from which the domain is extracted. This error can occur if such a URL is provided with a http:// rather than the https:// scheme.
|
DISABLED / disabled
|
Indicates that for a secure strings or custom JWT usage that the appropriate feature is not enabled in the account settings. |
UNKNOWN_KEY / unknownKey
|
Indicates that for a secure strings usage that there is no secure string with the given key value. |
NA / badKey
|
For iOS, indicates that for a secure strings usage the key value provided is invalid, either being empty or longer than the 64 character maximum allowed. |
NA / badPayload
|
For iOS, indicates that for a custom JWT fetch that the payload provided is invalid. It is either too large or is not a valid JSON object. |
NO_NETWORK_PERMISSION / NA
|
For Android, indicates that the app does not have ACCESS_NETWORK_STATE or INTERNET permission.
|
MISSING_LIB_DEPENDENCY / NA
|
For Android, indicates that the Approov SDK dependency on the OkHttp library has not been satisfied.
|
INTERNAL_ERROR / internalError
|
Indicates there has been an internal error within the SDK. Please contact Approov support if this ever happens. |
NA / notInitialized
|
For iOS, indicates that an attempt is being made to use an SDK method before it has been initialized. Note that the Android SDK generates an exception in this case. |
Inhibiting Token Fetch On SDK Initialization
SDK version 3.5 introduces a new fast resumption capability to fetch an Approov token in the background as part of the SDK initialization and if the app has been launched previously. This can substantially reduce the latency when the app first uses an Approov token or secure string. An implication of this is that the device ID will appear in the billing for your account even if the app instance does not make any specific Approov token fetch calls. In most cases this will have no net impact, since a given device ID may be used any number of times in a monthly billing period (or you may be using a special plan where billing is not directly related to device counts).
However, it is possible to disable the fast resumption capability in the SDK. If this is used then no automatic Approov token fetch on launch is performed, although of course this means that the initial latency to obtain one will be higher when it is required.
To disable the resumption capability, use the following command:
approov sdk -setConfigOptions NoResumption
This will output the following if completed successfully:
config options were set successfully
To disable all config options, use the following command:
approov sdk -setConfigOptions none
If you have multiple options selected and wish to remove the NoResumption entry, reissue the original command to set all the options with a comma separated list of entries but omit the NoResumption value.
This option only has an impact on 3.5 and later SDKs.
Fetch Latency
The integrity check operation provided by Approov requires the SDK to perform a CPU computation and possibly one or more network requests. For latency purposes the fetch types are categorized as follows:
Initial Fetch: The initial fetch after the app has been installed for the first time. This timing of this may be impacted by various options used in the Approov account (see below).Network Fetch: Fetches when an app is relaunched or when a previously fetched Approov token has expired.Cached Fetch: This returns a previously fetched Approov token and/or secure string and does not require much additional computation or any network connection. Typically this information is cached for a period of 5 minutes, after which aNetwork Fetchis required again. Note that a custom JWT fetch always requires aNetwork Fetch.
If you are using a 3.5 or later SDK then the Network Fetch latency is optimized to allow an Approov token to be fetched more quickly after the app is restarted. These SDKs are able to initiate a background fetch process as part of the SDK initialize call. This means that the latency experienced by an explicit call to perform the fetch may be much lower (as low as that for a Cached Fetch) although this will depend on the period of time between initialization and the first subsequent fetch that requires a result.
The table below provides an average of values obtained by measuring the performance of fetch operation on a range of devices for both Android and iOS with good network conditions and using the latest SDK version. Note, these devices were located close to one of our AWS points of presence for the Approov cloud. More geographically remote devices will suffer higher average Initial Fetch and Network Fetch latencies due to networking delays beyond our control. Please contact Approov support for a current list of our AWS point of presence or other information regarding latency optimization.
| Platform | Initial Fetch | Network Fetch | Cached Fetch |
| Android | 850ms* | 500ms** | 65ms |
| iOS | 650ms* | 450ms | 45ms |
The type of fetch call made (synchronous or asynchronous) does not impact the overall latency before a result is obtained.
*: These timings may be further impacted if DeviceCheck, AppAttest or Play Integrity options are enabled. These operations require additional network connection(s) and CPU processing time, over which the Approov SDK has no control. The impact will depend on various factors, including the age of the device being used. Expect an additional latency of between 2500ms and 3500ms for each option used, on an applicable platform.
**: If you have added app signing certificates, this will cause an increase to the latency of the first Network Fetch after launching the app by an amount proportional to the size of the APK and the performance of the device on which the app is running. Since the 3.3.0 SDK version this should be negligible on arm64 based devices. On other architectures this will add further delay. For example, a 30MB APK on an entry-level device may take around 1300ms to complete the additional checks.
Note that the Approov fetch process itself may make various retries of the communication with the Approov server. Within the SDK, the absolute worst case timeout before the method returns is typically configured to be 30 seconds.
Attestation Response Code
An Attestation Response Code (ARC) is a short alphanumeric code that is assigned to all Approov fetch events. The ARC encodes a subset of the device property flags of the device making the request. It also encodes whether a fetch resulted in attestation pass or not. The encoding ensures it is not possible to determine the actual properties without Approov backend access. When fetching Approov tokens, the ARC also embedded inside the received Approov tokens themselves in the arc claim.
ARC provides a way of finding out why an attestation may have failed, and the overall properties of a device, without leaking this information to the end user or, indeed, any attacker. This is because the ARC cannot be decoded without access to the Approov cloud service. It may also be useful for internal debug purposes or internal support.
The ARC can be provided in error information presented to the user or submitted by the app in an API call, for cases where the user is having trouble using their app. The base32 encoding and short length means that it is possible to read out or submit this information reliably for support purposes. The encoding also includes internal checking that detects most transcription errors. This facility might be needed if the app is not usable because invalid Approov tokens are being issued. When the ARC is decoded it is then possible to ascertain why Approov fetches are failing and for remedial action to be taken.
Approov also provides a more direct way of determining why a particular attestation was rejected using Rejection Reasons. This provides the causes in the SDK so that the app can directly inform the user. This feature is off by default.
The ARC will be enabled by default but if necessary you can enable it as follows:
approov policy -setARC on
Changing the ARC policy requires an admin role and confirmation:
WARNING: updating the arc policy will have an immediate impact on your apps in production
ATTENTION: If you wish to continue then please type YES and return: YES
arc policy was set successfully
Although you are able to set the arc policy to off we do not recommend this.
The current status of the ARC policy can be obtained as follows:
approov policy -getARC
This will output the state and a list of the device property flags that can be encoded in the ARC if it is enabled:
ARC policy is on
flags that can be ARC encoded:
  app-not-registered
  bad-hmac
  ...
If any of those properties were set for a fetch then you will be able to determine that by decoding the ARC.
The codes are encoded using a cryptographic secret so that it is not possible to determine their meaning without access to the Approov account backend. Moreover, the encoding for each Approov account is unique so codes generated by one account cannot be decoded by another.
Decoding an Attestation Response Code
The Attestation Response Code is embedded in the arc claim of all issued tokens. However, if you wish to obtain the code directly then certain Mobile App Quickstarts errors provide it directly. See the quickstart documentation for more details.
An API endpoint is provided that takes an ARC and returns the decoded information for it. This is designed for use in backend customer support systems. Information about how to access the API endpoint is provided as follows:
approov token -showArcInfoCurl
This will output an example curl command such as the following:
curl -H "Authorization: Bearer xxx..." -H "Arc: <arc>" https://<account-domain>/arc-info/
The API key in the Authorization is account specific and should not change unless a specific support request is made to request its rotation. The API key only allows the decoding of tokens and obtaining additional token information and does not enable any other actions on the account. However, as with any account credential, steps should be taken to keep it secured and to prevent accidental disclosure or inclusion in source code repositories.
A curl request should output something like:
{
  "status": "failed",
  "deviceProperties": [
    "app-not-registered",
    "rooted",
    "root-risk",
    "xposed"
  ]
}
The status indicates if the attestation was passed or failed. If the provided ARC is invalid in some way (perhaps issued to a different Approov account or entered incorrectly) then the status will be arc invalid.
The deviceProperties lists device property flags that have been determined from the device. If the status is failed then this will almost certainly pinpoint the reason(s).
Note that, although the output is a curl command, you can of course use an alternative tool or command to perform the GET request.
This API is for the use of your backend systems only. Never build calls to this API, and especially not the Authorization key required, directly into your mobile app. Moreover, this endpoint should only be used for informational purposes, as it may be subject to rate limiting and does not have the Cloud Server Redundancy features of the Approov token issuance process.
Rejection Reasons
This feature allows an app to directly determine if an Approov operation has failed because the device does not meet the rejection criteria for the current security policy. See the Mobile App Quickstarts documentation to see how it can be obtained for your integration. It is provided as a comma separated list of the device properties that are asserted and are in rejection set for the current rejection policy.
This feature is not enabled by default. If you enable it then the app will be able to determine programmatically whether a particular fetch request has passed or failed, and the reasons for failure. By default, and if the feature is again disabled,an app is unable to determine if a token is valid. This is by design, as it reduces the information available to attackers. Only use this feature if you wish to directly inform the user about failures and their causes.
You can enable this feature as follows:
approov policy -setRejectionReasons on
Which will output something like:
WARNING: updating the rejection reasons policy will have an immediate impact on your apps in production
ATTENTION: If you wish to continue then please type YES and return: YES
rejection reasons visibility policy was set successfully
Changing the rejection reasons policy requires an admin role and confirmation. Use off to disable it again.
The current status of the rejection reasons policy can be obtained as follows:
approov policy -getRejectionReasons
The rejection reasons information may be presented to the user as an explanation of why they are unable to proceed in the app. You can rely on the device property names not changing, so you may wish to split the string and check against individual commonly occurring properties (e.g. rooted or jailbroken) and provide a more detailed explanation to the user.
This rejection reasons capability is only available in version 3.0.0 and later SDKs.
Managing API Domains
This provides an overview of the management of API domains in the account. These correspond to the domains for which Approov protection can be applied.
Overview
Each Approov account has a set of API domains for which an app can fetch Approov tokens. These will typically correspond to the domains serving the APIs that are to be protected with Approov. An account may have a maximum of 25 different domains. API domains may be added and removed from the account as required.
Approov is passed the API domain for which a token is being fetched. There are a couple of motivations for specifying Approov token fetches with particular domains:
- APIs that are protected with Approov tokens need to be pinned to prevent a Man-in-the-Middle (MitM) attack from stealing valid, albeit short lived, Approov tokens. Pinning needs to be based on the domain for the API since this determines the certificate that will be presented by the server.
- It is possible that Approov tokens fetched for different domains are in a different format, or are signed using different secret keys. For instance, a particular domain may be setup to use encrypted (JWE) rather than symmetrically signed (JWS) tokens.
Domains are restricted to lower and upper case letters, digits, a dash and a period. This means that the API domain should not (and cannot) contain the full URI path to a particular resource.
There is no special handling of sub-domains so, for instance, your.domain and sub.your.domain are considered to be entirely distinct.
Adding API Domains
A new API domain can be added to the account as follows:
approov api -add your.domain
Confirmation is required whenever a new domain is added. This is because it has an immediate impact in production, with tokens being served for the new domain. As soon as a domain is added, tokens for the API domain can be obtained.
using managed trust roots rather than pinning to protect the API channel
WARNING: adding the API will have an immediate impact on your apps in production
ATTENTION: If you wish to continue then please type YES and return: YES
added API domain your.domain with type:account, alg:HS256, pin:JG29gD8vWiEanTCVPjYLQ5yiYMKQqR05OH38yFf0kBU=
enabled continuous monitoring for https://your.domain:443 (remove using `approov monitoring -removeAPI`)
An error is generated if the provided domain is not accessible from your local machine, and in this situation you will have to confirm addition. If the API domain is not on the standard port 443, you can use the -port option to select a different port. Do not try and add the port to the API domain name itself as this is not valid.
By default, newly added domains are included for continuous API monitoring. This means that you will receive an email notification if the API domain becomes inaccessible or the certificates it presents are no longer valid. Note that you must setup the alert email or general email recipients to receive these notifications.
By default, newly added domains will support attestations from mobile apps. Add the -allowWeb flag if you also need to provide access to the API from web apps using one or more of the Web Protection Integration.
By default, Approov tokens for a particular API will be issued as signed JWS tokens using the account secret key. Approov also provides an option to issue encrypted JWE tokens for a domain. This is enabled by using the -jwe option when adding the new API domain. See Approov token format for more details.
Once you have added an API domain you can edit its attributes by adding it again with the new set of attribute options specified. However, editing an API domain requires the admin role.
Keyset Key API Addition
If you have added one or more keyset keys then you can add an API domain that uses one of those keys as follows:
approov api -add your.domain -keySetKID your-key
This requires confirmation as follows:
using managed trust roots rather than pinning to protect the API channel
WARNING: adding the API will have an immediate impact on your apps in production
ATTENTION: If you wish to continue then please type YES and return: YES
added API domain twitter.com with type:keyset, alg:RS256, kid:your-key, pin:kJ8+U7wNPfc5vxwnQYvlffbaZA6wwCvd/eC8YMpB+sU=
enabled continuous monitoring for https://your.domain:443 (remove using `approov monitoring -removeAPI`)
This adds the domain using the keyset key your-key. This means that all Approov tokens issued for the domain will be signed or encrypted with the specified key. The key identifier will appear in the kid claim in the header. The particular algorithm to be used is also defined by the key, allowing a wide range of choices including asymmetric options which can ensure that the Approov cloud service is the only entity capable of generating valid tokens signed with the private key, which the tokens can be verified by your backend using the public key.
Adding No Approov Token Domains
An option is provided to add an API domain which does not need Approov tokens to be sent. Do this as follows:
approov api -add your.other.domain -noApproovToken
This requires confirmation as follows:
using managed trust roots rather than pinning to protect the API channel
WARNING: adding the API will have an immediate impact on your apps in production
ATTENTION: If you wish to continue then please type YES and return: YES
added API domain your.other.domain with type:none, pin:kJ8+U7wNPfc5vxwnQYvlffbaZA6wwCvd/eC8YMpB+sU=
enabled continuous monitoring for https://your.other.domain:443 (remove using `approov monitoring -removeAPI`)
The purpose of this is to allow access to the pinning or managed trust root features of Approov without the need to send Approov tokens. This option should therefore only be used on endpoints where it is not necessary or possible to add Approov token checking on the backend.
Any attempt to get a token for the domain results in an UNPROTECTED_URL / unprotectedURL status from the Approov token fetch call. The Mobile App Quickstarts continue with the request in this case without adding an Approov token.
Listing API Domains
A list of all the domains that are configured for the account can be obtained with:
approov api -list
This provides information about all of the domains that have been added and their attributes:
2 API domains:
 your.domain           type:account, alg:HS256
 shapes.approov.io  type:restricted, alg:HS256
The type attribute may be:
account: This is the default, indicating that the account secret key is used.restricted: Indicates that the keys and pins for the domain are centrally managed by Approov.keyset: Indicates that the key used for the domain is one from the keyset.none: Indicates that the domain has been added without the need to send Approov tokens.
The alg attribute shows the type of algorithm used for signing or encrypting the Approov tokens. By default, for account type tokens, the HS256 signing algorithm is used. However, if the -jwe option was used then the A256GCMKW JWE encryption algorithm is used instead. For a keyset type a wider range of algorithms are available.
The kid attribute, and the associated value, is shown if the domain has been configured to use a JWT KeySet entry. The specified key ID will be included in the header of all subsequent tokens issued for the domain.
The monitorPort property is included if continuous monitoring has been enabled for the domain (the default). This displays the port being used to probe the domain, normally 443. (See API Monitoring)
Approov tokens are only served, for an account, for those APIs listed by this command. Any attempt to get a token for another domain results in an UNKNOWN_URL / unknownURL error from the Approov token fetch call (unless wildcard mode is enabled).
Removing API Domains
An API domain that has been previously added can be removed with the following command:
approov api -remove your.domain
Note that removal of an API domain requires an admin role and further confirmation is required before the domain is removed:
WARNING: removing the API will have an immediate impact on your apps in production
ATTENTION: If you wish to continue then please type YES and return: YES
removed API domain your.domain
Once removed this means that Approov tokens will no longer be served for that domain. You must not remove a domain that is being used by production apps as this will lead to a production outage.
Setting Wildcard Mode
A facility is provided to enable wildcard Approov tokens. Normally if a token fetch is made for a domain for which an API domain has not been added, then an UNKNOWN_URL / unknownURL error is returned. In typical Approov SDK usage this will cause the API request to continue without adding an Approov token. If wildcard tokens are enabled then an Approov token will be returned always. However, if the URL is not for an explicitly added API domain then the provided Approov token will always be a failing one. This is because these domains will not be pinned and so valid Approov tokens should not be transmitted on them.
The purpose of this mode is to enable quick discovery of which particular API calls are getting Approov tokens added and to manually check if Approov tokens are being received at the backend, prior to implementing full backend Approov token checking. A gradual transition to full Approov protection can then be made, by adding API domains and turning off wildcard mode without any need to make code changes to the app.
Wildcard token mode can be enabled as follows:
approov api -setWildcardMode on
It may be subsequently disabled using an off parameter value.
The current wildcard status can be found with:
approov api -getWildcardMode
Adding Demonstration Shapes API
A special shapes domain (managed by the Approov team) can be added to your account:
approov api -add shapes.approov.io
Confirmation will be required as follows:
WARNING: adding the API will have an immediate impact on your apps in production
ATTENTION: If you wish to continue then please type YES and return: YES
added API domain shapes.approov.io with type:restricted, alg:HS256
This domain serves a very simple API that provides random shapes and it is used by the Approov demo app. Any account can add this domain to generate Approov tokens for the API. The type is shown as restricted meaning that it has the special property that the associated Approov tokens with a secret key expected by that API rather than the standard one for the account. Moreover, you are not able to modify the pins associated with that domain.
Managing App Signing Certificates
App signing certificates are used to sign a particular build of an app, on either Android or iOS/watchOS, to show that the app has been created by a particular company or developer. Any modified or otherwise tampered version of the app cannot be correctly signed with that certificate. Approov uses this information to confirm that a particular app has indeed been officially created. Thus it is necessary to add signing certificates to the Approov account to show what signing identities should be officially recognized. Approov only needs the form of the certificate containing the public key to perform a verification. Since the private key is not uploaded there is no risk associated with the addition of the certificate to the Approov account in this way.
An option is provided called auto registration and, if this is applied, then all apps signed with that certificate are effectively registered automatically and there is no need to use per-app registration at all.
If you are signing an app for release then the signing key and associated certificate will generally be managed by the Apple or Google development portal, and you can download the public key certificate from there. The Apple portal also manages all of the signing certificates for individual developers associated with the account. On Android, a local keystore file may hold the keys for signing locally on a development machine and these may also need to be added to allow Approov to recognize development versions of apps.
By default a maximum of 25 different signing certificates may be added to the account to allow apps with different signing certificates. These may be from different developer accounts, allowing them to be supported in a single Approov account. Moreover, if you upgrade or change your app signing certificate you should keep the old one in the Approov account as there will be installed versions of your app still using it.
Android App Signing Certificates
Generally all Android apps are signed. There are two different options for how the signing keys are stored and managed:
- Locally: Local keys may be held in an Android Studio managed keystore.
- Google Managed: Google Play Signing allows Google to manage your signing keys. This means that the app package delivered to your users will be signed by the certificate held in the Google cloud. Releases made via an Android Application Bundle are always signed in this way, but it is also possible to release APKs that are Google Play Signed, as explained in this guide.
App signing certificates added to Approov are used to verify the provenance of apps. They are also used if you utilize the Play Integrity integration options to check the certificate hash provided in the token.
Adding the signing certificate to Approov only ever adds the public key information for verification purposes. The private key used in the app signing process is never accessible to Approov.
The public key of the certificate allows the signed digest of your full app content to be verified. Recreating a valid signature for a modified app requires access to the private key associated with the certificate, which is inaccessible except to Google. Approov supports the signature algorithms in the list of signature algorithm IDs on the Android Open Source Project’s web site. The Approov SDK does an analysis of the app signature as part of its analysis to ensure that only your app is able to obtain a valid Approov token.
Adding Android App Signing Certificate From Portal
An app signing certificate will be available in your Google Play console. Log in and navigate to the release management section for your app. You will see a screen similar to the following:
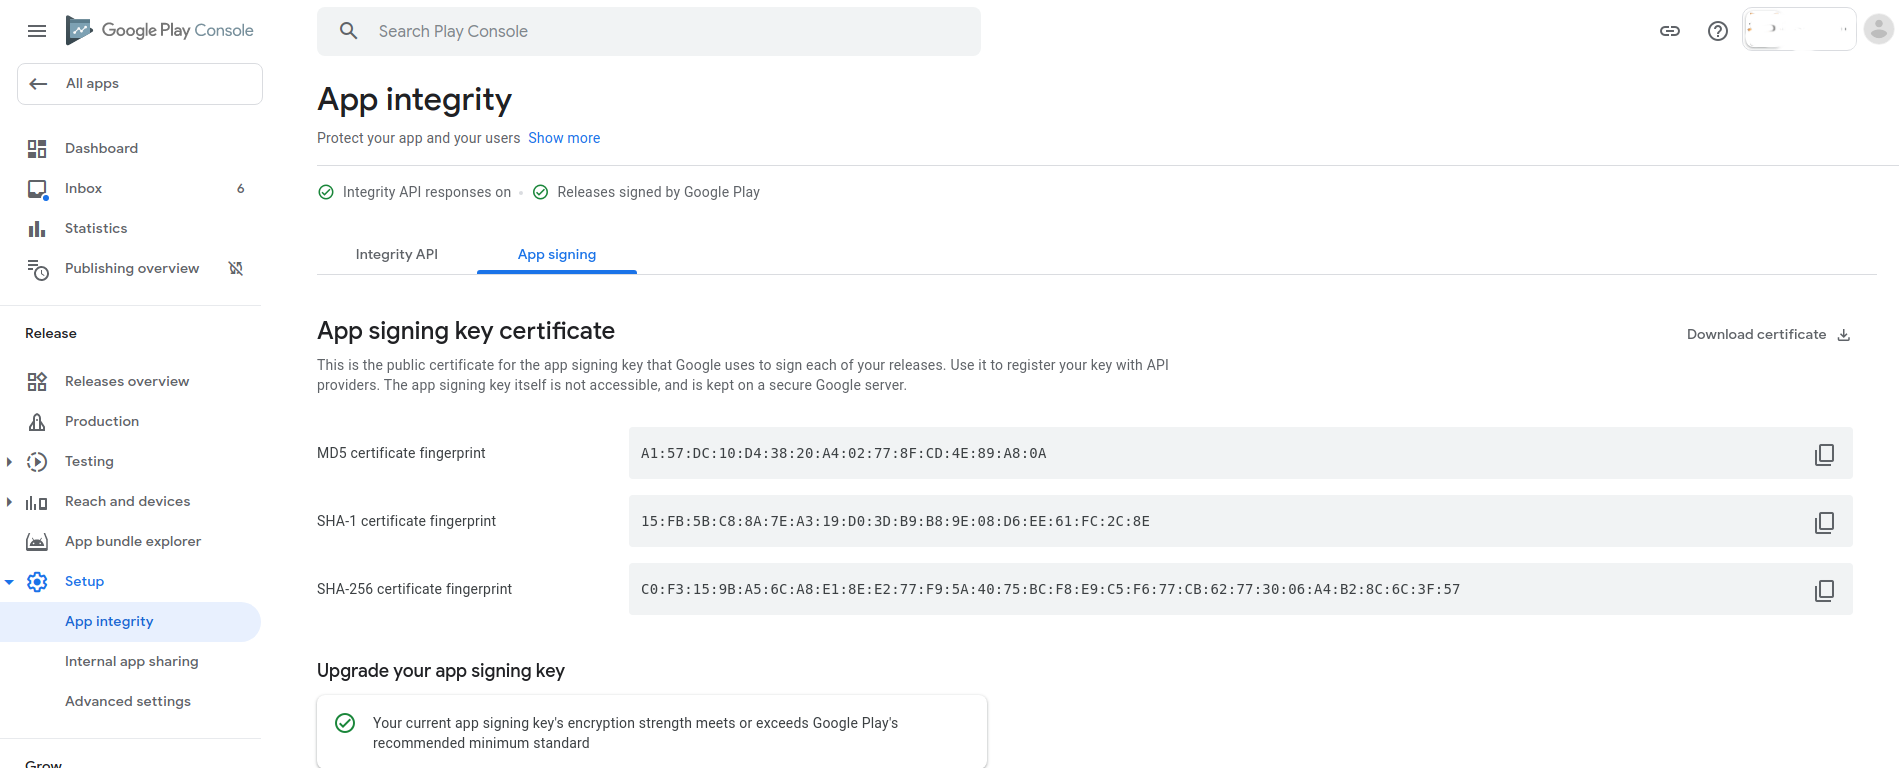
The section Setup, subsection App Integrity and tab App signing shows the signing certificate that is currently active, and its hash in various forms. Download the .der certificate file by clicking on the Download Certificate button. Save it as app-signing-cert.der, or some other convenient name. Note that there is no risk of key compromise by doing this since it is a public certificate and the private key is not included.
You can add the signing certificate to Approov with the following command:
approov appsigncert -add app-signing-cert.der -autoReg
This will output the fingerprint hash of the certificate added such as:
successfully added C0:F3:15:9B:A5:6C:A8:E1
This adds the certificate to those that are known by Approov. The optional -autoReg option adds the auto-registration property for the certificate so there is no need to add individual registrations for apps signed with this certificate.
The first 8 bytes of the SHA256 hash of the certificate are shown in hex. This matches the first 8 bytes of the value SHA-256 certificate fingerprint shown in the Google Play Console. Other certificate metadata and the expiry date are also output.
If you are sharing app bundles or APKs internally then this will use a different app signing certificate. In this case you must download this internal test certificate and also add it to Approov using approov appsigncert -add for these test apps to be valid.
Adding Android App Signing Certificate From Keystore
For local development the private key will be held in a binary file called a Java keystore (with a .jks or .keystore file extension). This can be used to hold the private signing key on your development machine, along with the public certificate for verification.
The following commands exports the debug certificate from its standard location when using Android Studio. The keystore can actually be in one of two different formats, depending on your machine setup. Since Java 9 (introduced in September 2017) the default keystore format is PKCS12. Prior to that the default format was JKS. The commands for importing are slightly different between the two formats. If you don’t know what format is used then simply experiment until the file is recognized.
For PKCS12 the command is:
approov appsigncert -add $HOME/.android/debug.keystore -storePassword android -autoReg
Please modify the keystore location to match the key store you are using (the one shown above is the default location for Android Studio). This command also assumes an encrypted file with the default password of android. Finally this uses the auto registration option to automatically recognize all apps signed with the certificate, If you don’t use this option, you will need to register valid apps individually.
For JKS format the command is:
approov appsigncert -add $HOME/.android/debug.keystore -alias androiddebugkey -autoReg
Please modify the keystore location to match the key store you are using (the one shown above is the default location for Android Studio). A JKS file may hold multiple keys and this command uses the default Android Studio debug key of androiddebugkey. If you don’t know the key alias then use any information output from an error that lists all the key aliases available in the file. Finally this uses the auto registration option to automatically recognize all apps signed with the certificate, If you don’t use this option, you will need to register valid apps individually.
In all cases, the command outputs the fingerprint hash of the certificate added such as:
successfully added 2F:9B:E0:7B:6C:A4:D0:FC
Keep in mind that the number of app signing certificates in Approov is limited to 10 by default. Sharing of debug or development keystores amongst a development group is advised. Please contact Approov support if you need this limit to be increased. See Enabled Features and Limits for how to view the limit configured in your account.
Ensuring Android Apps are Suitably Signed
If you are running apps on a device or simulator using the Run button in Android Studio then the APK installed on the device might not be signed by default. Note that the reference documentation Sign your debug build indicates it should be signed, so you should check this for your installation.
If your debug build for running is not signed then, even with auto-registration enabled, Approov will be unable to recognize your app and will fail attestation. If you are able to obtain the APK from the device you can check it with:
approov registration -checkSigType app-debug.apk
This example checks app-debug.apk and shows if it contains a V2 Signature Scheme or later, which contains an APK signing block and allows the use of the app signing certificates feature.
You can update the application .gradle file to ensure all debug APKs are signed as follows:
signingConfigs{
    debug{
        keyAlias 'androiddebugkey'
        keyPassword 'android'
        storeFile file('<home-dir>/.android/debug.keystore')
        storePassword 'android'
    }
}
buildTypes {
    debug{
        signingConfig signingConfigs.debug
    }
}
The above configuration assumes a typical Android Studio configuration with a JKS format file and with the keystore located in the user’s home directory. Modify this as appropriate for your use case.
The key used can then be Added to Approov.
For automatic signing of releases see Configure the build process to automatically sign your app.
Testing Android App Bundles
It is not necessary to go through the Play Store console to test using an app bundle with Approov. You can use Android Studio Build -> Build Bundle(s)/APK(s) -> Build Bundle(s) to build an app bundle which will be automatically signed with the debug key from your debug keystore. You can use Build -> Generate Signed Bundle / APK... to build an app bundle and sign it with a key from another key store.
Locate the signed app bundle you have just built and follow the bundletool instructions on Generate a set of APKs from your app bundle and Deploy APKs to a connected device to deploy the app bundle to a test device.
For Approov to recognize app bundles built and deployed in this way, the key used must be Added to Approov.
Adding Android App Signing Certificates From App
It is possible to add an app signing certificate extracted directly from a signed .apk application file. It is convenient to use this option if it is not clear which particular app signing certificate is in use for your Android application.
Firstly obtain the apk that is currently installed on a device by finding out the installation path:
adb shell pm path <your-package-name-defined-in-Manifest>
This should output the apk location on the device. Pull the the apk file to a local computer using adb:
adb pull "/data/app/~~-nE2-j-opqG-D3HAbSJfSQ==/com.yourpackage.app-dqDeQoqf8IByPEjAz58MDg==/base.apk"
Use the apksigner utility shipped with the Android build-tools that verifies and prints the apk signatures which is usually available in the ~/Library/Android/sdk/build-tools/
apksigner verify --print-certs-pem base.apk
This should print a list of certificates that can be identified by the Certificate DN as belonging to a particular enterprise. There can be entries related to Google and Android but at least one certificate will belong to the organization or developer responsible for signing the apk which is the one we are interested in. Select and copy the relevant certificate including the lines -----BEGIN CERTIFICATE----- and -----END CERTIFICATE----- and save them to a file with a .pem extension. The final step consists on converting the .pem file to a .cer by using the following command:
openssl x509 -outform DER -in org-file.pem -out org-file.cer
You can then add the certificate to your account by issuing the following command:
approov appsigncert -add org-file.cer
Adding Huawei App Signing Certificates From Portal
This section is only relevant if you are registering an app that is being released to the Huawei AppGallery using an Android Application Bundle (AAB). This means that it is using Huawei AppGallery App Signing where the app package delivered to your users will be signed by a certificate held in the Huawei AppGallery.
In order to use Huawei AppGallery app signing with Approov you need to inform Approov about the app signing certificates that you use. These are stored in your Approov account so it is only if you add a new certificate or revoke an old one that you will need to complete this step again. An app signing certificate proves that a particular installed app package has been issued by Huawei via your account. The public key of the certificate allows an encrypted digest of your full app content to be verified. Recreating a valid signature for a modified app requires access to the private key associated with the certificate, which is inaccessible except to Huawei.
The app signing certificate is available in Huawei AppGallery Connect. Log in and navigate to the App Signing section for your app. You will see a screen similar to the following:
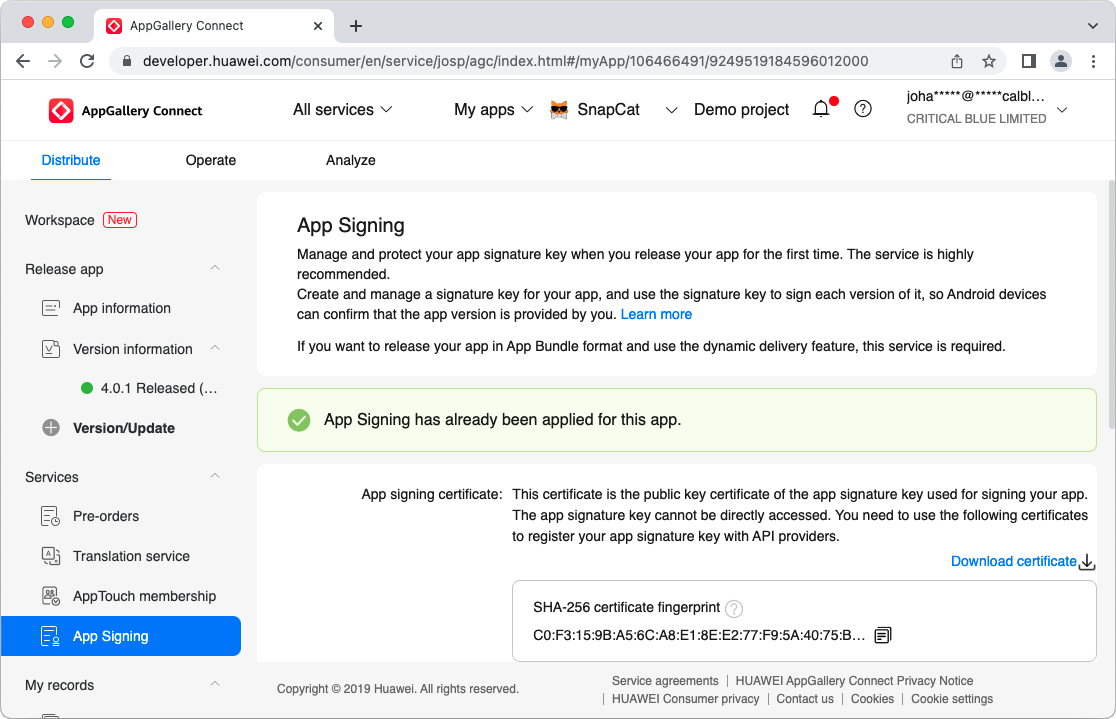
The section App signing certificate shows the signing certificate for the app and its SHA-256 hash. Download the public certificate file by clicking on Download certificate. It will be saved as certificate.pem.
You can then add the fixed and converted app signing certificate to Approov with the following command:
approov appsigncert -add certificate.pem -autoReg
This will output the fingerprint hash of the added certificate such as:
successfully added C0:F3:15:9B:A5:6C:A8:E1
This adds the certificate to those that are known by Approov and enables auto-registration for it. The first 8 bytes of the SHA256 hash of the certificate are shown in hex. This matches the value SHA-256 certificate fingerprint shown in AppGallery Connect.
Adding Apple App Signing Certificates From Portal
TestFlight iOS applications are device-specific and not supported by Approov for certificate-signing registration.
You should add the signing certificate used to sign iOS or watchOS apps for development, or release. These are available in your Apple development account portal. Go to the initial screen showing program resources:

Click on Certificates and you will be presented with the full list of development and distribution certificates for the account. Click on the certificate being used to sign iOS/watchOS applications from your particular Xcode installation and you will be presented with the following dialog:
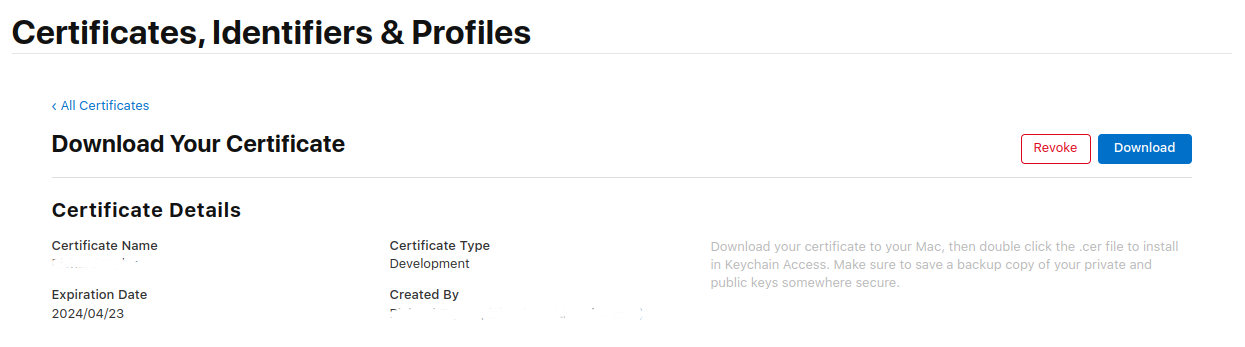
The downloaded certificate only includes the public key information used to verify an app’s authenticity. The private key used in the app signing process is never accessible to Approov.
Now click on the Download button and a file with a .cer extension is downloaded, e.g. development.cer. You can then add the app signing certificate to Approov with the following command:
approov appsigncert -add development.cer -autoReg
This adds the certificate to those that are known by Approov and enables auto-registration for it. It will output the fingerprint hash of the certificate added such as:
successfully added FA:C5:E7:78:2B:DB:86:B1
The fingerprint is the first 8 bytes of the SHA256 hash of the certificate shown in hex.
Apps built to run on the iOS/watchOS simulator are not code signed and thus auto-registration does not work for them. In this case you can consider forcing a device ID to pass to get a valid attestation.
This auto registration feature only works if you are using an SDK version 3.1.0 or above.
Adding Apple App Signing Certificates From App
It is possible to add an app signing certificate extracted directly from a signed .app application file. It is convenient to use this option if it is not clear which particular app signing certificate is in use for your Xcode configuration.
Firstly you need an xcarchive package for the whole app generated when you select the Archive option in Xcode’s Product menu (if the Archive option is greyed out, you need to modify your target by setting the destination to be Any iOS device since targeting a simulator device disables archiving). Once the archive operation finishes, you will see the Organizer window similar to the one below:
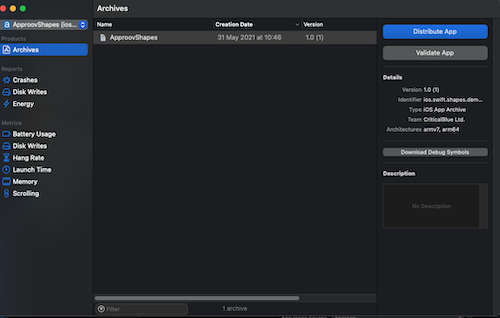
Xcode has archived the source files and linked the libraries by producing an xcarchive file which is a collection of files, binaries, debug symbols and other files from which an actual app file can be obtained by following these steps:
- Right click and select
Show in Finder - Right click on the
.xcarchivefile and selectShow Package Contentsin the popup menu - The finder will switch to showing the contents of the `.xcarchive`` file
- Navigate to
Products/Applications - Your
.appwill be located inProducts/Applications(it will be shown without a file extension) - Copy and paste this file to a suitable location (let’s assume it is called
YourApp.app)
You can then extract the certificates directly from this app package using the codesign tool that is installed with Xcode. Execute the following:
codesign -d --extract-certificates YourApp.app
This wil extract the certificates as files in the local directory, typically codesign0, codesign1 and codesign2. The first file is the one that contains your leaf signing certificate and this is typically the one that you want to add. To use this with the Approov CLI you must rename it with a .cer file extension as follows:
mv codesign0 codesign0.cer
You can then add the app signing certificate to Approov with the following command:
approov appsigncert -add codesign0.cer -autoReg
This adds the certificate to those that are known by Approov and enables auto-registration for it. It will output the fingerprint hash of the certificate added such as:
successfully added FA:C5:E7:78:2B:DB:86:B1
The fingerprint is the first 8 bytes of the SHA256 hash of the certificate shown in hex.
Apps built to run on the iOS/watchOS simulator are not code signed so it is not possible to extract the certificates from them. In this case you can consider forcing a device ID to pass to get a valid attestation.
This auto registration feature only works if you are using an SDK version 3.1.0 or above.
Showing App Signing Certificates
You can list the current app signing certificates as follows:
approov appsigncert -list
Which will output something like:
1 app signing certificate:
 C0:F3:15:9B:A5:6C:A8:E1
   Subject: CN=ANOther,O=Approov,L=Edinburgh,C=UK
   Expiry: 21 May 2041
   Auto-Registering
   SPKI: MIIBIjANBgkqhkiG9w0BAQEFAAOCAQ8A...DftceTQwhEcv5UbnEnwk13MOzQIDAQAB
   Updated: 2023-11-20 10:34:14
   Added By: Another Person
Each entry is listed under the fingerprint hash value for that certificate, which can be used to remove it if necessary. If the certificate was assigned a label then that is shown in brackets after the fingerprint hash. Each entry then has:
- Subject: The subject of the certificate.
- Expiry: The time and date of the certificate expiry.
- Properties: Optional additional properties that may be applied such as auto-registration and development.
- SPKI: This provides a prefix and suffix of the Subject Public Key Information (SPKI) for the certificate and may be useful in debugging with other tools that show the certificate in this form.
- Updated: The date and time that the entry was last updated.
- Added By: Name of the user that last updated the entry.
Removing App Signing Certificates
An app signing certificate can be removed with:
approov appsigncert -remove C0:F3:15:9B:A5:6C:A8:E1
Use the fingerprint hash to select the appropriate certificate. Note that removal requires an admin or delegate role and user confirmation:
WARNING: removing an app signing certificate will have an immediate impact on your apps in production
ATTENTION: If you wish to continue then please type YES and return: YES
successfully removed app signing certificate with fingerprint C0:F3:15:9B:A5:6C:A8:E1
Adding or removing an app signing certificate does not have an immediate impact on an app that is already running. The impact is only for apps which are launched 30 seconds or more after the change.
Auto Registration
It is possible to add an individual app signing certificate with auto-registration, simply by using the -autoReg option when adding the certificate. If this property is added for a particular certificate then this means that any app that is signed with it will be automatically registered and there is no need to add a specific registration for it, as detailed in Managing Registrations. This makes it easier to develop and debug using Approov, and also means that the process of releasing new app versions to the app store is easier as there is no Approov registration step required.
If you have previously added the same certificate and then want to make it auto-registering, then you will need to add it again with the -autoReg option. You will receive an error if it is already added, and you must use approov appsigncert -remove to remove it briefly before adding it again.
Note you can use the feature for force failing specific app versions if you wish to ensure specific versions do not pass attestation even if they are signed with an auto-registering app signing certificate.
Apps built to run on the iOS/watchOS simulator are not code signed and thus auto-registration does not work for them. In this case you can consider forcing a device ID to pass to get a valid attestation. Note also that the feature requires use of an SDK of version 3.1.0 or above.
Forcing Failure of Specific App Versions
You may wish to force particular app versions to fail, even if they are signed with a valid app signing certificate that is marked as auto-registering. One motivation might be to prevent an obsolete version of an app from connecting to API end points that are still running.
You can do this simply by adding the app package/bundle name and the version number you wish to block as follows:
approov forcefail -addApp io.approov.shapes -appVersion "3.0(3)"
Note that if the version number contains brackets then you must include it as quotes as shown to allow correct command line parsing.
An admin role and confirmation is required as follows:
WARNING: forcing an app version failure will have an immediate impact on your apps in production
ATTENTION: If you wish to continue then please type YES and return: YES
successfully added the app io.approov.shapes, version 3.0(3)
Any further attestations by app instances of that specific version will then be rejected.
For Android apps you must include the version number and the specific version code in brackets. For iOS/watchOS you should only include the version number, and thus no quotes are required. The iOS/watchOS build number is not required.
You can see the full list of blocked apps as follows:
approov forcefail -listApps
In this example, only a single app version is blocked:
io.approov.shapes: 3.0(3)
Finally, you can remove any app version using the following command:
approov forcefail -removeApp io.approov.shapes -appVersion "3.0(3)"
An admin role and confirmation is required as follows:
WARNING: removing an app version fail will have an immediate impact on your apps in production
ATTENTION: If you wish to continue then please type YES and return: YES
successfully removed the app io.approov.shapes, version 3.0(3)
Only a maximum of 100 different app versions may be added by default.
Development App Signing Certificates
It is possible to add an individual app signing certificate as being used for development, simply by using the -dev option when adding the certificate. If this property is added for a particular certificate then this means that any app that is signed with it will be considered an app under development. This means that it will receive a valid attestation even if the app is being debugged or running on an Android emulator. Moreover, any failures will not be included in the monthly summaries of failures and are shown with a dev prefix in the live attestation metrics.
Typically the signing keys associated with development are those in a keystore on a development machine. Be aware that there is a default limit of 10 app signing certificates per account, so you might want to share development signing credentials across multiple developers to stay within this limit. Please contact Approov support if you need this limit increased. See Enabled Features and Limits for how to view the limit configured in your account.
If you have previously added the same certificate and then want to make it for development, then you will need to add it again with the -dev option. You will receive an error if it is already added, and you must use approov appsigncert -remove to remove it briefly before adding it again.
App Signing Certificate Labels
It is possible to add a label associated with the certificate, simply by using the -label option with a suitable name when adding the certificate. This label is then shown when showing the app signing certificates. This facility can be used to note the reason why the certificate was added if that is not obvious from its other metadata information.
If you have previously added the same certificate and then want to add or change its label, then you will need to add it again with the -label option. You will receive an error if it is already added, and you must use approov appsigncert -remove to remove it briefly before adding it again.
Using a Development Key
Some testing environments might need to resign mobile apps so that they can be run in their testing environment. A popular example of this is Appium Browserstack testing. In this case the attestation will fail because the app signing certificate will not be recognized, and there may be no way of obtaining the certificate from the testing environment. Since the device IDs of the testing devices is not known, there is also no way to force a pass on a particular testing device. Moreover, the global security policy cannot be changed to always-pass as that would affect other production devices.
To deal with this issue an optional development key facility is provided. This is a short base64url encoded string that can be embedded in a development app and set via the specific setDevKey method available in the SDK and quickstarts after initialization. If the correct value is provided then the app build will always pass attestation, even when being debugged. Application of the development key can itself be based on some build or runtime feature flag.
To retrieve the current development key, or create a new one if it doesn’t exist, use the following command:
approov forcepass -getDevKey
The short development key value will then be output, something like:
uDW9FuLVpL1_4zo1
This string can then be used as the parameter for the setDevKey call.
The development key should never be included in any builds that are publicly available, and should certainly never be included in any released apps, even if the code path to use the value is not enabled. This is because an attacker could potentially reverse engineer the value of the development key and use this to bypass Approov protections.
If there is any concern that the development key for the account has been leaked, then it is easy to rotate it to a new value. The only impact will be that prior app builds using the old development key will no longer be forced to pass. Use the following command:
approov forcepass -changeDevKey
This will output the following. Note that an admin role and confirmation is required.
WARNING: changing the development key will have an immediate impact on your apps in production
ATTENTION: If you wish to continue then please type YES and return: YES
successfully changed the development key - any apps using the old one will no longer be forced pass
The new development key value can be obtained with approov forcepass -getDevKey.
Managing Registrations
App registration management determines the set of specific apps that the Approov service will consider valid for the account.
We recommend that you use the Auto Registration feature when adding the app signing certificates for an account. If you do this then there is no need to register each version of an app for it to pass attestation.
iOS IPA Extraction
In order to obtain an .ipa file for iOS select the Archive option in Xcode’s Product menu (if the Archive option is greyed out, you need to modify your target by setting the destination to be Any iOS device since targeting a simulator device disables archiving). Once the archive operation finishes, you will see the Organizer window similar to the one below:
Xcode has archived the source files and linked the libraries by producing an xcarchive file which is a collection of files, binaries, debug symbols and other files from which an actual ipa file can be obtained. From there you should click Distribute App and select one of the options, App Store Connect to submit to the app store or one of the others. Irrespective of the selection, you can always recall the Organizer by selecting the menu Windows and then Organizer and if you select the same archive you can generate another ipa file or make another submission to the App Store.
Registering an App
The Approov service is designed to only send a valid Approov token to apps that have been registered. Registration indicates that Approov has captured the fingerprint of a good instance of your app and should, subject to various other checks and conditions, deliver valid Approov tokens to any identical app instance. Any other app cannot receive valid Approov tokens and will therefore be unable to access the backend API services that you have protected with Approov.
When you release a new version of your app to the app store, you will need to register the final version that will be published. Multiple different versions of the app registration may be live simultaneously to support end users who are running different versions of the app. In general it may take some time for users’ apps to be updated to the latest version. You may also wish to register various versions of the app during the development and test process.
In order to register an app you need the app package that is to be run. This is either an .apk or .aab file (Android) or an .ipa file (iOS). An app being registered must have the Approov SDK integrated within it or else the registration will fail.
approov registration -add your-app.apk
approov registration -add your-app.ipa
The command output indicates that an overall signature of the app, its name and its version have been extracted and are available for viewing in the list of all registrations for the account.
registering app
 Ac15BRFWqxn79dGsjOdVJXVqBQQ64ZWTAuKdrzRC9hc=your.app.com-2.0[3]-1042  SDK:Android(2.5.0)
registration successful
registering app
 DRJNqt37tsdHwb9FKFT80dPqXlOHqZnZy68zAiVSsvM=your.app.com-2.0[3]-1041  TeamID:953D8M53YN  SDK:iOS(2.5.0)
registration successful
The overall signature consists of a signature hash of aspects of the application, the application package name, application version information, and the ID of the Approov SDK that is integrated within it. Finally, information about the type and version number of the Approov SDK used is also provided.
Once an app is registered, it should be possible to get valid Approov tokens for it, assuming there are no other issues with the device or its runtime environment (for instance, a debugger being active) that prevent it from receiving a valid token. By default, an app registration is permanent and will remain in the Approov cloud database until it is explicitly removed. Permanent app registrations should be used to identify apps that are being published to production.
It is only possible to have a maximum of 250 registrations at any one time.
Android Registration Considerations
If you are registering an Android APK that will be released using Google Play App signing then you must use the -playSigned option, and add your app signing certificates. If the app is in the form of a .aab then this option is set implicitly.
If you are registering an Android App Bundle (.aab file) then the approov tool needs access to bundletool. The bundletool is a command line tool written in Java and distributed as a .jar. To use it you will need Java installed, although it is likely you have it installed already if you are developing Android apps. It can be installed from here. Once you have Java installed you can download the latest version of the bundletool from here. If you have saved the bundletool-all-<version>.jar to the current directory then try a command such as:
java -jar bundletool-all-1.15.6.jar version
Substitute the filename to the version you have. This confirms that it is running correctly.
When you make a registration of a .aab Android app the approov tool needs to be able to invoke the bundletool and therefore needs to know its location. This can be done by specifying the -bundletool option providing its path for all registrations of app bundle .aab files. Alternatively the path of the bundletool jar file can be set in the environment variable APPROOV_BUNDLETOOL.
You must install the .jar version of the bundletool rather than a direct command line version.
If you are registering an Android app that you intend to publish to the Play Store, you must ensure that it is signed with a V2 signature (or later) or else the registration will not match the Play Store version and it will not receive valid Approov tokens.
If your Android app bundle includes other native libraries that include architectures that are no longer supported, then you may wish to remove them from your build and only include the relevant architectures using ABI Filters. For instance, you can use abiFilters 'armeabi-v7a', 'arm64-v8a', 'x86', 'x86_64' to restrict to Approov supported architectures only. We have had reports that, without this filtering, certain devices may receive a package of native libraries without the libapproov.so SDK thereby breaking the Approov integration.
iOS Registration Considerations
Note that if your iOS app uses extensions then you may use the -appex option when you register to add those too. They may have different package names and version numbers, and will show up as different entries in the overall registration list. It is assumed that extensions will always share the same Approov SDK version.
The signature extracted for an iOS registration only includes the version number and not the build number. Thus all builds of the same version will share the same registration. You should thus be careful not to remove the registration for a previous build of the same version, as this will also remove the registration for all builds of that version. Instead you should employ Temporary Registrations and then make any released build registration permanent. This will upgrade any pre-existing temporary registration to be permanent, and any others will expire naturally.
watchOS Registration Considerations
Approov supports watchOS apps if they are released inside a companion iOS app. The Approov SDK for watchOS is different from that used by an iOS app, and must be integrated into the watchOS project.
When building the companion iOS app for release, the watchOS app will be integrated within the same package.
To register the watchOS app, you must use the -watchOS option when registering the overall .ipa. The flag causes the registration of the embedded watchOS app not the companion app. If the Approov SDK is also integrated with the companion app then you should use a second registration call passing the same .ipa but without the -watchOS flag. (Using app signing certificates avoids this subtlety.)
Temporary Registrations
By default an app registration is permanent. This also means that an admin role is required to remove it. Removal needs to be restricted since an accidental removal will stop apps in production from receiving valid tokens, which may effectively bring an app service down. Note that in such a circumstance the Approov failover system will not be enabled, since this is not an Approov cloud system failure but explicit user action.
A temporary registration is performed just like a permanent registration, but with the addition of the -expireAfter option.
approov registration -add your-app.ipa -expireAfter 3d
This creates a registration that is active for 3 days. The expiry time is given in local time in the output:
registering app YourCoolApp
 P6nTmI3fhftxUr740ZnUMGKuAyTYjxP5dxKzJGd9yOk=my.app.com-2.0[3]-2974  TeamID:953D8M53YN  SDK:iOS(2.5.0)
registration successful, expires 2019-06-01 16:27:01
Note that if the registration already exists and is permanent or has a longer lived temporary expiration time, then that later time is retained.
The -expireAfter parameter takes a duration which may be specified in y (years), d (days), h (hours), m (minutes) or s (seconds). Multiple time units may be used as long as they are specified in this order, e.g. 3d12h to register for three and a half days.
Updating Registration Expiry
If you have made a Temporary Registration you may subsequently want to make that registration permanent, or at least to extend the time of the registration expiry. You can do this as follows, using the registration signature provided from the registration -list option:
approov registration -updateExpiry P6nTmI3fhftxUr740ZnUMGKuAyTYjxP5dxKzJGd9yOk=my.app.com-2.0[3]-2974
This method does not require you to have access to the original app package. Note that the -expireAfter option can also be used to extend an existing temporary registration.
Unversioned Registrations
By default an app registration is for a specific version of the app. This means that a new app registration is required each time a new app is released. This gives the flexibility of fine grain control of your registrations, allowing you to remove individual registrations associated with specific versions (perhaps if you no longer wish to issue valid Approov tokens to an older version of your app).
However, it is possible to create an app registration that is not specific to a version. This will match any app issued with the same signing authority and with the same package name. If you use this style, then only one registration is required and any updated app release will also match. Remember that you lose the flexibility of revoking individual versions in the future.
An unversioned registration is performed with the addition of the -unversioned option. Note that this is not supported for Android .apk packages, only for .aab.
approov registration -add your-app.ipa -unversioned
This creates an unversioned registration, denoted by the * in place of the version number.
Listing Registrations
All of the registrations that are active for the account can be listed as follows:
approov registration -list
This provides the registrations such as:
3 app registrations:
 Ac15BRFWqxn79dGsjOdVJXVqBQQ64ZWTAuKdrzRC9hc=com.criticalblue.demo-2.0[3]-2974                   SDK:Android(2.5.0)  registered:2019-05-15 18:03:17
 P6nTmI3fhftxUr740ZnUMGKuAyTYjxP5dxKzJGd9yOk=approov.io.client.swift.shapes-client-1.0[1]-4803   SDK:iOS(2.5.0)  registered:2019-05-15 18:03:31
 Ac15BRFWqxn79dGsjOdVJXVqBQQ64ZWTAuKdrzRC9hc=com.criticalblue.demo-2.0[3]-2974                   SDK:Android(2.5.0)  registered:2019-05-29 14:49:36 expiry:2019-06-01 14:49:36
Each registration entry provides its overall signature as a single text block at the start of each line. This is the signature that must be copied in order to remove a registration (see next section). It contains a signature hash of aspects of the application, the application package name, application version information, and the ID of the Approov SDK that is integrated within it.
More information is also provided about the type and version number of the Approov SDK used. The registration time of the app is also provided (in local time). This is updated if a new registration of an app is made that happens to have the same signature. Finally, the expiry time of the registration is shown if it was registered with -expireAfter. Once a registration expires it is automatically removed from the list.
Note that if you are looking for a particular registration you are able to find it by simply piping the output through grep, for instance on Linux/MacOS:
approov registration -list | grep iOS
Using this method it is possible to find registrations for specific platforms, SDK versions, app names and versions.
Removing Registrations
Any individual registration can be removed using its overall signature provided from the registration -list option. For instance, to delete a temporary app registration:
approov registration -remove Ac15BRFWqxn79dGsjOdVJXVqBQQ64ZWTAuKdrzRC9hc=com.criticalblue.demo-2.0[3]-2974
If you are using the zsh shell you will need to enclose the -remove parameter with single quotes ('). This is because zsh interprets square brackets as a globbing specifier.
You will be asked for confirmation if the app has a permanent registration, but not for a temporary registration. Note the removal process assigns an expiry time for the registration two minutes into the future, at which point it is actually removed. When removed no further valid Approov tokens will be issued for the app. Note that running apps may already hold a cached Approov token so it may take up to 5 further minutes before all valid token usage by those apps stops.
Permanent app registrations are removed in the same way but users are also asked to provide confirmation before the deletion occurs. An admin role can be used to remove any registration. Registrations that were added with an admin role can only be removed with an admin role (it doesn’t need to be the same user). A user’s dev role can be used to remove registrations that they added using a dev role. In other words, a developer can remove their own permanent registrations or any temporary registration and an administrator can remove any registration, e.g:
approov registration -remove P6nTmI3fhftxUr740ZnUMGKuAyTYjxP5dxKzJGd9yOk=approov.io.client.swift.shapes-client-1.0[1]-4803
Confirmation will be required however:
WARNING: removing app registration will have an immediate impact on your apps in production
ATTENTION: If you wish to continue then please type YES and return: YES
app registration P6nTmI3fhftxUr740ZnUMGKuAyTYjxP5dxKzJGd9yOk=approov.io.client.swift.shapes-client-1.0[1]-4803 has been removed
You can provide just the first part of a signature if it is unique amongst all of the registrations. If you are using the zsh shell then this also means you don’t need to use single quotes if you don’t include the part of the signature with square brackets.
Removing Multiple Registrations
A facility is provided to remove multiple registrations using a single command. This is useful for maintaining the hygiene of your app registrations. You should actively remove registrations that are no longer in use, either because they are registrations for old testing apps (that have been accidentally permanently registered), or for previously released production apps that no end users are still using.
The command is invoked as follows, for the package com.criticalblue.demo targeted registrations older than 30 days ago:
approov registration -removeMatching com.criticalblue.demo,30d
A list of matching registrations is provided. You should review this carefully before providing confirmation and allowing the operation to complete.
2 matched registrations to be removed:
 Ac15BRFWqxn79dGsjOdVJXVqBQQ64ZWTAuKdrzRC9hc=com.criticalblue.demo-2.0[3]-2974  registered:2019-05-05 16:01:46
 A4rcdXpfEOg0wse4snbAURnjRZidPvY63EULzUrZeFE=com.criticalblue.demo-3.0[4]-2974  registered:2019-05-15 18:02:08
WARNING: removing app registrations will have an immediate impact on your apps in production
ATTENTION: If you wish to continue then please type YES and return: YES
removing Ac15BRFWqxn79dGsjOdVJXVqBQQ64ZWTAuKdrzRC9hc=com.criticalblue.demo-2.0[3]-2974
removing A4rcdXpfEOg0wse4snbAURnjRZidPvY63EULzUrZeFE=com.criticalblue.demo-3.0[4]-2974
This needs an administration role as this is a risky operation that could cause current production app registrations to be removed if care is not taken. The parameters provide the exact package name of apps to be matched and the minimum age of last registration of the app.
Annotating a Registration
A facility is provided to add an arbitrary string instead of the version name for a particular registration. This allows a particular registration to be annotated to show that it is for some specific purpose (perhaps a special testing version, for instance) and this allows it to be easily located in the list of all app registrations. We advise you not to use this facility on apps which are to be retained for production purposes, so that the real version number of app registration is available.
The annotation is added as follows:
approov registration -add your-app.apk -versionName "special"
This particular registration can then be easily found again as follows:
approov registration -list | grep special
Special Library Registration
By default, the SDK library ID for an app is determined by the approov tool that analyzes the app to be registered. In some cases though an Approov SDK may itself be embedded inside another SDK within the app. In this case the tool cannot automatically locate the SDK and, in any case, it is possible for there to be more than one Approov SDK in the app.
In such a case you must use the specific ID of the Approov SDK that you want to register with. This can be specified with an additional command line option as follows, for library ID 1056 in this case:
approov registration -add your-app.apk -libraryID 1056
Registration From Device
This feature allows a registration to be made when access is not available to the original IPA or APK. This might be necessary if an app registration has been accidentally deleted and the original IPA or APK file is no longer available, for instance. It leverages the getting specific device information capability. Please follow those instructions in order to be able to get the detailed information for a running device, including its app registration information.
You can then add the registration as follows:
approov registration -addFromDevice qZka0yfv+ExvOq3PRh6pGw==
This adds the registration associated with the app that is running on the device. Note that is is also possible to use the -expireAfter option to create a temporary registration using this method.
It is possible to use the -playSigned option to provide a registration that is compatible with an Android app that uses Google Play signing. An app released as an App Bundle will always use Google Play signing. Note that in this case you must also add your app signing certificates.
Registration Cloning
A registration cloning option is provided to support a use case employed by certain Approov customers. In this use case the developer and publisher of the app using the Approov SDK (developer) is distinct from the publisher of the API that is protected by Approov (controller). Both the developer and the controller must have Approov accounts. The developer is responsible for managing app registrations. The controller is responsible for Adding API Domains and also Dynamic Pinning. Only the controller is able to view and manage the secret keys associated with their APIs.
To use this flow, an admin role holder of the controller account should create a delegate user role for use by the developer. The developer can then use this role to:
- Download the controller’s Initial SDK Configuration for use in their apps
- Add and remove registrations of their apps to and from the controller’s account. (They do this by cloning app registrations from their account into the controller’s account. Apps that were previously registered but have since been deleted by the developer are removed from the controller’s account at that same time that the new ones are added. The developer cannot modify any app registration that they did not add to the controller’s account. The controller can always remove any app registration from their own account.)
The developer uses the configuration obtained from the controller’s account to initialize the SDK in the app. Since the account that the app uses depends on the SDK configuration with which it is initialized, this flow means that the Approov SDK will use the controller’s account when it is obtaining tokens to include on its API requests. Typically, the app will provide a way to dynamically select which initial configuration is used, allowing the app to either use the developer’s or the controller’s account. In general, there might be several possible controller accounts for a single app.
While in app development, the developer can use Approov in the normal way using their own Approov account. When they do a release for use with the controller’s APIs, either for testing or production, then they will need to copy the active app registrations from their account into the controller’s account. In the case where a single app is to be used by various controllers, the app developer will need a delegate role provided by each one of those controller accounts. If the app has the ability to dynamically switch which controller account is to be used, then the SDK must be reinitialized dynamically to select the appropriate one.
If the developer has initialized the delegate role(s) into their Approov CLI then the registrations can be cloned as follows:
approov registration -cloneToAllDelegateAccounts
This lists all of the accounts that will be cloned to, which you must confirm:
registrations will be cloned to the following accounts:
  accountA
  accountB
WARNING: this will have an immediate impact on production of the target accounts
ATTENTION: If you wish to continue then please type YES and return: YES
cloning 3 permanent registrations into account accountA
cloning 3 permanent registrations into account accountB
If the delegate roles are password protected then you may be asked for each of the passwords during the cloning operation. If you are unable to provide the correct password then the cloning for that particular account is skipped.
In the example, three registrations are cloned to two different accounts. Note that only permanent registrations are cloned. Note also, due to the complete cloning of all active app registrations, if a new API controller account is introduced, with a new delegate role, then all registrations (including historic ones) are easily cloned with this single command. If a registration was previously cloned, but then subsequently removed, then the next clone operation will also remove it from the target delegate account.
When the registrations are listed in the delegate account they are associated with the name of the app developer account from which they were cloned. This allows the API controller to easily identify the apps that were contributed by different delegate roles.
If you only want to clone to a subset of all your delegate role accounts, then you can do this as follows:
approov registration -cloneToAccounts accountA
This option takes a comma separated list of the accounts into which you wish to clone your registrations.
The maximum number of registrations that may be cloned in this way is 50. A warning is provided if the maximum number of registrations in the target account is exceeded.
This command only clones the app registrations. If you are using Google Play signing then you will also need to set the app signing certificate in the target account. The delegate role provides rights to do this. Note also that if you are relying on DeviceCheck, AppAttest or PlayIntegrity this information can also be set using a delegate role.
Approov Tokens
The result of performing a token fetch request with the Approov SDK is an Approov token held by the app. The app then adds the token to the requests made to the backend API to be used in the authorization flow. This section describes the format and content of the tokens.
Token Format
The Approov service uses JSON Web Tokens (JWTs) to represent the authenticity of client apps. This in an open and standard mechanism for representing claims in a tamper proof form and your web service will need to decode and verify these tokens as part of the Approov flow. An Approov token is typically a JWS (a type of JWT) which consists of three parts; the header, payload and signature where each part is base64url encoded and the parts are separated by periods. For a more in depth explanation off JWT tokens, please read this introduction.
JWT libraries take responsibility for generating the header and the signature. We just need to specify the signing algorithm we want to use, the secret key for the algorithm, and the un-encoded payload part. For JWTs, the payload is always a JSON object with the entries referred to as claims.
JWS Token Signing
This section describes the approach used to create signed JWTs (called JWS to differentiate them from JWE tokens which are encrypted). If an app has passed the attestation process according to the selected rejection policy, then a correctly signed token is issued. If the rejection policy causes the app to fail attestation then a token is still issued, but it will not be correctly signed. An observer that does not know the signing secret key will not be able to differentiate between these two cases.
There are a number of different options for token signing depending on the type notified for the API domain when it is added:
account: This is the default, and this selects a token signed with theHS256algorithm. This performs HMAC signing using the account secret key. The 512-bit symmetric secret may be exported using theapproovCLI. If there are multiple API domains using the account type then they are all signed using this key.keyset: If keyset keys have been added then an API domain may be assigned to use one of them for token signing. Each key in the keyset is associated with a particular signing algorithm, providing support for asymmetric key pairs such as RSA and ECDSA.restricted: Some specific domains are considered to be restricted and are managed directly by Approov (such as the demonstration Shapes domain). If these API domains are added to the account then they are automatically allocated therestrictedtype. Approov tokens for them are signed or encrypted using a different key that is not accessible.
Be aware of the performance impact when you are selecting your algorithm. Token signing is performed by the Approov cloud service and it impacts the time required to get a token. Token verification is performed by the backend that handles API requests. The precise performance for different algorithms will be specific to the implementation you use and the hardware on which it is running, however, you can use the table below as a rough guide for Approov tokens (using an HS256 base-case with a signing time of x):
| Algorithm | Signing | Verifying |
|---|---|---|
| HS256 | x | 2x |
| ES256 | 5x | 15x |
| RS256/PS256 | 250x | 10x |
JWE Token Encryption
Note that Approov can also support another type of JWT, encrypted JWE tokens. One use case for these is if you wish to provide extended information within the anno and do not want to reveal the contents to any party that is able to read the tokens. JWE tokens use compact serialization which has 5 parts separated by ., where the first part is unencrypted and holds the encoded information about the algorithms used to encrypt the Content Encryption Key (CEK) and the payload. The Approov service uses A256GCMKW (alg claim) for encrypting the CEK and A256GCM (enc claim) for content encryption.
An API domain will use JWEs if the -jwe option is used when adding the domain. A JWE will also be used if a keyset key is used that is associated with the A256GCMKW algorithm.
Token Lifespan
The normal lifetime for an Approov token is 5 minutes, plus a grace period, from the point of issue by the Approov cloud service. The grace period of a few seconds is added to allow a valid token to be propagated and checked within a backend API system. If a particular device is identified as being risky in some way (such as it being rooted or jailbroken), then, independently of the overall security rejection policy that is set, it will receive a shorter lived 2 minute token instead of a 5 minute one. This forces the device to make more frequent checks as it receives tokens.
The app itself should never cache Approov tokens that it gets from the Approov as the underlying SDK does this in a secure way. Each Approov call does some basic app environment checking and, if issues are discovered, performs a complete attestation check to fetch a new token. Thus an Approov token lifetime should be considered to be up to 5 minutes, since any cached token may be discarded at any point.
Token Claims
Depending on the source of an Approov token (the main Approov service or the Failover) the claims it contains may vary. However, the expiry (exp) claim is always present. The details of the claims are provided in the table below:
| Key | Name | Type | Description |
anno
|
Annotation | Embedded JSON | This is an embedded JSON array of strings showing the list of flags that are set and are in the annotation set for the security policy that is selected. This allows additional information to be collected about the state of a particular device without necessarily causing an attestation failure. Note that if there are no possible annotations then this claim is not present at all. This claim is not included by tokens from the failover. |
arc
|
Attestation Response Code | String | This is an optional claim that encodes information about a subset of the device property flags and also whether the attestation was a pass or fail. The claim is encoded in base32 and is typically 10 characters long (although it may be longer in some circumstances). See Attestation Response Code. This claim is not included by tokens from the failover. |
aud
|
Audience | String | An optional claim that is added if the audience inclusion option is enabled. This provides the domain for which the token was issued. It can be used as an additional layer of backend verification to ensure that tokens intended for one domain cannot be used to access a different one. |
device_state
|
DeviceCheck Device State | Embedded JSON | This is provided for tokens issued to iOS devices if the DeviceCheck option is enabled. It provides embedded JSON providing the status of the two bits held per device, and the last month when those bits were updated. This can be used to direct some optional behaviour based upon that status. |
did
|
Device ID | String | This claim identifies the app installation for which the token was issued. This is a base64 encoded string representing a 128-bit identifier. This may change if the same app is uninstalled and then reinstalled on the same device. |
dmh
|
Device Measurement Hash | String | An optional claim to provide the device measurement hash if a measurement has been requested by the SDK on the domain for which the token is issued. This is a base64 encoded 256-bit SHA256 measurement value. Note that if measurement is being used, then JWE tokens will be used to keep this claim secret. |
ipk
|
Installation Public Key | String | An optional claim that is a base64 DER encoding of an ASN.1 represented installation public key. This key should always be an Elliptic Curve (EC) key using the P-256 curve. If this claim is present then it should be used as a signal that Installation Message Signing is being used. This is only present in Approov tokens issued to devices with SDKs that support installation message signing. It should be used as an indication to the backend verification that installation message signatures should be expected in requests. |
embed
|
Embedded Installation Attributes | Embedded JSON | An optional claim that may be included for all Approov tokens issued on a particular app installation if these have been previously set via an Application Installation Attributes token. This is a signed JWT provided by the backend that indicates some particular attributes should become associated with the installation. |
exp
|
Expiry | Number | The only mandatory claim for Approov tokens. It specifies the expiry time for the token as a Unix timestamp. |
iat
|
IssuedAt | Number | An optional claim that is added if the issued-at inclusion option is enabled. It provides the time at which the token was issued as a Unix timestamp. |
imh
|
Integrity Measurement Hash | String | An optional claim to provide the integrity measurement hash if a measurement has been requested by the SDK on the domain for which the token is issued. This is a base64 encoded 256-bit SHA256 measurement value. Note that if measurement is being used, then JWE tokens will be used to keep this claim secret. |
ip
|
IP Address | String | This holds the IP address of the device as seen by the Approov cloud service. It is provided in a human readable IP address format (in either IPv4 or IPv6 format). In practice this value can often change between the time a token is issued and the time it is sent to your backend, so you should never block if it differs, but you may include it as a signal that tokens have somehow been stolen and are being replayed. This claim is not included by tokens from the failover or if the IP Tracking Policy for the account has been set to none.
|
iss
|
Issuer | String | An optional claim that is added if the issuer inclusion option is enabled. This provides the Approov account ID that was used to issue the token (suffixed with approov.io). It can be used as an additional layer of backend verification if signing keys are shared between multiple accounts. It indicates that tokens were issued from the expected Approov account. This claim may also be set to an explicit value for long lived Approov tokens. This flexibility is designed for use with server-to-server communication (which may only be signed with the account specific secret keys).
|
mpk
|
Measurement Proof Key | String | An optional claim to provide the measurement proof key if a measurement has been requested by the SDK on the domain for which the token is issued. This is a base64 encoded 128-bit proof key value. Note that if measurement is being used, then JWE tokens will be used to keep this claim secret. |
mskid
|
Account Message Signing Key ID | String | This is an optional claim that encodes the ID of a key being used for Account Message Signing. This is only present in Approov tokens for which account message signing is active. It should be used as a signal to the backend verification that account message signatures should be expected in requests. |
pay
|
Payload Hash | String | An optional claim that is added if the protected app passes a token binding argument to the setDataHashInToken method. The claim value is set to the base64 encoded SHA256 hash of the provided payload string. This is typically used to bind an Approov token to some other data used by your app to enhance security (like a user auth token). |
sub
|
Subject | String | An optional claim that is added if the subject inclusion option is enabled. This provides the subject of the token, which is the particular device and app to which it was issued. The claim is compromised of approov| suffixed by the device ID, another | separator and then the app package name.
|
Obtaining Additional Token Information
An API is provided that allows additional information to be obtained for a previously issued Approov token. Note that for additional information to be available the Attestation Response Code feature must be enabled.
Information about how to access the API endpoint is provided as follows:
approov token -showTokenInfoCurl
Which will output the example curl command as follows:
curl -X PUT -H "Authorization: Bearer xxx..." -H "Approov-Token: <token>" https://<account-domain>/token-info/
  add `-H "Report-Message: <message>" to report a particular token
The API key in the Authorization is account specific and should not change unless a specific support request is made to request its rotation. The API key only allows the decoding of tokens and obtaining additional token information and does not enable any other actions on the account. However, as with any account credential, steps should be taken to keep it secured and to prevent accidental disclosure or inclusion in source code repositories.
You should provide an issued Approov token to the API endpoint and this will generate output such as the following:
{
  "did": "qZka0yfv+ExvOq3PRh6pGw==",
  "status": "failed",
  "claims": {
    "arc": "B3Y5SLMO2K",
    "did": "qZka0yfv+ExvOq3PRh6pGw==",
    "exp": 1607528162,
    "ip": "1.2.3.4"
  },
  "expiryTime": "2020-12-09 15:36:02 UTC"
  "deviceProperties": [
    "app-not-registered",
    "rooted",
    "root-risk",
    "xposed"
  ]
}
The status indicates if the attestation was passed or failed. If the provided token was issued to a different account then the status is likely to be arc invalid (and if it does happen to be valid it will not report the correct decoding). The did property provides the Device ID. The full set of token claims are provided, even if the Approov token is an encrypted JWE. The expiryTime provides a readable form of the expiry time of the Approov token. Note that, the tokens you provide may have expired and this will not impact their status or the ability to decode them.
The deviceProperties lists the device property flags that have been determined from the device. If the status is failed then this will almost certainly pinpoint the reason(s).
Note that although the syntax is provided for curl for your convenience, any standard tool or mechanism can be used to perform the PUT request to the endpoint.
This API is for the use of your backend systems only. Never build calls to this API into your mobile app and, especially, never expose the Authorization key.
You should never use this endpoint to check the validity of the token. Always check validity by verifying the signature of the Approov token directly. This endpoint should only be used for informational purposes on a subset of received tokens; it may be subject to rate limiting and does not have the Cloud Server Redundancy features of the Approov token issuance service.
Reporting Token Misuse
The Token Information endpoint provides an optional facility to report the misuse of particular tokens. This endpoint can be used in conjunction with Approov support to allow automatic reporting of tokens that appear to be being misused in some way. This may be because you have reason to believe that a valid Approov token is being issued when it should not have been. Alternatively, if you believe that the Approov token has been somehow extracted from a running app and is being used to make API calls outside of the official app then these should be reported.
You should include a short message (256 characters or less) describing the issue in the Report-Message header for the request, for example:
curl -X PUT -H "Authorization: Bearer xxx..." -H "Approov-Token: eyJh..." -H "Report-Message: Expected a token fail on this device, contact ops@your.domain" https://<account-domain>/token-info/
Token reports are automatically forwarded to Approov support and they will be notified at the end of day in which the report is made. Unless you are already in dialogue with Approov support about this issue, we suggest you include email contact information in your report message. Approov support will analyze the information provided, and may gather more information from the specific device reported, and will respond with some additional diagnosis of the issue.
Token reports are rate limited, typically restricted to one per minute. If you exceed the rate limit then the API will return Ok but the report will not be forwarded to Approov support. Note also that subsequent token reports are ignored if they are issued on the same day and about the same device ID.
Checking Token Validity
A checking option is provided that allows any Approov token to be checked. This is useful for debug purposes during your integration with Approov. Simply use:
approov token -check eyJhbGciOiJIUzI1Ni…
Which will output something like the following:
failed: expired alg:HS256
payload: {
  "arc": "CHDCG4GHWJ",
  "did": "h4gubfCFzJu81j/U2BJsdg==",
  "exp": 1669924065,
  "ip": "1.2.3.4"
}
expiry: 2022-12-01 19:47:45 UTC
device-properties: root-risk
The Approov token content is decoded, and information is provided about whether the token is passed or failed. For a JWS it also shows if the token has expired or not. Remember that expiry and signature validity are independent. The validity of a token (i.e. whether it is signed with the account secret key) depends on whether the request came from a valid app instance and also the security policy in place in the account. The expiry is purely related to how long ago the token was issued. Tokens normally only have a 5 minute lifetime, and the human readable form of the expiry is also shown.
The signing algorithm of the token (alg) is also shown, as well as any key ID (kid) in the token. The content of the token payload will depend on other Approov features that are being used.
If Attestation Response Codes are enabled for the account then this command will also provide a list of the device properties associated with the device to which the Approov token was issued.
Note that the token check is also able to process encrypted JWE tokens. It shows if they are valid and can decode their content, even if they are invalid.
Loggable Tokens
It is generally not recommended to log Approov tokens within an app. This is because it might be possible for an attacker to turn logging on in a production app and use this as a mechanism to steal valid Approov tokens that have been received. Furthermore, the raw Approov tokens are also very opaque since they are just base64url encoded JWT strings and therefore not very useful for debugging.
Loggable tokens are output in the logging generated by the Mobile App Quickstarts. They provide a decoded string form of the Approov token, and are therefore much more useful for debug purposes. The returned string holds a JSON object containing the payload contents with an additional sip claim, as demonstrated by the following example:
{
  "anno": [
    "app-not-registered"
  ],
  "did": "h4gubfCFzJu81j/U2BJsdg==",
  "exp": 1558626228,
  "ip": "1.2.3.4",
  "pay": "6ZIvH1YelZyc2hx1iRRqD3dWNcFgjVtCon+7921XDjg=",
  "sip": "HggK-u"
}
Note that if no valid token was returned from the Approov token fetch request, or the returned token was a JWE, then a marshaled JSON string with the status is provided, e.g.:
{
  "status": "POOR_NETWORK"
}
{
  "status": "JWE"
}
As mentioned, a loggable token includes a special sip claim. This contains the first few characters of the signature of the token. Six characters are provided in base64, giving 36 bits out of the 256 bits provided in the complete signature. Thus it is not sufficient to create a validly signed token, but, if the signing key is known, it is sufficient to check, with a very high degree of accuracy, whether an Approov token is valid. Note that app itself never knows the symmetric secret used for signing tokens. Its possible to check a loggable token in the same way as a JWT as follows:
approov token -check '{"anno":["app-not-registered"...'
Note that the loggable token must be enclosed in single quotes so that it is treated properly as a single command line parameter.
A statement is provided about whether the token was valid or not. It does this by reproducing the complete Approov token on the cloud service with the correct signature and then checking this against the prefix part of the signature that it knows from the sip.
The sip claim cannot be used to determined token validity if the token was signed with a the probabilistic signature scheme. Probabilistic schemes include keyset key that use one of the following algorithms: PS256, PS384, PS512, ES256, ES384 or ES512. For these algorithms the loggable token will always be interpreted as a fail.
Long Lived Approov Tokens
It is possible to generate Approov tokens that have a long expiry time. Approov tokens issued via the Approov SDK only have an expiry time of 5 minutes or less. This facility allows tokens for an arbitrary duration to be created. It requires an admin role. To create one use:
approov token -genLongLived server-token,90d
Which will output the expiry date and the token itself:
token will expire at 2019-06-03 13:24:38
WARNING: Long lived token should never be integrated into public clients and their security must be carefully managed
eyJhbGciOiJIUzI…
This generates an Approov token that is valid for 90 days. The server-token parameter is included in the iss claim of the token. Change this to whatever name you would like. It can be used to identify particular long lived tokens, or even to revoke certain ones by backend API checking. In effect this claim could be used as a type of API key within the overall signed Approov token. The expiry time should be specified in days and cannot be less than 1 day.
Long lived tokens can be used to authorize communication to the protected backend API for server-to-server communication and test environments (such as Postman). This allows a particular API to be accessible both from mobile apps and also via other servers without having to create a different authorization mechanism. Generating a long lived token has no impact on the expiry time of tokens issued normally through the Approov SDK.
Long lived tokens must never be included in public clients, such as web pages or mobile apps. They should only be used in circumstances where the token can be protected in a server environment.
Long lived tokens cannot be generated for restricted domains, such as shapes.approov.io demo endpoint. Moreover, it is only possible to generate long lived JWS tokens signed with the account secret key. It is not possible to create tokens signed with a keyset key.
IP Tracking Policy
The IP tracking policy determines how Internet Protocol addresses are dealt with in your Approov account. When your account is setup the policy will be token. This means that the IP address of the device requesting an Approov token will be included in the token itself in the ip claim. However, in accordance with Approov’s privacy notice, no record will be kept of the IP address in Approov’s internal logs or records. This is because IP addresses can be considered to be Personally Identifiable Information (PII) and the Approov service does not collect this by default for an account holder’s end customers. IP addresses are only stored by Approov services after transformation through a one-way hash function from which the original IP address cannot be recovered.
If desired the IP tracking policy can be changed to none so that the IP address claim is not even included in the issued Approov token.
approov policy -setIPTracking none
An admin role and confirmation is required to make an IP tracking policy change:
WARNING: updating the IP tracking policy will have an immediate impact on your apps in production
ATTENTION: If you wish to continue then please type YES and return: YES
IP tracking policy was set successfully
A policy of full is also available whereby permission is given for Approov services to record unhashed IP addresses. This allows more sophisticated correlation analysis between IP addresses and device characteristics, carried out in conjunction with Approov support. Note, however, that if this option is used then the Approov service is collecting PII on your behalf and this may have GDPR implications.
The current IP tracking policy can always be retrieved as follows:
approov policy -getIPTracking
Audience Inclusion
The audience inclusion feature allows the aud claim to be populated in all Approov tokens issued for the account. This will be set to the domain name for which the Approov token was issued. This can be useful to ensure that tokens issued for one domain cannot be used to gain access to a different domain that shares the same signing secret key. This needs to be checked by the backend API integration.
The audience inclusion feature can be enabled as follows:
approov policy -setAudience on
An admin role and confirmation is required to make an audience policy change:
WARNING: updating the audience policy will have an immediate impact on your apps in production
ATTENTION: If you wish to continue then please type YES and return: YES
The current audience policy can always be retrieved as follows:
approov policy -getAudience
Note that wildcard tokens are issued with an aud claim of *.
Issuer Inclusion
The issuer inclusion feature allows the iss claim to be populated in all Approov tokens issued for the account. This will be set to the name of the account suffixed with approov.io. This is useful as an additional verification if signing keys are being shared between multiple accounts. The backend API integration is able to verify that the token was issued for the expected account.
The issuer inclusion feature can be enabled as follows:
approov policy -setIssuer on
An admin role and confirmation is required to make an issuer policy change:
WARNING: updating the issuer policy will have an immediate impact on your apps in production
ATTENTION: If you wish to continue then please type YES and return: YES
issuer policy was set successfully
The current issuer policy can always be retrieved as follows:
approov policy -getIssuer
IssuedAt Inclusion
The issued-at inclusion feature allows the iat claim to be populated in all Approov tokens issued for the account to show the timestamp of when it was issued. The feature can be enabled as follows:
approov policy -setIssuedAt on
An admin role and confirmation is required to make the policy change:
WARNING: updating the issuedat policy will have an immediate impact on your apps in production
ATTENTION: If you wish to continue then please type YES and return: YES
issuedat policy was set successfully
The current issued-at policy can always be retrieved as follows:
approov policy -getIssuedAt
Subject Inclusion
The subject inclusion feature allows the sub claim to be populated in all Approov tokens issued for the account. This is set with the string approov| and then the device ID that the token was issued to. This is then followed by a | separator and then the app package identifier.
The feature can be enabled as follows:
approov policy -setSubject on
An admin role and confirmation is required to make the policy change:
WARNING: updating the subject policy will have an immediate impact on your apps in production
ATTENTION: If you wish to continue then please type YES and return: YES
subject policy was set successfully
The current subject policy can always be retrieved as follows:
approov policy -getSubject
Backend Integration
This section describes the changes that are needed in the backend API to check that an Approov token is valid.
This section provides a detailed reference for backend integrations. If you able to use one of our Backend API Quickstarts then you may find this simpler.
Requirements
To protect a backend API with Approov it is necessary to check that incoming requests have a valid Approov token. This might be required on all endpoints or just on some that demand additional security. Typically, token checking will be performed in some middleware layer of the backend rather than be implemented in the business logic.
Approov token checking is often performed in addition to user authorization, as an orthogonal activity. User authentication and authorization ensure that a known user is invoking the software making the request. Approov checking ensures that the software making the request is actually what it claims to be.
Approov uses standard JWTs as discussed in the previous section. This makes the backend API checking straightforward since almost all backend languages and technologies support JWT checking. To check an Approov JWS, the account secret key must be made available to the backend code. The token will be signed with the HS256 profile, and the shared symmetric account secret key is needed to perform the check. Libraries for working with JWTs are available in most common languages, with many listed on the JWT homepage.
There are essentially three cases which should cause a request to be rejected:
- Invalid Token: If the Approov token is simply missing or is not a correctly formatted JWT then this indicates some spoofed request and should be rejected.
- Incorrectly Signed Token: If the token is not correctly signed then it must be rejected. Obviously an attacker can synthesize an incorrectly signed token. An app is also provided with an incorrectly signed token if the attestation has been rejected. Note it is important to ensure that the signing method of the JWT is
HS256. - Expired Token: Any token that has expired must be rejected, as under normal operation this should never happen. The app should never cache the Approov token, and the Approov SDK never provides a token that has expired. A small grace period is built into the token lifetime to allow for transmission and propagation delays in the backend systems. It is important to make sure that the server checking the tokens is correctly time synchronized.
Note that the actual behavior for an invalid token does not have to be rejection, although this is the typical approach. An invalid token event could simply be used for logging or as a signal to require some additional authentication and security checks on a particular user.
We recommend that the backend integration has a dynamic facility to enable or disable the Approov token check. This allows traffic to be passed through without the check in case of some emergency situation. Moreover, you may wish to collect logging for events where invalid Approov tokens are being provided.
Account Secret Key Export
The account secret key can be obtained with the following command:
approov secret -get base64
An admin role required to gain access to the account secret key.
This example displays the secret as a base64 encoded string, representing a 512-bit value that is randomly assigned to the account during signup. The value of the secret must be protected with extreme care. The number of individuals with exposure to the value of the secret should be minimized and it should never be checked into a source control system. Ideally, it should only be made available to the runtime environment of the backend servers. Note that if base64url is used as a parameter to the command then the secret can be obtained in base64url encoded format, which may be needed by some backend integrations.
Note that it is also possible to obtain the secret in raw form, as discussed here.
If you wish to output the secret value, with no additional text, you may use the -plain option. This allows the output to be easily piped into other command line tools, so that generic scripts can be easily developed that extract and operate on the account secret key. Of course, you should never include your administration token in such a script directly.
If you wish to export the secret key that is used for JWE tokens (of the account type and using the A256GCMKW algorithm) then the -jwe option can be used as follows:
approov secret -jwe -get base64
Account Secret Key JWK Export
The account secret key may also be exported in JSON Web Key (JWK) format as follows:
approov secret -getJWK secret.jwk
This writes the JWK to the file secret.jwk with content like the following:
{
    "kty": "oct",
    "use": "sig",
    "k": "dEitzKUYJLQ…",
    "alg": "HS256"
}
The JWK format is useful for certain backend systems that accept this format directly. Usage with JWKs is also often associated with the requirement for a Key ID property in tokens. This needs to be set prior to getting the JWK so that the kid property is listed.
It is also possible to export it in the JSON Web Key Set format, for systems that require that format. In this case the single account secret key is included in the keys map.
If the -jwe option is used then the secret key used for JWEs is provided, rather than the one for JWSs.
Generating Example Tokens
It is possible to generate example Approov tokens that have the same format as those generated for a mobile app. The API domain, for which the token is being generated, must be provided. For example:
approov token -genExample my.api.io
This generates the example token as the output. The result is a valid token that lasts for one hour. The extended expiry time of these tokens provides for longer debug sessions using a single token. For example, the token can be used in synthetic queries made to a backend API to check that it is working correctly. There is no need to know the actual account secret key to use this facility as the token is automatically signed with the correct secret.
If an API domain is provided that has not been added for the account then no token can be generated. If the API domain is associated with encrypted JWE tokens then one is generated, to allow verification of the JWE decryption logic in the backend.
The example tokens contain a fake IP address and device ID that are in the correct format. A -setDataHashInToken option is also provided for testing the Token Binding feature. You can decode the example Approov token to see what it contains as follows:
approov token -check eyJhbGciOiJIUzI1N…
By default a valid Approov token is generated. But it is also possible to generate an invalid token to test the backend API handling with such tokens. For instance:
approov token -genExample my.api.io -type invalid
Changing the Account Secret Key
The account secret key can be changed with the following command:
approov secret -change
This requires an admin role and a confirmation of the operation:
WARNING: updating the account secret key will have an immediate impact on your apps in production
ATTENTION: If you wish to continue then please type YES and return: YES
If confirmed then the new account secret key value is output as follows:
new base64 encoded account secret key is VcXl2IgVUgz…
If the account secret key is changed then this has an impact in production within 30 seconds for newly issued tokens. This means that for a period of up to 5 minutes the backend API may see a combination of tokens signed with the old secret (if they have been cached and reused by the app SDKs) and new ones signed with the new secret (for freshly obtained tokens).
In general it is hard for a backend integration to deal with two different secret values, so we recommend the following procedure if rotating the account secret key:
- Disable Approov token checking on the backend API. This will let any traffic through for a short period of time,
- Execute the command to update the account secret key and copy the new value.
- Integrate the new account secret key into the backend API.
- Re-enable Approov token checking. Assuming this process takes more than 5 minutes, all tokens in use will be using the new account secret key.
Raw Account Secret Key
There are certain specific backend JWT checking libraries that require the secret to be specified as a raw string (they have no facility to provide it in an encoded form such as base64). To support this, a feature is provided to get the secret in its raw format. However, the initial secret generated for your account will almost certainly contain some bytes that are not printable and therefore cannot easily be added to a string. Thus, if you need the secret in its raw form, you must first change it and include the special -forcePrintable option as follows:
approov secret -change -forcePrintable
It is then possible to obtain the raw secret value as follows:
approov secret -get raw
Use of this option reduces the entropy of the secret and so you should only use this facility if there is no option but to use a JWT library that requires the secret in this format. Typically you should specify the secret in an encoded format rather than a raw string.
Managing Dynamic Pinning
It is essential that all channels used to communicate Approov tokens, or secure strings, are protected against Man-in-the-Middle (MitM) interception. This means that the app should only be willing to establish a TLS connection where the presented certificates are both valid and are as expected. Public key certificate pinning is used to achieve this, as detailed in Dynamic Pinning. By default, the managed trust roots facility is used which effectively limits the set of root certificates that may be used, even if the device is modified. Explicit public key pinning options are also available to determine more specific pin requirements. Protection will be provided automatically if you have used one of our Mobile App Quickstarts.
Managed Trust Roots
By default the managed trust roots facility is used instead of explicit pins. This handles all situations, even when the backend API is not managed by the same organization as the mobile app. In this case the public key pin of the presented certificate could be changed at any point. Moreover, the issuing certificate authority and therefore the root certificate could also be changed at the time of renewal or indeed at any time.
To deal with this, Approov provides a set of trusted roots with the same set of certificate authorities typically trusted by the iOS and Android system trust stores. The set of trusted roots is managed by Approov and is dynamically updated as required. If any individual root certificate is revoked then Approov removes it from the trusted set and the update will be picked up by all apps on their next attestation. Approov monitors the iOS and Android system trust stores for changes and updates the Approov managed trust roots appropriately.
In the app, the trusted roots set is enforced in addition to the trust store on the device itself. A root certificate has to be present in both sets for a connection to be established. Without this protection a Man-in-the-Middle (MitM) proxy can simply install a self signed certificate into the system trust store of a device (either on an emulator or a rooted/jailbroken device) and then intercept traffic. With managed trust roots enabled, this style of attack is prevented because the self signed root certificate cannot be added to the Approov managed trust roots and therefore any connection attempts with the MitM proxy certificate will be rejected. Only connections to a certificate in a chain to a legitimate root authority will be accepted.
Controlling Managed Trust Roots
For new Approov accounts, Managed trust roots are enabled by default. If you have an Approov account where it is not enabled use:
approov pin -setManagedTrustRoots on
An admin role and confirmation is required:
WARNING: updating the managed trust roots policy will have an immediate impact on your apps in production
ATTENTION: If you wish to continue then please type YES and return: YES
managed trust roots policy was set successfully
Managed trust roots require some changes to the pinning management logic for Approov quickstarts. If you are a pre-existing Approov customer where managed trust roots are not enabled by default, you must only enable this if using a quickstart designed for a 3.0.0 SDK or later.
Managed trust roots can be disabled using the above command with off.
Disabling managed trust roots while some domains have no specific pin configuration will leave those domains relying solely on the system trust store and therefore potentially exposed to MitM attacks.
It is possible to get the current status of managed trust roots using:
approov pin -getManagedTrustRoots
Adding a Leaf Pin
Although managed trust roots are used by default, you can choose to provide an explicit set of pins for an API domain that has been added. This will ensure that communication can only occur if one of the specific set of pins provided is present. You should only do this if you have control or visibility of the backend API being pinned to, and therefore will have some notice before the pin might change so you can update your Approov configuration beforehand.
You can add the leaf pin for a specific API domain using the following command:
approov pin -add your.domain -addLeafPin matching
You will be asked for confirmation:
WARNING: updating the pins will have an immediate impact on your apps in production
ATTENTION: If you wish to continue then please type YES and return: YES
pin gPXaRc4yVQHyqlts3sZFECBDlSmRCuyVFk8f2UIukJk= added to API your.domain
The pin is extracted from the leaf certificate presented by the domain’s server. When a leaf pin is collected with the matching parameter then the pin is calculated from both a local network request and via a network request from the Approov cloud servers. The pin obtained must match, or else an error is generated, for example:
domain your.domain local pin 1O0wDRM/roe6UTctDVQ5aN/ASNYsGQFVzXYhO34t5GE= differs from remote pin OfxtkIyzmWFXb028KrIr3VqP0XHW41mbunxtNnS3eb4= (may be due to local firewall)
This means that the observations differ. This might indicate that the leaf certificate obtained is not deterministic, or may depend on the geographic location from where the request is made. Alternatively, it might just mean that the local network is subject to interception via a firewall (this can be checked with the approov pin -api <domain> -getCertChainPins command which obtains the full certificate chain obtained from a local request).
In this case a different pin matching approach can be used by changing the parameter to -addLeafPin as follows:
- matching: Ensure that there is a matching pin between the local network access and remote observation by the Approov servers.
- local: Obtain the pin value as observed on the local network.
- remote: Obtain the pin value as observed remotely by the Approov servers.
When you add new APIs, or change the pins on existing APIs, a new pinning configuration is automatically sent to your running apps when they connect to the Approov servers. Connections are made whenever a new token is required (default 5 minutes). To avoid pinning failures when deploying a new certificate, you should add the new certificate pin and wait for the token lifetime to elapse (5 minutes) before deploying the new certificate on your servers. Once the certificate is deployed and in use by your servers or load balancer, you can remove the old pin for the domain (this will trigger another configuration update). Using this approach, you can deploy a certificate with a new pin with no downtime for your apps.
Adding a Leaf Pin with a Port
If the endpoint being accessed by the mobile is not on the standard port of 443, the -port option can be used. Here is an example that adds the leaf pin as observed by the local machine on port 8000:
approov pin -api your.domain -addLeafPin local -port 8000
Pin sets are recorded per domain and the same set is used to check each connection to that domain, no matter which port is used. If your apps make connections to multiple ports on the same domain then please make sure that the pin set includes a valid pin for each of the different certificates used by the accessed ports on that domain.
Listing the Pins
You can always see the pins configured for any domain as follows:
approov pin -api your.domain -list
This shows the set of pins that have been set for the domain. This will be shown as unpinned if no pins have been set, but managed trust roots will still be in place if these are enabled (as is the default).
Adding an Explicit Pin
It is also possible to add an arbitrary specific pin to a domain with the following command. The pin value itself may have been extracted using one of the methods discussed in the following sections. For example:
approov pin -api your.domain -add Q62DnTGJsy1h+ude8HB5ZjKy0Vhg2pvTzjplWSD3hkk=
Note that you need an admin role to modify the pins and you will be asked for confirmation:
WARNING: updating the pins will have an immediate impact on your apps in production
ATTENTION: If you wish to continue then please type YES and return: YES
pin Q62DnTGJsy1h+ude8HB5ZjKy0Vhg2pvTzjplWSD3hkk= added to API domain your.domain
Removing an Explicit Pin
Specific pins can be removed as follows:
approov pin -api your.domain -remove Q62DnTGJsy1h+ude8HB5ZjKy0Vhg2pvTzjplWSD3hkk=
This also requires confirmation:
WARNING: updating the pins will have an immediate impact on your apps in production
ATTENTION: If you wish to continue then please type YES and return: YES
removed pin Q62DnTGJsy1h+ude8HB5ZjKy0Vhg2pvTzjplWSD3hkk= from API domain your.domain
Any attempt to change the pins for the demo endpoint shapes.approov.io result in an error.
Intermediate Public Key Pin Extraction
In some cases you might not want to pin against a leaf certificate but, instead, choose to pin against an intermediate or root certificate within the chain presented by a domain. A command is provided to extract this information:
approov pin -api approov.io -getCertChainPins
This shows the full chain of certificates:
pin gPXaRc4yVQHyqlts3sZFECBDlSmRCuyVFk8f2UIukJk=, expiry 2024-06-20, CN=approov.net
pin 18tkPyr2nckv4fgo0dhAkaUtJ2hu2831xlO2SKhq8dg=, expiry 2030-08-23, CN=Amazon RSA 2048 M02,O=Amazon,C=US
pin ++MBgDH5WGvL9Bcn5Be30cRcL0f5O+NyoXuWtQdX1aI=, expiry 2038-01-17, CN=Amazon Root CA 1,O=Amazon,C=US
For this example we use our website domain approov.io which is hosted by AWS and uses an AWS issued certificate. You can see the chain right up to Amazon’s root certificate. Notice that certificates higher in the chain tend to have longer expiry times. Depending upon your particular backend setup, it may be better to pin to one of these certificates rather than the leaf, which may change frequently or at unpredictable times. (Note, in the specific case of AWS, they suggest you add a pin for all their published root certificates so that it doesn’t matter which root is used when updating your certificate.)
Once the pin is obtained use Adding an Explicit Pin to add it to the required domain.
Note that if the endpoint being accessed is not on the standard port of 443, the -port option can be used to obtain the certificate chain on the specified port.
Note that the certificate chain is determined by making a local request. If the local network has a firewall that intercepts TLS traffic, then the resulting chain will not be the same as one observed by a device outside that network. Also be aware that, depending upon the backend API architecture, the observed chain may be influenced by the specific server that responds to the request. For example, different geographical regions may supply different certificates.
Certificate File Pin Extraction
As well as getting the public key pin from a live endpoint, it is also possible to get a pin from a certificate file. This is useful when you want to add a pin to a certificate that is not yet in service. Use the following to get the pin:
approov pin -getCertPin your-cert.crt
Which will output something like:
pin jZetC3373f9dmwxg5YE9TCZzl4MYvp0eYTiEsbcTU34=, expiry 2022-05-10, CN=your.domain
This provides the public key pin along with the expiry time and subject of the certificate. Note that, to use this option it is necessary to have a PEM encoded certificate file. This is normally associated with a .cer, .crt or .pem file extension.
Once the pin is obtained use Adding an Explicit Pin to add it to the required domain.
Certificate Pins From a Device
It is possible to obtain the set of pins seen by the SDK in a particular device using the Managing Devices capabilities.
First, you need to get the device ID from which you wish to capture the certificate information. To obtain the ID see Extracting the Device ID. A probe URL is specified that must include https and may optionally include a port number as shown:
approov device -add qZka0yfv+ExvOq3PRh6pGw== -probeURL https://shapes.approov.io:443
The next time the device fetches an Approov token it will also probe the specified URL and obtain the information about the certificate chain. Remember that the device must obtain a new Approov token to do this, so if it has already obtained one then it can be up to 5 minutes before it expires.
The device information can then be obtained as follows, and this should include the probe result information (other information has been elided here):
approov device -getInfo qZka0yfv+ExvOq3PRh6pGw==
Which will output something like:
captured: 2020-07-23 09:54:46 BST
...
probe-result:
  probe result for https://shapes.approov.io:443:
   dqP5GOntRqZST5GfBj8NGpr1GMUTeKZG5g6+Q5mZFYM=: CN=shapes.demo.approov.io
   YLh1dUR9y6Kja30RrAn7JKnbQG/uEtLMkBgFF2Fuihg=: CN=Let's Encrypt Authority X3,O=Let's Encrypt,C=US
   Vjs8r4z+80wjNcr1YKepWQboSIRi63WsWXhIMN+eWys=: CN=DST Root CA X3,O=Digital Signature Trust Co.
This is the full set of certificate pins in the chain and the subject information of the certificate. See Adding an Explicit Pin to add one of the pins shown.
This option of extracting the pins live from a running device is useful for pin debugging purposes, or network topologies where it is not practical to run the approov command line tool on the same network as the device and the network is not accessible via remote pin probing from the Approov cloud services. This might be the case if you are deploying Approov in a private network environment.
Checking API Configuration
An option is provided that checks that all of the specified API domains are accessible and that, if pins are provided, then they do actually match a certificate being presented for the domain. This can be used as a quick check that the API configuration that is currently set is valid. It is invoked as follows:
approov api -check
This outputs the result of the check as follows:
your.domain:
  no pins defined
shapes.approov.io:
  certificate chain:
    dqP5GOntRqZST5GfBj8NGpr1GMUTeKZG5g6+Q5mZFYM= CN=shapes.demo.approov.io
    jQJTbIh0grw0/1TkHSumWb+Fs0Ggogr621gT3PvPKG0= CN=R3,O=Let's Encrypt,C=US
  pins:
    dqP5GOntRqZST5GfBj8NGpr1GMUTeKZG5g6+Q5mZFYM=
  matched pin dqP5GOntRqZST5GfBj8NGpr1GMUTeKZG5g6+Q5mZFYM=
The current API configuration is obtained from the Approov cloud service, and then each of the domains is checked from your local machine. If monitoring is enabled for the API domain then any port specified for that is used for the access. If the API domain is not accessible then that is considered an error.
If pins are defined for a particular API domain then the certificate chain observed is shown, along with the list of pins that are defined for the domain. If there is a matching pin then that is also listed.
The command has a return code of 0 if it succeeded or 1 if it failed. Note that if the user role is invalid, or the Approov cloud service cannot be contacted, then this is not considered a failure since the explicit purpose of the command is to check the API endpoints themselves.
Testing the Pinning Implementation
It is important that any pinning implementation is tested, by forcing the app into situations where the pins are incorrect with respect to the certificates being presented on the API endpoints. It is necessary to show that this is handled correctly and, importantly, that dynamic configuration updates issued from the Approov cloud update the app’s pins correctly.
In production it would be undesirable to change the certificates on the real API endpoints to do the testing as this would impact all app users. To avoid the need to do this, Approov provides facilities to modify the set of pins provided to a particular device being tested. These facilities are discussed in detail in the Managing Devices section. The idea is that for a particular device the pins can be set to a known bad value that will trigger the pinning exception so that it can be tested, i.e. Approov changes what the app is pinning against rather than what is being presented by the API endpoint. This is an equivalently good test.
The following is a recipe of commands to perform a test on your pinning implementation. Firstly you will need to get the ID of your device, see Extracting the Device ID. You should then check that the app is operating normally and that you have pins defined for the endpoints you are trying to protect with pinning.
Next, you can block all of the communication by forcing bad pins to be downloaded as a dynamic configuration for your app. For example:
approov device -add h4gubfCFzJu81j/U2BJsdg== -pinMode block
Note that nothing will happen until the next Approov fetch is made. An existing token may have a lifetime of up to 5 minutes. A new dynamic configuration should then be received. You may be able to see this in the app’s logging. How quickly your app can respond to this update will depend upon the app’s architecture. Once the update has been actioned, you should see an appropriate error from your app when it attempts to make API calls. We suggest you go through this whole process without exiting the app.
You can then simulate what would happen to your running app if a new set of valid pins are transmitted to your app via a dynamic configuration update:
approov device -add h4gubfCFzJu81j/U2BJsdg== -pinMode pin
This sets the pins back to the default for the account. Once any currently fetched Approov token has expired (up to 5 minutes) a dynamic configuration update is transmitted to the app. Depending on the pinning implementation, this might have an immediate impact or after some time if the pins can only be rebuilt then. If your app’s pinning implementation cannot rebuild the pins until the app is restarted then it should provide a user message to that effect.
It is vitally important that you test that your app is able to recover from having incorrect pins to correct ones via a dynamic configuration update. This is the process that your app must successfully follow should there be a need to supply new pins to your app over-the-air.
It is also possible to block all app communication, including that between the Approov SDK and the Approov cloud as follows:
approov device -add h4gubfCFzJu81j/U2BJsdg== -pinMode blockAll
In this case you will receive a MITM_DETECTED error from fetch attempts. This will allow you to check the handling of this in your app.
Continuous Pinning Testing
Pinning relies on the underlying http stack implementation, that is part of the device OS, to implement it. If this underlying implementation is compromised then it is possible that the pinning is not actually restricting TLS connections in the way intended, and potentially allowing an attacker to MITM connections. Approov incorporates various detections of modifications to the runtime environment that may allow such a compromise to occur. In such cases the device will typically not be issued with valid Approov tokens. However, if a particularly lax rejection policy has been selected then there is a danger that such underlying tampering could be occurring whilst valid Approov tokens are issued.
Thus an additional pinning verification mechanism is provided. This allows an arbitrary URL to be specified. The SDK attempts to connect to this the very first time a new app installation tries to fetch an Approov token. The fetch uses the underlying pinning mechanisms of the device OS and specifies a pin that will not be present. Thus the connection attempt should fail. If it succeeds then it indicates that the pinning mechanism has been compromised in some way. If this happens then the app installation will never be issued valid Approov tokens.
Set the URL to be used as follows:
approov pin -setPinningTestURL https://your.domain:443
You will be asked for confirmation:
WARNING: updating the pinning test URL will have an immediate impact on your apps in production
ATTENTION: If you wish to continue then please type YES and return: YES
pinning test URL was updated successfully
The URL should be specified as a full URL with https and may optionally include a port number. This URL should be something that it is possible to perform a successfully http GET operation upon and obtain a 200 OK response. The URL should also not result in a redirect. If the URL is not valid then approov tool will issue a warning. The idea is that if SDK is able to perform this GET, despite the pinning restriction, then this is the trigger to mark the app as being compromised.
We recommend that the URL is one of the key API backend domains that your app uses and is protected using Approov.
You will be able to see devices that have compromised using the pinning-tampered device property flag.
You can see any URL that has been set as follows:
approov pin -getPinningTestURL
Finally you can remove the URL at any point using:
approov pin -removePinningTestURL
Again, you will be asked for confirmation:
WARNING: updating the pinning test URL will have an immediate impact on your apps in production
ATTENTION: If you wish to continue then please type YES and return: YES
pinning test URL was updated successfully
Getting All API Configuration
The complete set of API domains and the pins that have been added to the account can be extracted into a JSON format file as follows:
approov api -getAll apis.json
This command gets all of the API attribute and pin information and writes it to the apis.json file. In this example the content is as follows:
{
  "your.domain": {
    "secretType": "account",
    "algorithm": "HS256",
    "pins": [],
    "monitorPort": 443
  },
  "shapes.approov.io": {
    "secretType": "restricted",
    "algorithm": "HS256",
    "pins": [
      "JG29gD8vWiEanTCVPjYLQ5yiYMKQqR05OH38yFf0kBU="
    ]
  }
}
This shows that Approov tokens can be issued either for your.domain or shapes.approov.io.
The attributes for each domain in the format are as follows:
secretType: The type of the API domain, primarily defining where the signing or encrypting secret key is obtained. Options areaccount,keyset,restrictedornone.allowWeb: This is an optional boolean flag that is only shown iftrue. It indicates that the API domain may have web protection Approov tokens fetched for it.algorithm: Provides the type of signing or encryption algorithm for the API domain (or empty fornone).kid: This is optional and provides any key ID for tokens issued for the domain. This is always present for thekeysettype.pins: The list of valid explicit pins for the domain. Empty indicates that no pinning is applied, although connections may still be protected with managed trust roots.monitorPort: If continuous monitoring is enabled for the domain then this specifies the port being used (normally 443).
Setting All API Configuration
API configuration may be set in the same format as that obtained with the API -getAll option. New domains may be added, removed or edited. For instance, we may edit the JSON received in the previous section with a different domain and two different potential pins.
{
  "another.domain.com": {
    "secretType": "account",
    "algorithm": "HS256",
    "pins": [
      "/ABoW73P1I3gWumpugB6zzHtqjl0+yFKRBEvJW8I3sQ=",
      "Wp/PdTn4cw7/jwsS9+DnheEm5AbtTEsmVPAGOGY3tHk="
    ]
  },
  "shapes.approov.io": {
    "secretType": "restricted",
    "algorithm": "HS256",
    "pins": [
      "JG29gD8vWiEanTCVPjYLQ5yiYMKQqR05OH38yFf0kBU="
    ]
  }
}
We can then update the Approov server configuration as follows:
approov api -setAll apis.json
An error is generated if the input is not well formed JSON. Each of the domains provided are checked to see if they are reachable and if any one of the pins provided match:
another.domain.com: matched pin Wp/PdTn4cw7/jwsS9+DnheEm5AbtTEsmVPAGOGY3tHk=
shapes.approov.io: matched pin JG29gD8vWiEanTCVPjYLQ5yiYMKQqR05OH38yFf0kBU=
WARNING: updating the APIs will have an immediate impact on your apps in production
ATTENTION: If you wish to continue then please type YES and return: YES
APIs set successfully
This ensures that the configuration is valid prior to updating it in the Approov cloud and distributing it to apps. If there is a problem then the follow message is seen:
WARNING: problem detected with APIs, we do not recommend you proceed (unless caused by known local firewall issue)
You can still choose to proceed if the issue may be caused by your local connectivity, since the check is made via the local network, but you should be convinced that this is the only issue or else it would be unwise to proceed.
We do not generally recommend that you use this option. It is better to perform finer grain management using the -add and -remove options for individual APIs and pins.
An admin role is required and further confirmation is expected. This is because these changes will have an impact on production within 30 seconds and as such are dangerous if domains have been accidentally removed or if pins are incorrect.
Any attempt to change the pins for the demo endpoint shapes.approov.io cause an error.
Security Policies
A security policy is set at the account level and determines which apps may be issued with a valid Approov token.
What is a Security Policy
Approov provides fundamental checks regarding the integrity of the app itself, so that valid Approov tokens are only issued to valid app instances. Additionally, various other runtime integrity checks are also performed and the results transmitted to the Approov cloud server in a secure manner. Whether these checks should result in an invalid Approov token or not is determined by the security policies that are selected. This gives you the flexibility to permit accesses or block them according to your risk assessments and the characteristics of your user base. For instance, if you develop a banking app, you may take the view that no rooted device should receive a valid Approov token. However, other consumer apps, deployed to certain markets or demographics, may require rooted devices to be accepted. Thus the security stance must be informed by the characteristics of the app’s user base and the particular threats that Approov is being used to defend against.
A security policy is shown and specified as three comma separated individual selections as follows:
- Security Rules: The security rules that should be used. Currently the only valid value is
default. - Rejection Policy: Policy to be used to determine if a particular request should be rejected and an invalid Approov token issued. This allows preset rejection policies to be set. It is also possible to create custom rejection policies and custom options.
- Annotation Policy: Policy for including device property information in the Approov token itself. It is possible to create custom annotation policies.
When a new account is created it is allocated a security policy of default,default,default. This provides a restricted policy of only issuing valid Approov tokens where no threat has been detected.
Note that security policies may also be set for individual devices as well as the whole account as described in Managing Devices. For this reason blanket policies such as always-pass and always-fail are provided that would not normally be applied to the whole account.
Device Properties
When Approov analyzes a particular app instance, and the environment in which it is running, it will perform an assessment against a number of different possible device properties. Any particular analysis may result in a number of different device properties being detected. The full set of possible device properties is subject to change, as new ones may be added as enhanced detection capabilities are added in new Approov versions. In some cases these may be added dynamically via security rules updates. Therefore the full set of device properties is not fixed, and you must use a command to retrieve the current set. This command also provides the currently selected security policy:
approov policy -get
This outputs the current setting as follows:
security policy is "default,allow-root,all" meaning:
  rules: default (Default security rules)
  rejection: allow-root (Accept rooted Android devices but reject emulators/simulators and Frida/Cydia/Cycript)
  annotation: default (No device properties provided)

device property flags:
  reject app-not-registered    App is not registered, which may indicate that it is fake or tampered
  ...

option flags:
  enabled  allow-debug         Allow debugging of the app (only do this for development purposes)
  ...
The output is in three parts:
-
Security Policy Summary: The first part of the output provides information about the security policy selected, including a description of the effect of each component of the policy. If you have set custom rejections or set custom options then the rejection policy is shown as
custom. Furthermore, If you have set custom annotations then the annotation policy is shown ascustom. -
Device Property Flags: The full set of device properties that are determined for each device then follows, with a short description for each. A
rejecttag is added to the output next to any device property that will cause a rejection if the property is detected. Thus you can see the impact of the chosen rejection policy at a fine grain level. A rejection causes a failed invalid Approov token to be returned. A device property may also be marked withannotatemeaning that this property will be included in theannoclaim of any Approov token if it is detected. -
Option Flags: The full set of options that you may enable that influences the policy. This allows you to opt in to particular behaviours or requirements, such as requiring a
Play IntegrityorAppAttestfrom every device. Aenabledtag is added to those options that have been selected.
Changing Security Policy
The security policy may be changed for the account using the following command:
approov policy -set default,allow-root-and-jailbroken,default
You will be asked for confirmation:
WARNING: updating the security policy will have an immediate impact on your apps in production
ATTENTION: If you wish to continue then please type YES and return: YES
This requires an admin role and confirmation. This particular command will change the security policy to allow rooted and jailbroken devices. The user must confirm the confirmation prompt in order to apply the new security policy.
If adding the new security policy is confirmed then it will have an effect on the account within 30 seconds. Care must be taken when making changes like this to a live account in case a new policy has a detrimental impact on legitimate users of your app.
Rejection Policies
The rejection policy is the second parameter in the comma separated list for setting a security policy. A number of preset options are available and the selection determines the set of device properties that cause a rejection of a fetch request. It is also possible to have custom rejection policies and we suggest using this if you have a more specific policy requirement.
The options are as follows:
| Policy | Description |
default
|
Reject all rooted/jailbroken devices, emulators, simulators, frameworks and cloned multiapps. |
initial
|
This is only provided for backward compatibility with older versions of Approov and should not be selected. It rejects all rooted/jailbroken devices, emulators, simulators, frameworks and cloned multiapps. This policy is identical to default, except it has the side effect of disabling any defences that might cause an app to crash if it is being debugged.
|
allow-cloned
|
Reject all rooted/jailbroken devices, emulators, simulators and frameworks. However, cloned apps running in multiapps are allowed. |
allow-xposed
|
Allow Android Xposed, but otherwise reject all rooted/jailbroken devices and emulators, simulators, other frameworks and cloned multiapps. This option is provided because for some markets Xposed is a popular modding framework for devices, without an intent to attack a given app. If an Android device is rooted without using Xposed, or if an active Xposed module is implicated in data stealing, then a rejection is made. |
allow-root
|
Accept rooted Android devices but reject emulators/simulators, cloned multiapps and Cydia/Cycript/Frida. Detected jailbroken iOS devices are rejected. |
allow-root-and-jailbroken
|
Accept rooted Android, iOS jailbroken devices, emulator/simulators, cloned multiapps but reject Cydia/Cycript/Frida. |
always-pass
|
A highly permissive policy that generates valid Approov tokens except when there is direct evidence of tampering in the Approov SDK. This generates valid tokens even if the app is not registered. This will typically only ever be applied to individual devices. Note this also has the side effect of disabling any defences that might cause an app to crash if it is being debugged. The app may need to be restarted to remove any already applied protection. |
always-fail
|
Always rejects, thus generating invalid Approov tokens. Typically this will only ever be applied to individual devices. |
Custom Rejection Policies
In addition to the preset rejection policies, it is also possible to use a customized rejection policy. The most applicable rejection policy should be used as the starting point, then it is possible to add or remove individual device properties to modify what will cause a rejection. If such modifications are made then the rejection policy will be automatically changed to custom. You can set a new security policy at any time, which will discard your custom policy and replace it with the preset policy you select.
Firstly get the current security policy as detailed in device properties. This shows the current reject status for each device property flag. To add a property to the set that cause a rejection, you can run a command similar to the following:
approov policy -addRejectFlag automated
Confirmation needs to be provided:
WARNING: updating the security policy will have an immediate impact on your apps in production
ATTENTION: If you wish to continue then please type YES and return: YES
This causes the device property flag automated to be added to the set that will cause a rejection. You can see the status by getting the security policy. Note you need an admin role and confirmation to perform this operation.
You can also remove a device property from the rejection set by using a command similar to the following:
approov policy -removeRejectFlag automated
Within 30 seconds the customized policy will be applied to new Approov fetches. Note that, if the app is already running then a new fetch will be necessary before the new policy is enforced (up to 5 minutes).
Note that you cannot apply custom rejection policies to custom devices, only the predefined ones.
Custom Option Policies
It is possible to set particular option flags that affect the implementation of particular rejection policies. This allows fine-grained opt-in to particular capabilities and requirements that are available in security policies. A full set of the available option flags is shown by getting the security policy.
If you make option flag modifications then the whole rejection policy will be changed to custom, so that the individual rejection policies can also be changed in a fine-grained manner.
To enable a particular option, you can run a command similar to the following:
approov policy -addOptionFlag crash-on-memdump
Confirmation needs to be provided:
WARNING: updating the security policy will have an immediate impact on your apps in production
ATTENTION: If you wish to continue then please type YES and return: YES
This causes the feature crash-on-memdump to be enabled (causing an Android app to crash immediately if a memory dump event is detected). You can see the status by getting the security policy. Note you need an admin role and confirmation to perform this operation.
You can also remove an option by using a command similar to the following:
approov policy -removeOptionFlag crash-on-memdump
Within 30 seconds the customized policy will be applied to new Approov fetches. Note that, if the app is already running then a new fetch will be necessary before the new policy is enforced (up to 5 minutes).
Note that you cannot apply custom option flags to custom devices.
Annotation Policies
The annotation policy is the third parameter in the comma separated list for setting a security policy. This determines what flags any anno claim in the Approov token may contain. These are a subset of the device property flags. This allows some ancilliary information to be present within the token. This is particularly useful where a valid Approov token is still being issued, but analysis has demonstrated some questionable aspects of the requesting device which may need to be analyzed by the backend API in conjunction with other information sources. It is also possible to have custom annotation policies and we suggest using this if you have a more specific requirement.
The following are valid options:
| Policy | Description |
default
|
No annotations are made. |
all
|
Indicates that all asserted Device Properties should be included in the Approov token. This annotation policy should never be enabled for the whole account, only for specific devices, since this information may provide an attacker with significant information about the reasons for any Approov rejection. If constant monitoring of these properties is required in the backend API then we suggest that JWE Approov tokens are used so that the content is encrypted. Note that alternative mechanisms are provided using an Attestation Response Code or Rejection Reasons. We recommend using one of these alternatives instead unless the results of the property checks are to be used as part of the request processing. |
Custom Annotation Policies
In addition to the preset annotation policies, it is also possible to use a customized annotation policy. You should start with the default annotation policy (which doesn’t include anything) and then add individual device properties that you wish to include in the anno claim. If such modifications are made then the annotation policy will be automatically changed to custom. You can set a new security policy at any time, which will discard your custom policy and replace it with the preset annotation policy you select.
You should be very selective with the device properties that you add. Typically you should not add properties that are marked as already causing a rejection. The mechanism is really intended for adding a small number of properties where you may wish your backend to perform some additional analysis or steps because they are present, even though they do not cause an outright rejection. For instance, you could choose not to reject rooted devices but could include this property in the Approov token to enforce some additional verification steps in the backend. If you are only including annotations for support purposes, and not automatic analysis, then you should consider using Attestation Response Codes instead.
To add a property to the set that are annotated, you can run a command similar to the following:
approov policy -addAnnotateFlag rooted
Confirmation needs to be provided:
WARNING: updating the security policy will have an immediate impact on your apps in production
ATTENTION: If you wish to continue then please type YES and return: YES
This causes the device property flag rooted to be added to the annotation set. You can see the status by getting the security policy. Note you need an admin role and confirmation to perform this operation.
You can also remove a device property from the annotation set by using a command similar to the following:
approov policy -removeAnnotateFlag rooted
Within 30 seconds the customized policy will be applied to new Approov fetches. Note that, if the app is already running then a new fetch will be necessary before the new policy is enforced (up to 5 minutes).
Note that you cannot apply custom annotation policies to custom devices, only the predefined ones.
Key IDs
It is possible to associate a key ID with all Approov tokens signed with the account secret key. You may arbitrarily choose the key ID as follows:
approov secret -setKeyID your-keyid
Once this is set then all issued JWS tokens will contain a kid field in the header with the value provided. The currently set value can be obtained with:
approov secret -getKeyID
Inclusion of a key ID can be removed with:
approov secret -clearKeyID
The addition of a key ID does not impact tokens issued for certain Approov managed domains, such as shapes.approov.io nor for domains using encrypted JWE tokens or tokens signed using a keyset key.
Managing Devices
Approov provides facilities to apply specific policies to particular devices that are being used. This affords flexibility in work practices during development, in continuous build systems, and to allow pentesting and analysis of an Approov protected app.
Extracting the Device ID
In order to modify the policy of a particular app installation, its ID must be extracted. There are several methods by which this extraction may be done.
-
Via the logging that is output by Approov when the SDK is first initialized, output with an
Approovtag. On Android this can be seen by viewing thelogcatoutput from the device. On iOS, you can look at the console output from the device using the Console app from MacOS. This provides console output for a connected simulator or physical device. Select the device and search forApproovto obtain specific logging related to Approov. Here is an example of the output (in this case from Android) with the device IDh4gubfCFzJu81j/U2BJsdg==shown at the end of the line.2021-05-20 13:56:57.789 29546-29546/com.criticalblue.demo I/Approov: test-account, com.criticalblue.demo, 2.6.0(5647), h4gubfCFzJu81j/U2BJsdg== -
Via extraction from an Approov token that has been generated on the device. A loggable token contains the device ID directly in the
didclaim. It can also be extracted from a raw Approov token using the command line tool, for example:approov token -check eyJhbGciOiJIUzI1NiIsInR5cCI6IkpXVCJ9.eyJkaWQiO…Which will output something like the following including the
didclaim value:failed: alg:HS256 payload: { "arc": "CHDCG4GHWJ", "did": "h4gubfCFzJu81j/U2BJsdg==", "exp": 1669924065, "ip": "1.2.3.4" }Use the value from the
didclaim, in this caseh4gubfCFzJu81j/U2BJsdg==. -
By calling the
getDeviceID()method on the SDK interface. This provides thebase64encoded string of the device which may be presented in some way within the app. -
By looking at the devices that have recently requested an Approov token using
approov device -getFetches timed. Note that if you are adding a custom device you can use the shorthandapproov device -add latestorapproov forcepass -addDevice latestto select any device that has made a request in the last two minutes, as long as it is the only device that has done so. -
By adding a device filter, perhaps using your IP address, and then analyzing filtered devices. From this you will be able to see the specific device ID that has been filtered.
Device ID Stability
To respect an individual’s right to privacy, both Apple and Google limit the ability to uniquely identify a device. The identifiers that are truly fixed for a device are hidden and device IDs are generated on-the-fly for new app installations. These, on-the-fly, platform generated device IDs are consistent for the same app but vary across iOS and Android as described below.
Approov device IDs are partly derived from the platform provided device ID, but also include information derived from the app identifier, so device IDs are really always just app installation IDs and cannot identify a particular physical device. If you are developing two different apps on the same physical device you will find that they will be allocated different device IDs. Moreover, any change to the package name of the app will also change the device ID.
The underlying identifiers used to derive the Approov device ID are as follows:
- iOS: The identifierForVendor is used. This ID remains constant per app vendor as long as there is one or more apps from the vendor installed. If all the apps are uninstalled then a new ID will be allocated. However, the ID can also change when installing test builds using Xcode or when installing an app on a device using ad-hoc distribution.
- Android: The ANDROID_ID is used. Since Android O, this is unique to an app installation and registered device user and is stable across app uninstalls and reinstalls. It will change if your app signing key changes or if the device user performs a factory reset.
Forcing a Device ID to Pass
A particular device ID may be extracted and then be forced to pass for development purposes. Where possible you should consider Auto Registration for this purpose, but there are cases (such as apps running on the iOS simulator) where this is not possible and this option should be used instead. Add the device ID with the command:
approov forcepass -addDevice h4gubfCFzJu81j/U2BJsdg==
The device ID is added to the set that will be forced to pass within 30 seconds. Note, if an app is already running, you will have to wait for a new attestation before a good token will be issued (up to 5 minutes by default). The default set size maximum is 100, and if this is exceeded then the device ID with the earliest addition time will be removed from the set to make room for the new entry.
If the device is the only one that has been used recently on your account you can use the latest shortcut, rather than having to specify the device ID explicitly.
approov forcepass -addDevice latest
Although, you should note that, the device must have performed a fetch in the last two minutes, and must be the only device doing so in that time. This option cannot be used reliably once you have your app in production where there may be a large number of end user Approov fetches in the 2 minute period.
The full list of devices in the forced to pass set can be shown with:
approov forcepass -listDevices
These are listed in time order, so the device most recently added or updated is shown last:
h4gubfCFzJu81j/U2BJsdg== 2023-11-21 11:56:11
Finally a particular device may be removed from the set as follows:
approov forcepass -removeDevice h4gubfCFzJu81j/U2BJsdg==
Forcing a Device ID to Fail
A particular device ID may be extracted and then be forced to fail. You might want to do this to ban some particular device from passing attestation; it will never receive valid Approov tokens or be able to read secure strings. Add the device ID as follows:
approov forcefail -addDevice h4gubfCFzJu81j/U2BJsdg==
The device ID is added to the set that will be forced to fail within 30 seconds. Note, if an app is already running, you will have to wait for a new attestation before a good token will be issued (up to 5 minutes by default). The default set size maximum is 100, and if this is exceeded then the device ID with the earliest addition time will be removed from the set to make room for the new entry.
The full list of devices in the forced to fail set can be shown with:
approov forcefail -listDevices
These are listed in time order, so the device most recently added or updated is shown last:
h4gubfCFzJu81j/U2BJsdg== 2023-11-21 11:56:11
Finally a particular device may be removed from the set as follows:
approov forcefail -removeDevice h4gubfCFzJu81j/U2BJsdg==
If a particular device ID is marked to both fail and to pass, the pass will take priority.
The forced failure is only related to the particular device ID. On iOS in particular, if the app containing the Approov SDK is uninstalled and reinstalled again it may be allocated a different device ID. In order to combat this on iOS the DeviceCheck Integration can be used to provide a permanent ban of a physical device, unrelated to the device ID being used.
Adding a Device Security Policy
A specific security policy may be assigned to a device whose ID has been extracted as follows:
approov device -add h4gubfCFzJu81j/U2BJsdg== -policy default,always-pass,all
This causes the given device to have the particular policy applied without applying it to the rest of the account. This change should be actioned for new Approov token requests within 30 seconds. Remember though that if your app is already running on the device and has fetched a token then it might not need to fetch a new one for up to 5 minutes, in which case the revised policy will only be apparent when that new fetch occurs.
The example rejection policy of always-pass is a common one for development and has a similar impact to forcing a Device ID to pass but has more flexibility in terms of being able to apply a specific security policy or various other options. The maximum number of devices with custom policies is more limited (25 by default). Please contact Approov support if you need this limit to be increased. See Enabled Features and Limits for how to view the limit configured in your account.
If the device is the only one that has been used recently on your account you can use the latest shortcut, rather than having to specify the device ID explicitly.
approov device -add latest -policy default,always-pass,all
Although, you should note that, the device must have performed a fetch in the last two minutes, and must be the only device doing so in that time. This option cannot be used reliably once you have your app in production where there may be a large number of end user Approov fetches in the 2 minute period.
There is a maximum of 25 devices that may be added to an account at one time.
If you don’t specify the -policy option when adding a device it will inherit the overall security policy that has been set. Note though you cannot do this if you have set a custom rejection or annotation policy.
Labelling a Device
When adding a device it is also possible to set a label for it to make it easier to remember what device it is:
approov device -add h4gubfCFzJu81j/U2BJsdg== -policy default,always-fail,default -label bobs-iPhone7
This label will then be shown when you list the devices. Note that if you wish to include spaces in the label then you must surround it with quotes. This example uses the rejection policy always-fail to ensure the device never receives a valid Approov token. This may be useful for testing.
Setting Pinning Mode
It is also possible to set the pinning mode for a particular device. This changes the way pins are handled for the device and can cause a new dynamic configuration to be downloaded to the app. This command removes all pinning or restrictions for managed trust roots for the app, by causing an empty set of pins to be transmitted as the dynamic configuration:
approov device -add h4gubfCFzJu81j/U2BJsdg== -pinMode unpin
This has the further impact of sending a special dynamic configuration update to the app on the particular device that has all the certificate public key pins removed. This causes all pinning (and any managed trust roots) protection to be removed from the app, allowing a proxy (such as Charles Proxy or MITM Proxy) to be used to intercept traffic between the app and the API endpoints. This can be useful for debug or pentesting. Note that some apps may require a relaunch to unpin after receiving the update if they are not written to be immediately reactive to pinning changes.
Other options may be provided for the pinning mode as follows:
block: This transmits a fixed but invalid pin in the dynamic configuration for all domains that have had pins added. This will force the app to experience a pinning failure in the same way it would if the API endpoint’s certificates had changed. This can be used for testing what happens in the app when such a certificate mismatch occurs.blockAll: This works likeblockbut it also causes the Approov channel to detect a MITM. This simulates what happens if all TLS traffic is being intercepted. In this case any Approov fetch (that is unable to use a cached result) will receive aMITM_DETECTEDerror.pin: This is the default and using this option resets the device to the default pinning configuration for the account.
Note that since no security policy is explicitly set, the device is assigned the current security policy for the account. You may also set an explicit security policy for the device in the same command.
Listing Your Devices
A full list of devices that have had a special override security status can be obtained with:
approov device -list
This produces a list, for example:
1 device:
 h4gubfCFzJu81j/U2BJsdg== default,always-pass,all  unpin  A N Other
It shows the device ID, the security policy currently being applied and any pinning mode that has been set (or pin by default).
The name of the user that added the device is also provided. If a device label has been set then this is also shown. This makes it easier to determine the user of a particular device.
If the device was added by a user with the pentest role then this is also shown as an attribute on the device. A user with the pentest role is only able to see or modify devices that have been added using that role, so that they are not able to determine the device IDs being used for development.
Removing Devices
A particular device can be removed as follows:
approov device -remove h4gubfCFzJu81j/U2BJsdg==
The standard account policy will be applied to the device within 30 seconds for new Approov fetches. Note that, if the app is already running then a new fetch will be necessary before the new policy is enforced (up to 5 minutes).
Device removal is not restricted to the user that added the device.
Removing Multiple Devices
Sometimes it is desirable to be able to remove multiple devices with a single command. For instance, if we perform:
approov device -list
We will get a list like the following:
3 devices:
 h4gubfCFzJu81j/U2BJsdg== default,always-pass,all  unpin  A N Other
 VI2c+UugQ6L7v0wkovXOSg== default,always-pass,all  pin  A N Other
 iDpOemiTdame9qvAQF4w/g== default,always-pass,all  pin  Me
You can issue a command to remove all devices associated with the user name A N Other as follows:
approov device -removeMatching "A N Other"
You will be asked for confirmation for the operation:
2 matched devices:
 h4gubfCFzJu81j/U2BJsdg== default,always-pass,all  unpin  A N Other
 VI2c+UugQ6L7v0wkovXOSg== default,always-pass,all  pin  A N Other
WARNING: are you sure you wish to remove these devices
ATTENTION: If you wish to continue then please type YES and return: YES
removed h4gubfCFzJu81j/U2BJsdg==
removed VI2c+UugQ6L7v0wkovXOSg==
You must specify the name in quotes if it contains any spaces. The matching devices will be listed and you will be asked for confirmation.
Note that the provided string also matches against any label that has been provided.
Clearing All Device State
It is possible to clear the persisted state of all devices in the account. If you are using DeviceCheck Integration, AppAttest or Play Integrity integrations then the previous results of these fetches will be erased and devices will be forced to perform the checks again next time they connect to the Approov service.
You can clear the state as follows:
approov device -clearDeviceState
You need an admin role and confirmation to perform this operation and pay careful attention to the warnings before confirming:
WARNING: clearing device state will require all app installs to redo any DeviceCheck/AppAttest/PlayIntegrity checks
WARNING: consider PlayIntegrity API quota limits as all devices will need to reattest after clearing
WARNING: this will have an immediate impact on your apps in production
ATTENTION: If you wish to continue then please type YES and return: YES
successfully cleared all device state
If you are using Play Integrity and you clear the device state, this means that new attestations will be required for all devices as they perform their first Approov fetch after the reset and this may exceed the Play Integrity API quota you have in place.
Note that clearing the device state will have no impact on your billing or the calculation of hourly, daily or monthly active devices. However, it will impact the derivation of the new-install flag so existing app installations will be considered to be new the next time they fetch an Approov token.
If you are using require-devicecheck, require-appattest or require-playintegrity option flags then you should consider clearing them before using this command. This is because the record of these checks will be cleared, and Approov attestation fails if they have not been completed. However, the checks cannot be performed again until the app is relaunched. Do not enable the option flags again for several days to provide ample opportunity for the apps to have been restarted.
If you have a very large app user base and are using AppAttest/PlayIntegrity then you might want to consider AppAttest Rate Limiting or Play Integrity Rate Limiting before using this option to prevent throttling by Apple or Google servers. This is because all subsequent new app launches by apps will attempt to perform an attestation and create a request to the Apple servers.
Device Filters
This section covers the optional device filtering feature in Approov.
Filtering Purpose
Facilities are provided to obtain detailed information about the attributes of devices. Filters may then be defined and checked against all devices attempting to fetch Approov tokens. These filters can match against specific device attributes.
When a filter matches then this is shown in a special graph within the Live Metrics. This allows an appreciation of the timing and prevalence of particular attributes to be known. This can be useful for understanding the population of devices that are using your Approov account. Moreover, these facilities may be used for understanding any suspicious behavior and/or by Approov support staff understanding any irregularities in the operation of apps using your account.
Options are provided to ban particular devices with specific characteristics, and even to apply special security policies to matching devices. This may be used by Approov support staff to run customized security rules that are able to gather more detailed telemetry from specific devices for analysis.
Getting Specific Device Information
It is possible to obtain more detailed device information for any device that has had a device specific security policy added. At least one Approov fetch must be performed to collect the information (remembering that a previously fetched Approov token may take up to 5 minutes to expire before the app needs to fetch a new one, if it is not restarted).
Once this is done the information can be obtained as follows, by specifying the device ID:
approov device -getInfo qZka0yfv+ExvOq3PRh6pGw==
The information most recently collected is shown, along with the local time of its capture:
captured: 2020-07-23 11:51:26 BST
rejection-flags: app-not-registered
public-flags: app-not-registered,rooted,root-risk,xposed
ip: 1.2.3.4
device-id: qZka0yfv+ExvOq3PRh6pGw==
device: Android 8.1.0, Nexus 5X, google, bullhead, en
archid: arm64-v8a
device-props: {'Model':'Nexus 5X','Fingerprint':'google/bullhead/bullhead:8.1.0/OPM6.171019.030.E1/4805388:user/release-keys'}
sdkid: 4000
sdk-version: 2.4.0
app-name: Approov OkHttp Shapes
app-version: 3.0(3)
appid: com.criticalblue.demo
app-id-sig: NhVaAEGs3U6fLObhZAIdRh71wVF7kSOL0aAMv+e5TvU=
app-sig: tL8CNNpf4XlekWkwuyJaCRtcntJyjZ1ujYJ7CZMO+Fk=
attest-reason: launch
The information consists of a series of <key>:<value> attributes as detailed in Specific Device Information.
The individual device information is collected and held by the Approov servers on a best effort basis. The information may be cleared from time to time so you should save it in a local file if you wish to keep it more permanently.
Specific Device Information
This details the information that may be made available for a specific device. The exact set of information may vary over time and also between iOS and Android.
| Key | Description |
app-id-sig
|
On Android this provides the overall identity signature used when registering an App Bundle or APK signed by Google Play signing (as the raw app signature may change depending on the app delivered to an individual device). |
app-name
|
The public name of the app. |
app-sig
|
The signature of the app that is running. |
app-version
|
The version of the app. |
appattest-risk-metric
|
Only shown on iOS if the AppAttest feature is enabled, showing the captured Fraud Risk from the device. |
appid
|
The unique package name of the app. |
archid
|
Processor architecture type. |
arcprefix
|
First 5 digits of the Attestation Response Code to assist in correlating this information with a specific Approov token. |
attest-reason
|
The reason for performing an Approov token fetch. |
boot-hash
|
This is only available on Android when using hardware based key attestation. This is a base64 encoded digest of all data protected by the device's verified boot process. |
boot-key
|
This is only available on Android when using hardware based key attestation. It is a base64 encoded secure hash of the public key used to verify the integrity and authenticity of all code that executes during device boot up as part of the device's verified boot process. |
custom-claim
|
Provides the base64 encoded 256-bit hash of a binding value if Token Binding is used. |
device
|
Information about the particular model of the device. |
device-id
|
The 128-bit base64 encoded device ID. |
device-props
|
Provides more detailed information about the particular model and OS build of a device (although it does not uniquely identify an individual device). |
install-pubkey
|
If the SDK version supports this, then this provides the installation public key. This is a base64 DER encoded ASN.1 EC key. |
ip
|
The IP address of the client, independently of the IP Tracking Policy that has been selected. Although, you should note that, the IP addresses are only held in the memory of the Approov cloud servers and are never committed to any file storage. |
playintegrity-app
|
Only shown on Android if the Play Integrity feature is enabled, providing any app integrity verdict obtained. |
playintegrity-certs
|
Only shown on Android if the Play Integrity feature is enabled, providing the fingerprints of any SHA256 hashes of certificates used to sign the app. |
playintegrity-device
|
Only shown on Android if the Play Integrity feature is enabled, providing any device integrity verdicts obtained. |
playintegrity-licensing
|
Only shown on Android if the Play Integrity feature is enabled, providing any app licensing verdict obtained. |
probe-result
|
Only shown if the Certificate Pins From a Device feature is used to extract the certificate chain for a URL from the perspective of an individual device. |
public-flags
|
The full set of device property flags that have been collected, comma separated. |
rejection-flags
|
Set of device property flags that have been collected and are causing the device to fail attestation, comma separated. If this key is not present then the device was passed. |
sdk-version
|
The version of the SDK being used. |
sdkid
|
The particular library ID of the SDK being used. |
system-hash
|
Base64 encoded 256-bit hash of the executable system image that identifies a particular build of a device. |
user-property
|
Optional for the user property that may be set in the SDK. This is normally used to identify which particular quickstart variant is being used. |
Analyzing New App Installs
Information for new devices (i.e. device IDs that have not previously been seen) is collected automatically. It can be obtained by using new-install as the parameter for -getInfo:
approov device -getInfo new-install
A stream of information for the most recent app installs is provided, with a separator providing the ID and the local capture time.
--- w4mmGFZkpz5oPz6w6gl1Cw== 2020-07-23 12:10:43 BST ---
rejection-flags: app-not-registered
public-flags: app-not-registered,jailbroken,devicecheck-unavailable
ip: 1.2.3.4
device-id: w4mmGFZkpz5oPz6w6gl1Cw==
device: iOS, 12.1.2, iPhone7,2, en_ES
archid: arm64
sdkid: 4505
sdk-version: 2.4.0
app-name: Approov Shapes
app-version: 1.0
appid: ios.swift.shapes.demo.approov.io
app-sig: DRJNqt37tsdHwb9FKFT80dPqXlOHqZnZy68zAiVSsvM=
attest-reason: expiry
The new device information is collected and held by the Approov servers on a best effort basis. Only the information for the last 100 new devices is held and earlier entries are discarded. Note also that the information may be cleared from time to time so you should save it in a local file if you wish to keep it more permanently.
If you wish to obtain information for all new app installs then the following short bash script can be used. This appends to the approov-new-install.txt file any new devices on a per-minute basis. This ensures that, unless there are more than 100 new devices per minute, all the new device information will be captured.
#!/bin/bash

while true; do
  echo "getting new devices"
  approov device -getInfo new-install -clear >> approov-new-install.txt
  sleep 1m
done
The use of the -clear option ensures that prior data is cleared on each call so there is no duplicate information in the generated file. Note that this approach cannot be used by more than one user at a time.
Adding a Device Filter
A device filter may created that checks the attributes of every device fetching an Approov token to determine if it has a particular attribute. For instance:
approov filter -add ipmatch -key ip -matchValue 1.2.3.4
This adds a new filter called ipmatch. This name is used to reference the filter and also appears in the Live: Mobile App Attestations Grafana dashboard if the filter is matched. The name is restricted to a maximum of 20 characters of lower case alphanumerics and the - sign only. If a filter name is reused then the previous settings are overridden.
The -key option determines the particular key in the information to be checked against, ip in this case. If the key is not present then the match never occurs. The -matchValue specifies the specific text for the value for the match to occur. In this case the match is for any device using the IP address 1.2.3.4. (This initial form requires an exact verbatim match, to have a single filter with more general matching semantics, see the section on Regular Expression Filtering.). See Specific Device Information for a full list of the keys that may be used and their meanings.
With the default options the only impact is to show the match in the Live: Mobile App Attestations Grafana dashboard.
Filtering may be restricted to only new devices by using the -newInstallOnly flag:
approov filter -add special-app-sig -key app-sig -matchValue DRJNqt37tsdHwb9FKFT80dPqXlOHqZnZy68zAiVSsvM= -newInstallOnly
In this case the matching is looking for a particular app signature amongst device IDs that attest for the first time.
A maximum of 25 filters may be defined at any one time.
Analyzing Filtered Devices
It is possible to capture full device information for any device that matches a filter. To enable this you must use the -captureDeviceInfo flag on the added filter, for example:
approov filter -add ipmatch -key ip -matchValue 1.2.3.4 -captureDeviceInfo
Information for any device that matches the ipmatch filter is then collected. The information can be obtained by using filtered as the parameter for -getInfo:
approov device -getInfo filtered
A stream of information for the most recent filter matches is provided, with a separator providing the ID and the local capture time:
--- w4mmGFZkpz5oPz6w6gl1Cw== 2020-07-23 12:10:43 BST ---
matched-filters: ipmatch
flags-all: app-not-registered,jailbroken,devicecheck-unavailable
ip: 1.2.3.4
device-id: w4mmGFZkpz5oPz6w6gl1Cw==
device: iOS, 12.1.2, iPhone7,2, en_ES
archid: arm64
sdkid: 4505
sdk-version: 2.4.0
app-name: Approov Shapes
app-version: 1.0
appid: ios.swift.shapes.demo.approov.io
app-sig: DRJNqt37tsdHwb9FKFT80dPqXlOHqZnZy68zAiVSsvM=
attest-reason: expiry
Note that the first property shown is matched-filters which lists all of the filters that were matched by the device.
The device filtering information is collected and held by the Approov servers on a best effort basis. Only the information for the last 100 new devices is held and earlier entries are discarded. Note also that the information may be cleared from time to time so you should save it in a local file if you wish to keep it more permanently.
If you wish to obtain information for all filtered devices then the following short bash script can be used. This appends to the approov-filtered.txt file any filtered devices on a per-minute basis. This ensures that, unless there are more than 100 filtered devices per minute, all the information will be captured.
#!/bin/bash

while true; do
  echo "getting filtered devices"
  approov device -getInfo filtered -clear >> approov-filtered.txt
  sleep 1m
done
The use of the -clear option ensures that prior data is cleared on each call so there is no duplicated information.
Regular Expression Filtering
Normally when a filter -matchValue is specified it must be an exact verbatim match for the specified key’s value. However, it is also possible to do Regular expression matching if the -regex option is used. For example:
approov filter -add android7 -key device -matchValue "Android 7" -regex
This creates a filter that checks for the substring Android 7 in the device property. By default a specified regular expression performs a substring match. However, the full power of regular expressions may be used. There is a useful interactive tool here for constructing regular expressions.
Regular expression filtering can be particularly useful for checking if a device has particular properties in the flags-all device information key. Simply specify the required flag name with -regex and this will do a substring match to check if the flag is set, regardless of other flags (being careful to make sure the flag name is not itself a substring of some other flag name).
Conjunction Filters
It is possible to create a filter that is only matched if a set of other filters all match. This allows the creation of more complex conditions that require matches across multiple different device information keys.
For instance, if you have previously setup a filter called android7 and another one called ipmatch, then you create a new filter that is the conjunction of these two as follows:
approov filter -add both-matched -conjunction android7+ipmatch
This new filter will only match if both the input filters are matched on the same device. You specify the set of input filters using a + separated list provided to the command. Note that these inputs must be ordinary filters and not conjunction filters themselves.
When you first add a conjunction filter a check is made that the input filters are present. However, if these are subsequently removed then the conjunction filter will never match since all inputs must be present for a match to occur.
Listing Device Filters
All currently set filters can be shown as follows:
approov filter -list
The list of options associated with the filter are shown on the right hand side of the filter listing:
2 filters:
 ipmatch          ip: 1.2.3.4
 special-app-sig  app-sig: DRJNqt37tsdHwb9FKFT80dPqXlOHqZnZy68zAiVSsvM=  newDIDOnly
Removing a Device Filter
Any named filter can be removed as follows:
approov filter -remove special-app-sig
If you remove a filter that is an input to a conjunction filter, then it will never match until the input filter is replaced,
Rejecting Filtered Devices
A -reject option is provided so that any device which matches is automatically rejected, and will not receive a valid Approov token. For example:
approov filter -add ipmatch -key ip -matchValue 1.2.3.4 -reject
This requires confirmation:
WARNING: using the ban or reject option will have an immediate impact on your apps in production
ATTENTION: If you wish to continue then please type YES and return: YES
successfully set filter ipmatch
This rejects any device that attempts to fetch an Approov token from the IP address 1.2.3.4.
You should be especially careful when using this option as it is available with dev role privileges. If a match is used that covers too many devices then this could cause large numbers of app users to be rejected. Always test the match without reject first and examine the metrics to determine the prevalence of the match.
Banning Filtered App Installs
A -ban option is provided so that any app installation which matches is automatically banned. For example:
approov filter -add ipmatch -key ip -matchValue 1.2.3.4 -ban
This requires confirmation:
WARNING: using the ban or reject option will have an immediate impact on your apps in production
ATTENTION: If you wish to continue then please type YES and return: YES
successfully set filter ipmatch
This bans any device ID that attempts to fetch an Approov token from the IP address 1.2.3.4.
Note that any such ban will be associated with the app installation and it will continue to be banned even if the filter is subsequently removed.
You should be especially careful when using this option as it is available with dev role privileges. If a match is used that covers too many devices then this could cause large numbers of app users to be rejected. Always test the match without banning first and examine the metrics to determine the prevalence of the match.
Marking Filtered Devices as Risky
A -risky option is provided so that matching devices are automatically marked as risky, for example:
approov filter -add ipmatch -key ip -matchValue 1.2.3.4 -risky
This means any request from IP address 1.2.3.4 will have the risky-device flag asserted.
The impact of this is two-fold:
- The device will be issued Approov tokens that have a 2 -minute lifetime rather than the usual 5.
- If the
riskAnnotation Policy is set then this means that therisky-deviceflag will be set. This enables backend systems to observe this annotation and potentially perform different actions for the device.
Custom Filtered Security Policy
It is possible to use the special device ID value ++FilteredSecPolicy++w== to provide a security policy that is applied to any device which matches specific filters. Firstly add this pseudo device ID as follows:
approov device -add ++FilteredSecPolicy++w== -policy alt-rules,default,default
For the filtered policy to have an effect, you should not use the same security rules setting as the default for your account. Note though that it is not possible to set custom rejection or annotation rules. The example alt-rules shown above will not work (there are no such rules). Normally this feature is used in conjunction with Approov support staff for more detailed analysis of specific activity on your account and so you should really contact Approov support if you wish to use this feature.
You are not able to use the -pinMode option on this special device ID but the -probeURL value is applied.
In order to enable this behavior for a particular filter you must use the -execFilteredSecPolicy option, for example.
approov filter -add ipmatch -key ip -matchValue 1.2.3.4 -execFilteredSecPolicy
This causes any request from IP address 1.2.3.4 to execute the custom filtered security policy.
It is also possible to make a certain percentage of all devices execute the special filtered security policy, instead of the standard one for the account. You can simply set the percentage as follows:
approov filter -setSamplingPercentage 0.1
An admin role and confirmation is required to make this change:
WARNING: using sampling will have an immediate impact on your apps in production
ATTENTION: If you wish to continue then please type YES and return: YES
successfully set sampling percentage
This sets the sampling percentage to 0.1%. This means that 0.1% of all devices will execute the special filtered security policy rather than the standard account security policy. This determination is made on the basis of the device ID so that the same device will either be subject to the special policy or not. However, the selections change on each day so the sampling moves across the device population. Note that the maximum that may be specified is 5%.
You can always see the current setting with:
approov filter -getSamplingPercentage
Adding this special security policy causes a very small addition to the latency of Approov fetches, independently of the number of devices that use it. Thus we suggest you only leave this special policy added for as long as you need to use it.
Observing All Fetching Devices
A record is kept of the device IDs of any apps that are fetching Approov tokens. This is held in time order, with an optional timestamp. It can be obtained with:
approov device -getFetches timed
Which provides a list of the fetches like this:
qZka0yfv+ExvOq3PRh6pGw== 2020-07-23 12:10:45 BST
qZka0yfv+ExvOq3PRh6pGw== 2020-07-23 16:27:12 BST
w4mmGFZkpz5oPz6w6gl1Cw== 2020-07-23 16:27:20 BST
This is useful for analysis of the device IDs that are using the account, and perhaps frequency of use analysis to determine if particular device IDs are responsible for a high use of the account. These devices can then be added as custom devices for more detailed analysis if required. The parameter timed indicates that timestamps should be included.
The fetching device ID information is collected and held by the Approov servers on a best effort basis. Only the information for the last 1000 requests is held and earlier entries are discarded. Note also that the information may be cleared from time to time so you should save it in a local file if you wish to keep it more permanently.
A simple script such as the following can be used to collect this information into the local file approov-fetches.txt:
#!/bin/bash

while true; do
  echo "getting latest fetches"
  approov device -getFetches untimed -clear >> approov-fetches.txt
  sleep 1m
done
This simply captures the latest untimed information every minute and uses the -clear option to discard the obtained information so that it is not duplicated in the resultant file.
Analyzing Captured Streams
Information collected regarding fetches or the attributes of particular devices can be easily manipulated using standard commands. For instance, imagine we have captured approov-fetches.txt showing two different devices using the account as follows:
qZka0yfv+ExvOq3PRh6pGw==
w4mmGFZkpz5oPz6w6gl1Cw==
w4mmGFZkpz5oPz6w6gl1Cw==
w4mmGFZkpz5oPz6w6gl1Cw==
w4mmGFZkpz5oPz6w6gl1Cw==
qZka0yfv+ExvOq3PRh6pGw==
qZka0yfv+ExvOq3PRh6pGw==
w4mmGFZkpz5oPz6w6gl1Cw==
w4mmGFZkpz5oPz6w6gl1Cw==
We can easily count the number of occurrences of each device ID as follows:
sort approov-fetches.txt | uniq -c
Which will output the device IDs and their frequencies as follows:
      3 qZka0yfv+ExvOq3PRh6pGw==
      6 w4mmGFZkpz5oPz6w6gl1Cw==
We can use this technique to analyze the frequency of use by certain device IDs or the frequency of occurrence of particular device attributes. This method can be used to identify commonly occurring device attributes, which can then be used in further searches in the original file to find the full context of each interesting match.
Note that this output can of course itself be piped to a file, such as output.txt. You can then show the most commonly occurring repeats as follows:
sort -h -r output.txt | less
The -h and -r options cause the most frequently occurring lines to be shown first.
Token Binding
This section covers the optional token binding feature in Approov.
If you are able to use one of our Mobile App Quickstarts then these typically include support for token binding, by specifying a particular http header that holds the source data for the hash. Similarly, the Backend API Quickstarts are able to extract the same information from the header and verify that the correct token binding is included in the Approov token.
Token Binding Concept
Token binding extends the security of the Approov token through a strength in depth approach. The mechanism ties an arbitrary string to an Approov token by including its hash in one of the claims. The facility is intended for long lived data, such as an OAuth token or a user session identifier, that can be used to uniquely identify a user. The data is supplied to the Approov SDK as an ASCII encoded string. The SDK takes the string and calculates its SHA256 hash. This is then provided inside the Approov token in the pay claim as a base64 encoded string.
If the binding data changes then this invalidates all currently cached Approov tokens and new ones are requested on the next fetch. Thus it is important not to use rapidly changing data for binding. Ideally long lived user session tokens should be used that will likely not change during normal app usage.
Note that the hashing of the data sent in the pay claim is always done in the SDK itself. Only the SHA256 hash of the data is sent to the Approov cloud service, so there is no need to be concerned about additional Personal Identifiable Information (PII) being sent to the Approov cloud service.
Setting the Binding
The data value may be explicitly set using the setDataHashInToken method in the SDK or frontend quickstart. Normally though the Mobile App Quickstarts will set the value automatically based on values provided in a binding header. If necessary, most integrations also provide a method to set the value explicitly.
When the data value is set the SHA256 hash of it is calculated and compared against any current value that is held. If the value is different, then any cached Approov token is cleared. Any subsequent Approov fetch call will obtain a new Approov token. The maximum rate at which new tokens can be fetched may be rate limited to prevent excessive usage if the binding data is modified and fetching performed in a tight loop.
The data binding is held in the pay claim of the generated Approov token. The same value is retained in all subsequently generated Approov tokens until it is changed with another setDataHashInToken call.
Note that once a pay claim has been added it is not possible to remove its inclusion in the running app, only change its value.
Generating Example Token with Binding
The example token generation also supports the ability to generate a token with a pay claim. This can be used to test backend integrations that must perform the same hashing calculation to compare the claim. For example we can use:
approov token -genExample your.domain -setDataHashInToken custom-data
You can decode the generated Approov token string as follows:
approov token -check eyJhbGciOiJIUzI1NiIsInR5cCI6IkpXVCJ9.eyJl…
This shows the pay claim hash derived from the string custom-data:
payload: {
  "did": "ExampleApproovTokenDID==",
  "exp": 1558640470,
  "ip": "1.2.3.4",
  "pay": "tih+xRFV8PMsDhKthuFdvqWtQpKdT+K8X5W3258EJnU="
}
Application Installation Attributes
Application installation attributes allow arbitrary attributes to be set for a particular app installation. These attributes are stored securely in the app installation and are included in all subsequent Approov tokens fetched by the installation, in the embed claim. The attributes may be arbitrary formed JSON set by your backend application.
When an app is first installed it will not have any of these embedded attributes. The idea is that these should be added by your backend application as more data is gathered about the app installation, and the user of that app. For instance, this mechanism can be used to mark that an app installation has completed particular security gates after initial installation to demonstrate the veracity of the installation and the user. The backend application can determine the current state by reading the embedded claim in the Approov token.
New installation attributes are added via a call made by the app to the Approov SDK. The information is then transmitted to the Approov servers for validation, and if it is accepted it is strongly protected against any tampering. Thus your backend application can trust the embedded attributes presented in the Approov token.
In order to make the system secure, although the data is set inside the app, it must actually be signed by your backend systems. To achieve this the installation attributes are actually provided as the payload of a signed JWT. These JWTs are also given expiry times and are also bound to particular device IDs. It is only if the token is correctly signed and meets all other requirements that the installation attributes are accepted. Thus such attributes can never be spoofed by the mobile application alone.
The keys used to sign and verify installation attributes tokens are managed by Approov. In order to cleanly handle key rotation, and to support various different key signing algorithms, Approov is able to manage a number of different installation token signing keys. A token may be signed by any one of these.
A maximum size is imposed for installation attributes tokens of 2KB. This means that the maximum size of the attributes payload will be somewhat smaller than this, depending on the signature size for the JWT. Attempts to set a token larger than this will generate an error.
Application installation attributes can only be set in 3.4.0 and later SDKs.
The information in the installation attributes token must be sent to the Approov servers for it to be verified, and for its payload data to be persisted in the device state and included in subsequently issued Approov tokens. Note that the Approov services only hold this data temporarily and no long term copy of the data is made. You must consider this with respect to Personal Identifiable Information (PII) compliance. It is typically best if the installation attributes do not directly identify individual users, but only provides hashes of such data or confirmations that certainly security checks have been completed.
Setting Installation Attributes
In order to set installation attributes it is necessary to create a signed JSON Web Token containing a payload of the installation attributes. This token must be signed on your backend systems and then sent to the running mobile app. Since the signing is done server side the key material is never exposed to mobile apps, so it is not possible for such attributes to be forged by a client side attack.
The JWT has the following requirements:
- The JWT header must contain a
kidclaim with the name of the signing key that is being used. This must correspond to an active installation attributes key in Approov. Thealgfield must also be consistent with the key signing type. - The payload must contain an
expclaim providing an expiry for the token. You may set any value for this that you wish, but we suggest that lifetimes should be restricted to 5 minutes or less. The token only needs to be active long enough to be transmitted from your servers back to the app, and then on to the Approov servers for verification. - The payload should also contain a
didclaim providing the base64 encoded device ID to which the token is being issued. This should be identical to thedidfield in the Approov token received. This provides an additional level of security to ensure attributes can only be applied to the correct app installation.
There are various JWT Libraries available for signing tokens. Please contact Approov support if you need any assistance in creating valid tokens. We anticipate that in the future we will also expand our backend API integrations with additional specific information about installation attribute token creation.
Once the token is signed it can be transmitted to the app as part of a request response. Inside the app, the installation attributes token may be set using the setInstallAttrsInToken method in the SDK. It is necessary to make another Approov token fetch to ensure that this information has been transmitted to the Approov server. Typically though the Mobile App Quickstarts will also provide a way to call this method and will also ensure that a new Approov token is fetch immediately to ensure that the data has been communicated correctly.
The installation attributes are then available in the embed claim of the generated Approov token. The same value is retained in all subsequently generated Approov tokens until it is changed with another setInstallAttrsInToken call.
Your backend may then use the embed claim as reliable information that has been supplied to a particular app installation. If the app is uninstalled then this information will be lost.
To assist your development, the Approov CLI includes commands to generate example installation attributes tokens for your testing. There is also an option to verify tokens that you have created to ensure that they meet the requirements.
Note that once a embed claim has been added it is not possible to remove its inclusion completely from the running app, only change its value with a new valid installation attributes token.
Adding a New Installation Key
A new, randomly generated, installation attributes token signing key can be added as follows. You must specify the name which you wish to give the key and the algorithm used for signing as follows:
approov installattrs -kid your-key -add ES256
In this case a new key named your-key is generated for use with the ES256 signing algorithm. A random ECC private key is generated by Approov and added to your account.
The following signing algorithm are available:
HS256,HS384,HS512: These HMAC signing methods use a symmetric key, with differing hashing algorithms.RS256,RS384,RS512: These useRSASSA-PKCS1-v1_5asymmetric cryptography, with differing hashing algorithms.PS256,PS384,PS512: These useRSASSA-PSSasymmetric cryptography, with differing hashing algorithms.ES256,ES384,ES512: These useECDSAasymmetric cryptography, with differing hashing algorithms.ES256uses curveP-256(secp256r1),ES384usesP-384(secp384r1), andES512usesP-521(secp521r1).
This article provides a good overview of the different options.
It is also possible to specify a key length override parameter when specifying an algorithm that uses RSA (RS256, RS384, RS512, PS256, PS384, PS512) or symmetric keys (HS256, HS384, HS512).
approov installattrs -add RS256 -kid your-key -keyLength 4096
The default length for an RSA key is 2048 bits, but it may be overridden to 1024 or 4096 bits. The default length for a symmetric key is 256 bits, but may be overridden to 128 or 512 bits.
It is only possible to have a maximum of 5 application installation keys at any one time.
Listing Installation Keys
The current keys that are valid for application attributes tokens are listed as follows:
approov installattrs -list
The key ID is shown alongside the algorithm associated with each key.
1 key:
 your-key  alg:ES256
Removing Installation Keys
An installation attributes key can be removed as follows:
approov installattrs -kid your-key -remove
Note that you need an admin role to remove a key and you will need to provide confirmation. Any installation attributes tokens signed with the removed key will no longer be accepted.
Getting Private Installation Key PEM
It is possible to obtain the PEM file for a specific private key. Obtain the PEM as follows:
approov installattrs -kid your-key -getPEM your-key.pem
The contents of the your-key.pem file will be something like the following:
-----BEGIN PRIVATE KEY-----
MIGfMA0GCSqGSIb3DQEBAQU...
-----END PRIVATE KEY-----
Various languages may support this format to define the private key that you are going to use in your backend to create installation attributes tokens. It is only possible to obtain a PEM for RSA and ECDSA key types, that use asymmetric cryptography.
Getting Installation Keys JWKS
It is possible to obtain the JSON Web Key Set for all keys as follows:
approov installattrs -getJWKS keys.jwks
The contents of the keys.jwks will be something like the following:
{
  "keys": [
    {
      "alg": "ES256",
      "crv": "P-256",
      "d": "r6Ehii2dXfeM...",
      "kid": "your-key",
      "kty": "EC",
      "use": "sig",
      "x": "BfOBn3oodNo...",
      "y": "6HUHrnhLdT6..."
    }
  ]
}
This contains all of the private keys that can be used to sign installation attributes tokens. Note that you need an admin role to get the JWKS for the key set.
Importing Installation Keys
It is possible to import a JSON Web Key as an installation attributes token signing key. Imagine you have a file byok.jwk with the following content:
{
  "alg": "RS256",
  "use": "sig",
  "d": "FumDxNCs...",
  "dp": "mUxVEADBN...",
  "dq": "Yv9xjIj5vOo...",
  "e": "AQAB",
  "kid": "byok",
  "kty": "RSA",
  "n": "05yGbvzgIobbtaeJ...",
  "p": "9_NNlMTz_S5jcxORGz...",
  "q": "2ns2LBc5-1f3m7iI...",
  "qi": "TxLIVbqDsTvmhTgmR..."
}
Import it as follows:
approov installattrs -import byok.jwk
A kid claim must be present and not be the same as any existing key in the key set. The alg and use claims must also be present and be consistent with algorithms supported by Approov, or else the import request will be rejected.
Generating Example Installation Attributes Tokens
It is possible to generate example installation attribute instructions if you provide a JSON file with the payload contents that you want. For instance create a file attrs.json containing the following:
{
 "did": "qZka0yfv+ExvOq3PRh6pGw==",
 "my-claim": "include me in Approov token"
}
This must include a did claim, and it can only be used on that particular device ID. An expiry claim will be added automatically. Otherwise you are free to add your own claims depending upon the requirements of your application.
Create the token as follows, supplying the name of the file containing the payload and the ID of the key you wish it to be signed by:
approov installattrs -genExample attrs.json -kid your-key
This generates the example token as the output. The result is a valid token that lasts for one hour. The extended expiry time of these tokens provides for longer debug sessions using the example token.
Verifying Installation Attributes Tokens
A verification option is provided for installation attributes tokens. Simply use:
approov installattrs -verify eyJhbGciOi…
Which will output something like the following:
passed: {"did":"qZka0yfv+ExvOq3PRh6pGw==","exp":1737315313,"my-claim":"include me in Approov token"}
The payload content is decoded, and information is provided about whether the token is passed or failed. Expired tokens are still considered to be passed, to assist with debug of tokens extracted from logs where tokens may have since expired.
Apple DeviceCheck Integration
This section covers the integration between Approov and Apple’s DeviceCheck feature. If this integration is used then the Approov SDK forces the iOS device to generate a token that is passed to the Approov servers. This can then be checked with Apple and proves that the token was generated on a real iOS hardware device. This provides an additional level of protection against any spoofing attempts.
If the DeviceCheck lookup was successful then information about the device is persisted in the app’s storage and included in any subsequent Approov token fetches. This provides the per-device data made available, consisting of two bits and the last update time of that state (with a month granularity). This approach means that the device only needs to fetch a new device token if subsequent changes need to be made to its state. This is more efficient since fetching such a token (and calling the Apple APIs to obtain the state) would otherwise introduce significant additional latency.
It is possible to cause a particular physical device to be banned if a specific bit of its state is set. This feature is particularly useful if there is suspicion of malicious or fraudulent activity occurring via the continual re-installation of an app on the same physical device. The app itself may be unmodified and running in a clean environment so would receive a valid Approov token. This feature allows a specific physical iOS device to be banned once fraudulent activity has been detected on it so it is not able to receive valid Approov tokens again.
A capability is provided to allow your backend servers to update the state as required, without having to directly deal with the logistics of obtaining a device token and calling the Apple APIs.
Apple’s DeviceCheck is only supported from iOS 11, and not all older hardware devices have the secure enclave needed to implement it. If you allow your app to be installed on earlier versions of iOS, or on devices without the required hardware support, then they will not be protected by DeviceCheck.
If this option is used then the iOS Approov SDK must make a call to generate a token to identify the device. This needs to be done on the first Approov fetch after launching the app for the very first time. Performing this operation requires additional network connection(s) and CPU processing time, over which the Approov SDK has no control. This can substantially delay the fetch operation on the iOS platform by adding up to 2500ms of additional latency.
DeviceCheck Concept
As discussed in Device ID Stability, the device ID reported on iOS automatically changes if an app is removed and then reinstalled. This is to preserve the privacy of the end user, as otherwise it would be possible to track an individual indefinitely via the device ID reported on their device. However, the inability to track specific devices creates some challenges with blocking specific malicious or fraudulent behavior emanating from a particular device. If blocking is based on a device ID then the malicious actor can always circumvent any banning via reinstallation of an app. IP based blocking can also be evaded by the use of proxies.
Apple have recognized this as an issue and have introduced the DeviceCheck feature to provide some very limited tracking of specific physical devices that maintains user privacy. The facility allows up to two bits to be recorded for each physical device for each Apple developer account. These bits can be used to record information such as the detection of some fraudulent behavior on the device.
Obtaining the bit status values and updates to them is performed by calling an Apple server API. In order to identify the device to this API it is necessary to obtain a Device Token. This is an ephemeral token (approximately 3KB in size) that identifies the device. Of course to prevent this itself being used to identify the device, and breaking the privacy policy, it is derived from a randomly generated nonce value so is different every time even on the same device. Since accessing the Apple API requires an authorization key this cannot be done in the app itself, since if this key was extracted it could be used to make arbitrary bit changes for other devices. Thus the API calls must be performed server side, necessitating that a protocol be established to communicate the DeviceCheck token from the mobile app to the server.
The Approov integration of DeviceCheck handles all of this integration complexity. If a DeviceCheck key is added to the Approov account, then the Approov SDK automatically collects and transmits the DeviceCheck tokens to the Approov servers. This token is then used to get and update the status of the device physical bits and prevent banned devices from being issued with valid Approov tokens. The simple check of the validity of the token also ensures that the traffic is emanating from a real iOS hardware device.
The status of the DeviceCheck will be reflected in the device property flags:
devicecheck-ban: Indicates a permanent device ban associated with the physical device.devicecheck-apple-err: Indicates a problem using the Apple endpoint, possibly due to an invalid AuthKey. Use theapproov devicecheck -getcommand to perform a check on the validity of the key provided.devicecheck-completed: DeviceCheck has been completed on a device.devicecheck-failed: DeviceCheck has failed indicating that the provided device token was not valid.devicecheck-performed: DeviceCheck has just been performed on a device.devicecheck-unavailable: Indicates that the DeviceCheck capability is not available on the device.
These flags are used in various Rejection Policies to determine if a valid Approov token should be issued. Note that by default the receipt of a DeviceCheck token is not mandatory. However, if the option flag require-devicecheck is asserted then all iOS devices must complete DeviceCheck or else they will be rejected with failed-requirement.
If are you using the option require-devicecheck and there was a failure getting or processing the DeviceCheck token then subsequent Approov token fetches will make further attempts. If you are not using the option then no further attempts will be made until the app is restarted.
There is a known problem with the usage of DeviceCheck on a small number iOS 14 devices. This manifests itself by the Apple servers not recognizing the device token, which causes Approov to report devicecheck-failed. An upgrade of the iOS version on the device fixes the problem.
Getting the DeviceCheck Key
In order to use the Approov DeviceCheck (or AppAttest) integration you need to add an Apple authentication key to your Approov account. This key only needs permissions to access and update the two bits provided for physical device. This is used by the Approov servers to dynamically query the Apple servers when new devices are added, and to update the settings of the bits if a particular device is being banned (or subsequently unbanned).
Log into your Apple Developer Account, click on Account on the top menus, login and then navigate to the “Certificates, IDs & Profiles page”. Here you will see the list of keys and certificates that have been issued for your account, such as this below.
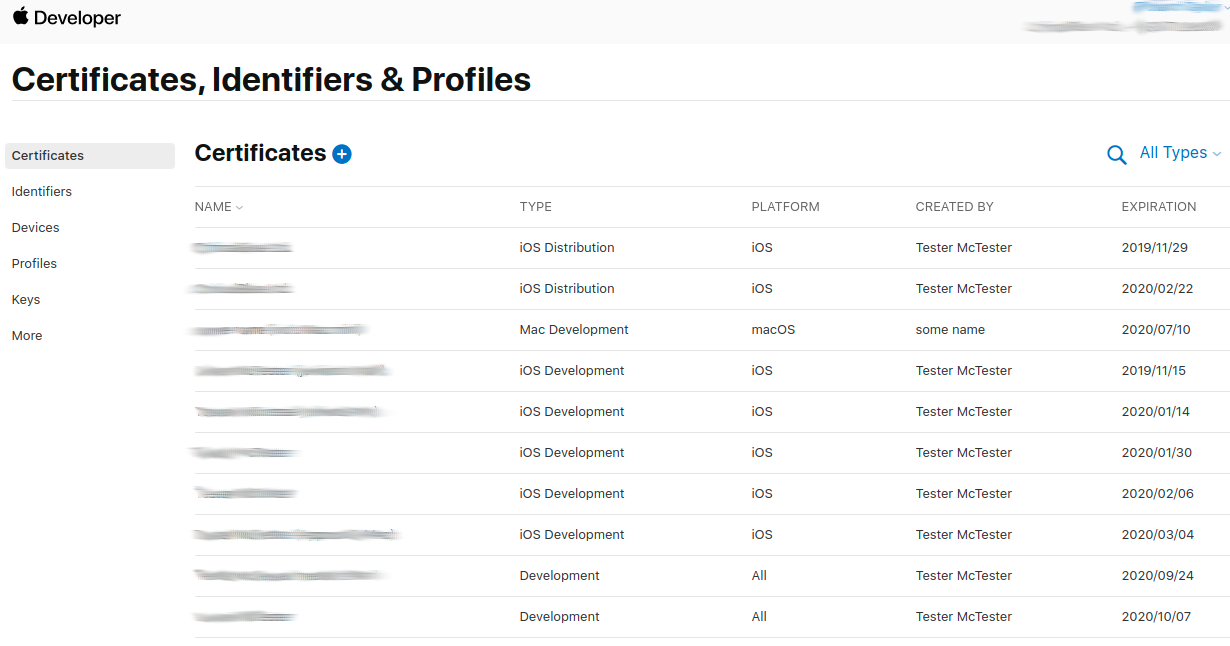
Select the “Keys” menu on the left hand side to navigate to the keys that have been issued for the account.
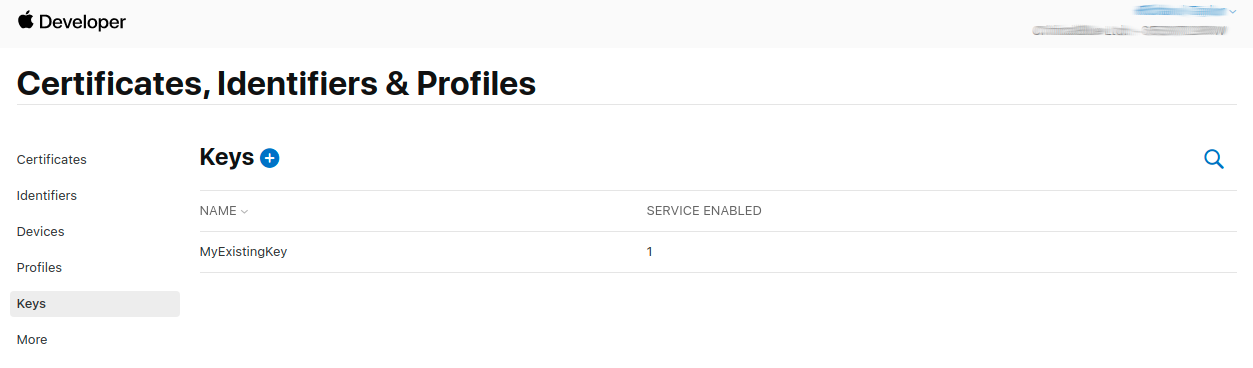
You need to click on the blue plus button to add a new key. Type in the name of that you want to call the key (you an choose anything that is meaningful to you) and click the option for DeviceCheck.
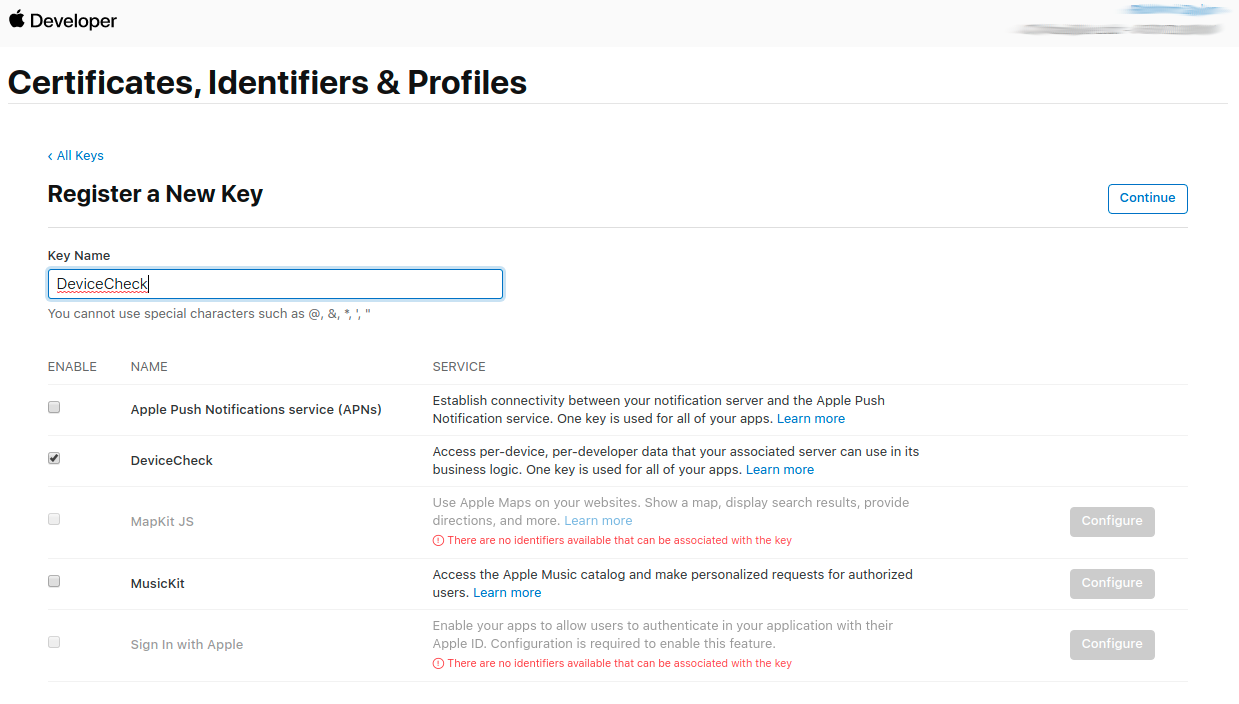
You then press the “Continue” button and a dialog will be shown asking you to confirm the key addition.
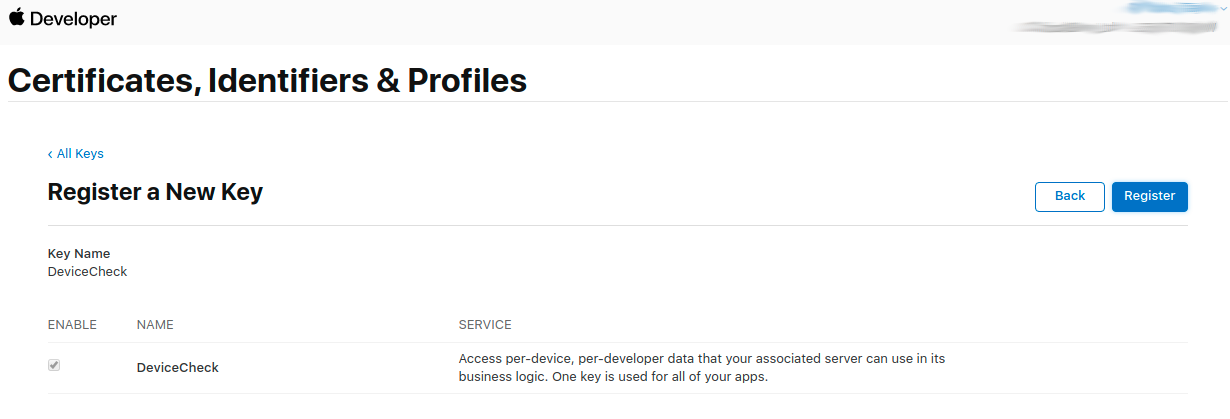
Click Register. You will then be provided with a dialog that gives you an option to download the private key that has been generated. Click this button. You will only get once chance to download this key so make sure the file is saved somewhere that is accessible for the next steps.

When the key is downloaded you will get a dialog such as the below with details of the key. The .p8 file itself should have been written to the Downloads folder that your browser uses by default. Also make a note of the Team ID value shown on the top right of the screen next to your company name. You will also need that.

In order to get the state it is also important that the app requesting a DeviceCheck device token needs an explicit App ID defined in your developer account, as discussed here. This failure will be reported as a devicecheck-apple-err.
Setting the DeviceCheck Key
Now that you have a private key you need to make it accessible to Approov.
approov devicecheck -addAuthKey AuthKey_XXXXXXXXXX.p8 -teamID YYYYYYYYY
You will need an admin or delegate role and confirmation to do this, and confirmation is required:
WARNING: this will have an immediate impact on your apps in production
ATTENTION: If you wish to continue then please type YES and return: YES
The file AuthKey_XXXXXXXXXX.p8 is the private key file you downloaded and YYYYYYYYY is your team ID.
Now that this information is added to your Approov account, the Approov cloud servers are able to contact the Apple servers to validate the device token and obtain the device state. You can confirm that the information has been recorded with:
approov devicecheck -get
Which will generate output such as:
TeamID: YYYYYYYYY
KeyID: XXXXXXXXXX
Expiry: 12m
BanBit: none
Apple Endpoint: Production
If there is a problem with the information provided, and it is not possible to authorize with the Apple servers then you will see WARNING: Apple Authorization Error with the message from the Apple servers.
Reading the Device State
If the DeviceCheck device state can be read then it is subsequently included in all Approov tokens fetched on the device. The information is provided in the device_state claim, such as the follows:
{
  "arc": "B3Y5SLMO2K",
  "did": "qZka0yfv+ExvOq3PRh6pGw==",
  "exp": 1737315084,
  "device_state": {
    "bit0": false,
    "bit1": true,
    "last_update_time": "2025-01"
  }
}
Your backend integration can read this information from a valid Approov token and then change the behaviour accordingly. Your logic must always be able to cope with the device_state not being presented, as it will not be for Android devices or for certain iOS devices that do not support this capability.
The device state could be used for security purposes (perhaps requiring additional checks if a certain bit is not set), or can be used for some other purpose not directly related to security concerns.
Banning Based on Device State
As discussed in Forcing a Device ID to Fail, it is possible to prevent a particular device ID from receiving valid Approov tokens. However, reinstallation of the app on the same device may generate a new device ID and evade the ban. If you are using DeviceCheck then a permanent ban for a particular physical device can be instigated.
To enable this you must setup the DeviceCheck configuration again, with the addition of the optional -banBit option, such as the following:
approov devicecheck -addAuthKey AuthKey_XXXXXXXXXX.p8 -teamID YYYYYYYYY -banBit bit0
This indicates that the device should receive failed Approov tokens if bit0 of its state is set. You can also set bit1 or both (requiring both bits to be set for a ban). Simply apply the configuration without the -banBit option to remove the ban completely.
If you have previously used the Apple DeviceCheck facility then the bits will not be set. If you have used the facility before and bits are set then this may cause those devices to be banned. In this case you may use the -expiry option as well to ignore settings made more than a certain number of months ago. Thus devices will fall out of their ban state after a configured number of months.
When a particular device is banned it is across all apps associated with the same Apple developer account, even if these apps are associated with different Approov accounts. This is because Apple stores the bit states on a per-developer account basis. If you are using multiple Approov accounts associated with a single Apple developer then you may select different bits on different accounts to avoid interference.
Updating the Device State
A capability is provided to allow your backend servers to update the state for a particular device using the Installation Attributes update mechanism.
To do this you must created a valid installation attributes token that includes a claim new_device_state, such as the following:
{
  "did": "qZka0yfv+ExvOq3PRh6pGw==",
  "new_device_state": {
    "bit0": true,
    "bit1": false
  }
}
This claim contains the desired new states of bit0 and bit1 for the device. Providing this will arrange for a new device token to be fetched by the device, and the Approov cloud service will make the call to Apple APIs to set the new state. If the state is updated then it will appear in the device_state claim of Approov tokens from the device on an ongoing basis. Note that the new_device_state will not appear in the embed claim of Approov tokens.
Removing the DeviceCheck Key
The DeviceCheck authorization key can be removed from the account at any point, if an admin role is available, as follows:
approov devicecheck -remove
You will need an admin or delegate role and confirmation to do this:
WARNING: this will have an immediate impact on your apps in production
ATTENTION: If you wish to continue then please type YES and return: YES
DeviceCheck information removed
This will disable all lookups of DeviceCheck. Any ban will remain for a particular app installation, but if the app is reinstalled then the ban will not follow. If the DeviceCheck key is subsequently set again then the banning of the same devices will be reinstated since the Apple bit state will have been persisted.
Apple AppAttest Integration
This section covers the integration between Approov and Apple’s AppAttest feature. If this integration is used then the Approov SDK forces the iOS device to perform a valid AppAttest attestation in addition to all of the other verifications performed by Approov. This provides an additional level of protection against any spoofing attempts, whilst hiding the integration complexity of using AppAttest on the backend.
Approov includes a full server side integration as detailed for AppAttest. If any of the AppAttest checks fail then valid Approov tokens are not generated for the iOS device. Support is provided for rate limiting AppAttest attestations and to perform optional fraud checks using information from Apple servers.
AppAttest assertion checks are also performed on subsequent Approov fetches from the device, ensuring the continued legitimacy of the device. This uses keys held in the secure enclave of the device, ensuring that the requests are really coming from the same device that passed the original AppAttest attestation.
Apple’s AppAttest is only supported from iOS 14. If you allow your app to be installed on earlier versions of iOS then they will not be protected by AppAttest. You might want to consider using DeviceCheck as well as, or instead of AppAttest, since it is supported on many devices from iOS 11.
If this option is used then the iOS Approov SDK must make calls to create a new key pair and then attest its origin with Apple. This needs to be done on the first Approov fetch after launching the app for the first time. Performing this operation requires additional network connection(s) and CPU processing time, over which the Approov SDK has no control. This can substantially delay the fetch operation on the iOS platform by adding up to 2500ms of additional latency.
AppAttest Status Flags
The status of the AppAttest will be reflected in the device property flags:
appattest-appid-fail: iOS device has completed an AppAttest attestation but app is not registered.appattest-apple-err: Indicates a problem using the Apple fraud lookup endpoint, possibly due to an invalid AuthKey. Use theapproov appattest -getcommand to perform a check on the validity of the key provided.appattest-assert-performed: iOS device has just performed an AppAttest assertion.appattest-attest-performed: iOS device has just performed an AppAttest attestation.appattest-completed: iOS device has completed (now or previously) an AppAttest attestation.appattest-failed: iOS device has failed an AppAttest attestation or assertion, or app is unregistered or fraud risk exceeds threshold.appattest-high-risk: iOS device has completed an AppAttest attestation but fraud risk exceeds threshold.appattest-unavailable: iOS AppAttest was attempted but it was unavailable. This will occur on devices running a version of iOS 13 or lower, or devices without a suitable hardware enclave (such as simulators).
These flags are used in various Rejection Policies to determine if a valid Approov token should be issued. By default, obtaining an AppAttest result is not mandatory. However, if the option flag require-appattest is enabled the all iOS devices must perform AppAttest or else they will be rejected with failed-requirement. This may mean that some older iOS devices may fail.
If are you using the option require-appattest and there was a problem getting or processing an AppAttest token then subsequent Approov token fetches will make further attempts. If you are not using the option then no further attempts will be made until the app is restarted.
AppAttest Environment Setting
In order to use AppAttest in production (or to use the optional fraud lookup facility at all) you must add the AppAttest Environment capability and entitlement into your app.
Firstly you need to register a new, or modify an existing, app identifier with the AppAttest capability. Log into your Apple account and navigate to the Identifiers section. If creating a new Identifier, press the + and go through the steps of the wizard to create a new App ID. Select the AppAttest capability, along with any others you need, as follows:
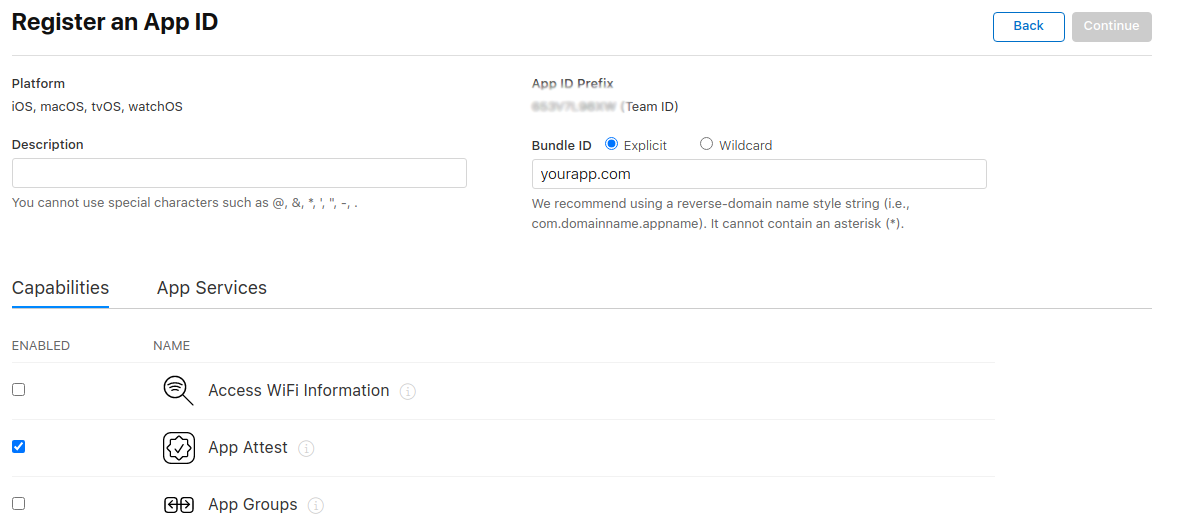
Note that you must provide a specific Bundle ID, it is not possible to add a capability when using a wildcard.
It is then necessary to add the required entitlement in your app’s .entitlements file, as follows:

The file holds key/value pairs. Ensure you set the value type to a String and then set it to either development or production. Remember to change the value to production before issuing your app to the App Store.
Enabling AppAttest
AppAttest is enabled by specifying the Apple team ID used for your apps, as follows:
approov appattest -addTeamID YYYYYYYYY
You will need an admin or delegate role and confirmation to make this change:
WARNING: this will have an immediate impact on your apps in production
ATTENTION: If you wish to continue then please type YES and return: YES
AppAttest team ID added
The TeamID can be found by logging into your Apple account, and you will have been provided with it during the AppAttest Environment Setting step. Alternatively, go to Certificates, Identifiers & Profiles and your team ID is shown on the upper right on the web page. It is a 10-digit alphanumeric code. The Team iD is also shown when you use Approov to register one of your iOS apps.
Note that in order to obtain valid AppAttests you must have at least one app registered with the correct Bundle ID and Team ID. If not then the AppAttest will fail with the appattest-appid-fail flag. You can clear this by Registering a suitable app. Note that you can see the information collected by AppAttest by Getting Specific Device Information under the appattest-app-id key.
AppAttest can be disabled, if an admin or delegate role is available, as follows:
approov appattest -remove
Confirmation is required:
WARNING: this will have an immediate impact on your apps in production
ATTENTION: If you wish to continue then please type YES and return: YES
AppAttest disabled
This will disable all future usage of AppAttest attestations or assertions on your account.
The persisted AppAttest state for any devices that have conducted an AppAttest attestation will be retained. This persisted state may still cause Approov rejections due to the last AppAttest result. If you wish to completely remove any persisted state, then consider Clearing All Device State.
Getting AppAttest Status
The status for AppAttest can be be viewed at any point using:
approov appattest -get
Which will provide the setup parameters such as:
TeamID: YYYYYYYYY
KeyID: XXXXXXXXXX
AssertionPeriod: always
RateLimit: unlimited
If you have provided the optional KeyID to support fraud lookup and it is not possible to authorize with the Apple servers then you will see WARNING: Apple Authorization Error with the message from the Apple servers.
Controlling AppAttest Assertion Rate
Once a full AppAttest attestation has been completed for a device, subsequent Approov fetches are protected using an AppAttest assertion. This signs some challenge data provided by the Approov server with the private key in the secure enclave created in the initial attestation step. This proves that the request is being handled by the same device since it is not possible to extract the private key from the secure enclave.
An assertion is a much quicker operation than the original attestation, taking of the order of 200ms rather than around 2500ms for the original attestation. By default the assertion repeat period is considered to be always so all Approov fetches include an assertion, and thus require additional processing time of approximately 200ms.
If this additional delay is problematic for your application’s responsiveness then you can elect to use a slower assertion period, specified in hours, as follows:
approov appattest -setAssertionPeriod 1
You require an admin or delegate role and confirmation to make this change:
WARNING: this will have an immediate impact on your apps in production
ATTENTION: If you wish to continue then please type YES and return: YES
AppAttest assertion period set
In this case this means that a new assertion is only performed if it has been an hour or more since the last one, thus reducing the latency of any intervening Approov fetches. Remember that these fetches will continue to be protected by all the usual Approov protections against request spoofing. You can reset the period back to always if required.
Note that an assertion is always performed on the first Approov fetch after a new launch of the app.
Rate Limiting AppAttest Attestations
An AppAttest attestation is performed, on all devices that support it, on the very first Approov fetch after the first launch of the app. This might be problematic if you have a very large app user base and are just enabling AppAttest, or you have very large numbers of new users. This is because the Apple documentation infers that Attestation requests from the device might be throttled if the load is very high (see Onboard Users Gradually in Preparing to Use the App Attest Service). No specific maximum numbers are provided by Apple.
By default AppAttest rates are not limited by Approov, but it is possible to set a rate limit as follows:
approov appattest -setRateLimit 1000
An admin or delegate role and confirmation is required to do this:
WARNING: this will have an immediate impact on your apps in production
ATTENTION: If you wish to continue then please type YES and return: YES
AppAttest rate limit set
The value is the maximum number of new AppAttest requests per hour. If this rate is exceeded then subsequent new app launches during the period will not perform an AppAttest. This is delayed until the next time the app is launched, and if the rate is below the threshold. You can disable the rate limit by specifying unlimited. Note you should not use the strict rejection policy with this option, otherwise devices that failed to perform an AppAttest due to the rate limit will be unable to get valid Approov tokens.
Adding Apple Fraud Lookups
If you add a DeviceCheck key then Approov will automatically do a fraud lookup using an Apple endpoint and reject devices that exceed a user specified risk level. Get a DeviceCheck Key to enable this access and add it as follows:
approov appattest -addAuthKey AuthKey_XXXXXXXXXX.p8
You will need an admin or delegate role and confirmation to do this:
WARNING: this will have an immediate impact on your apps in production
ATTENTION: If you wish to continue then please type YES and return: YES
AppAttest fraud lookup authorization added
The parameter AuthKey_XXXXXXXXXX.p8 is the private key file you downloaded. Now that this information is added to your Approov account, the Approov cloud servers are able to contact the Apple servers and assess fraud risk for all new AppAttests performed.
The fraud check guards against an attack where a single compromised device may be used to spoof many individual devices. The fraud lookup provides a metric based on the approximate count of AppAttest attestations performed on a particular device for your app. Since this is held in the secure enclave of the device it is extremely hard for an attacker to spoof this. A high value might indicate fraud associated with the device. By default, apps with a risk metric of higher than 25 are rejected, but you can set your own maximum risk metric.
In order to use the fraud lookup facility you must set the AppAttest Environment entitlement, even if you are still performing development in the sandbox. You will receive an appattest-apple-err if you haven’t done this.
You may remove the fraud lookup for new AppAttests as follows:
approov appattest -removeAuthKey
Again, you will need an admin or delegate role and provide confirmation to do this:
WARNING: this will have an immediate impact on your apps in production
ATTENTION: If you wish to continue then please type YES and return: YES
AppAttest fraud lookup authorization removed
Setting Maximum Fraud Risk
You can vary the maximum acceptable fraud risk as required. The risk metric grows with user reinstalls of your app, restores from a backup, or transfers of a device between users. The metric may also grow if you use the facility to clear all device state as this causes a new attestation key pair to be generated on the device.
If an individual device exceeds the maximum risk metric then it will fail with the appattest-high-risk flag set.
The Apple provided risk metric values have no specific thresholds and you will need to experiment with a suitable threshold, as described in Accessing Fraud Risk in the Interpret the Metric section.
You can see the risk metric collected by AppAttest by Getting Specific Device Information under the appattest-risk-metric key. You could collect information for devices failing with high risk by adding a filter on appattest-high-risk and then analyzing a sample of the captured results.
You can adjust the maximum acceptable fraud risk metric value as follows:
approov appattest -setMaxRisk 10
You will need an admin or delegate role and confirmation to do this:
WARNING: this will have an immediate impact on your apps in production
ATTENTION: If you wish to continue then please type YES and return: YES
AppAttest max risk set
The new value will be used to assess both new and previously performed AppAttest attestations.
Google Play Integrity Integration
This section covers the integration between Approov and Google’s Play Integrity attestation feature. It allows enhanced assessment of the integrity of the app and device, and provides additional signals that Approov uses to check for rooting or modified devices.
The Approov Play Integrity integration provides a nonce value to prevent the replay of Play Integrity tokens. Play Integrity tokens are decoded and analyzed by the Approov backend and contribute to the overall signals indicating an app and device’s integrity. You must provide credentials to allow the Approov servers to contact the Google Cloud to decode the integrity token on your behalf. You have complete control over the set of Play Integrity verdicts that should cause an Approov attestation failure.
In order to use Play Integrity you must use an SDK that is version 3.1.0 or later. If this option is used then the Android Approov SDK must make a call to perform a Play Integrity attestation on the device. This needs to be done on the first Approov fetch after installing the app. Performing this operation requires additional network connection(s) and CPU processing time, over which the Approov SDK has no control. This can substantially delay the fetch operation on the Android platform by adding up to 3500ms of additional latency.
Play Integrity Status Flags
The Play Integrity status is reflected in the device property flags that are collected as follows:
playintegrity-completed: Indicates that a Play Integrity token has been received by Approov for the device at some point.playintegrity-fail-app-cert-hash: Indicates the device has failed Play Integrity because the app certificate hash doesn’t correspond to any that have been added to the Approov account. This flag can only be asserted if Android App Signing Certificates have been setup for the account.playintegrity-fail-app-integrity: Indicates the device has failed Play Integrity because of the app integrity verdict.playintegrity-fail-app-licensing: Indicates the device has failed Play Integrity because of the app licensing verdict.playintegrity-fail-device-integrity: Indicates the device has failed Play Integrity because of the device integrity verdict.playintegrity-failed: Indicates that the Play Integrity token has resulted in a rejection verdict for one of a number of reasons.playintegrity-google-err: Indicates that a Play Integrity token has just been received and is transiently failing. This might possibly be due to bad credentials or an exceeded rate limit.playintegrity-performed: Indicates that a Play Integrity token has just been received by Approov.playintegrity-need-cpn: Indicates that a Play Integrity token fetch was attempted but failed with an error, likely because a Google Cloud project number needs to be set.playintegrity-unavailable: Indicates that Play Integrity was not available. This may be because it is not supported on the device, the API usage tier has been exceeded or because the app has not been built to include the necessary library (see Play Integrity Build Requirements).
These flags are used in various Rejection Policies to determine if a valid Approov token should be issued. Note that by default the receipt of a Play Integrity token is not mandatory. However, if the option flag require-playintegrity is enabled, then any Android devices unable to perform a Play Integrity check will be rejected with failed-requirement.
Note that you can see information about the exact verdicts returned for a device by Play Integrity by getting Specific Device Information. This may help you debug why the verdicts are causing an Approov failure.
Since obtaining a Play Integrity token is an expensive operation, the results are recorded by Approov and are persisted against the device ID. This means that the app should only suffer the extended latency to obtain an integrity token on the initial launch after installation.
It might not be possible to obtain a Play Integrity token with the most likely reasons being one of the following:
- The device does not support it
- Play Integrity API usage tier was exceeded
- Play Integrity service was temporarily down
- The device had poor network access
If are you using the option require-playintegrity and there was a problem getting or processing a Play Integrity token then subsequent Approov token fetches will make further attempts. If you are not using the option then no further attempts will be made until the app is restarted.
Play Integrity Build Requirements
If you wish to make use of Play Integrity you must add the appropriate libraries in the dependencies part of your app’s build.gradle file as follows:
implementation 'com.google.android.play:integrity:1.4.0'
If the Approov SDK inside your app is unable to resolve dependencies to the required Play Integrity services, then the message Play Integrity not available will be logged when an attempt is made to fetch an Approov token if Play Integrity is enabled in the Approov account.
Create Google Cloud Project
Use of Play Integrity requires that you have a Google Cloud project. This can then be linked with your Google Play account and is used for handling the API requests that are necessary to decode the Play Integrity tokens obtained from your running apps. This project needs to have the Play Integrity API enabled for it.
Create a new Google Cloud Project as described here. The first step is to name the project, with something like the following (this step is unnecessary if you already have a Google Cloud project):
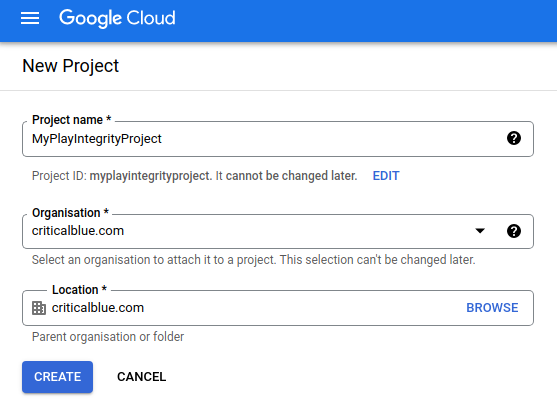
After clicking CREATE, you must then select Enabled APIs and Services on the left hand side for your project as follows:
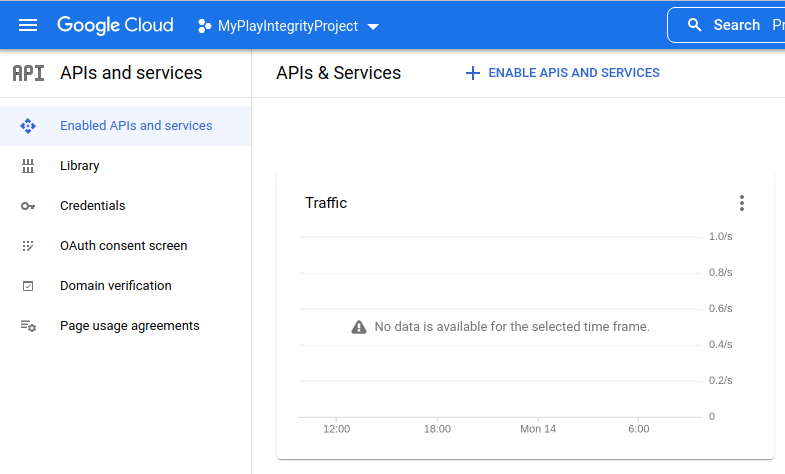
Click on ENABLE APIS AND SERVICES and search for Play Integrity API as follows:
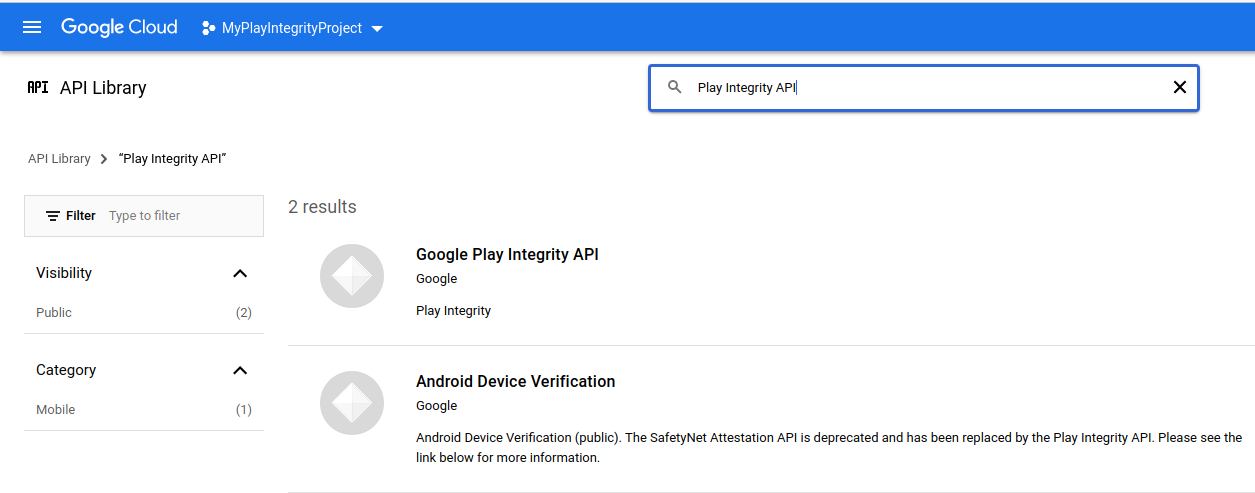
The click on this service:
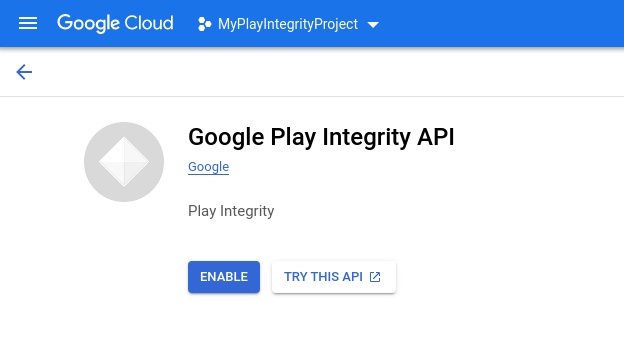
Press the ENABLE button and then you will see the graphs of usage of the Play Integrity API as follows:
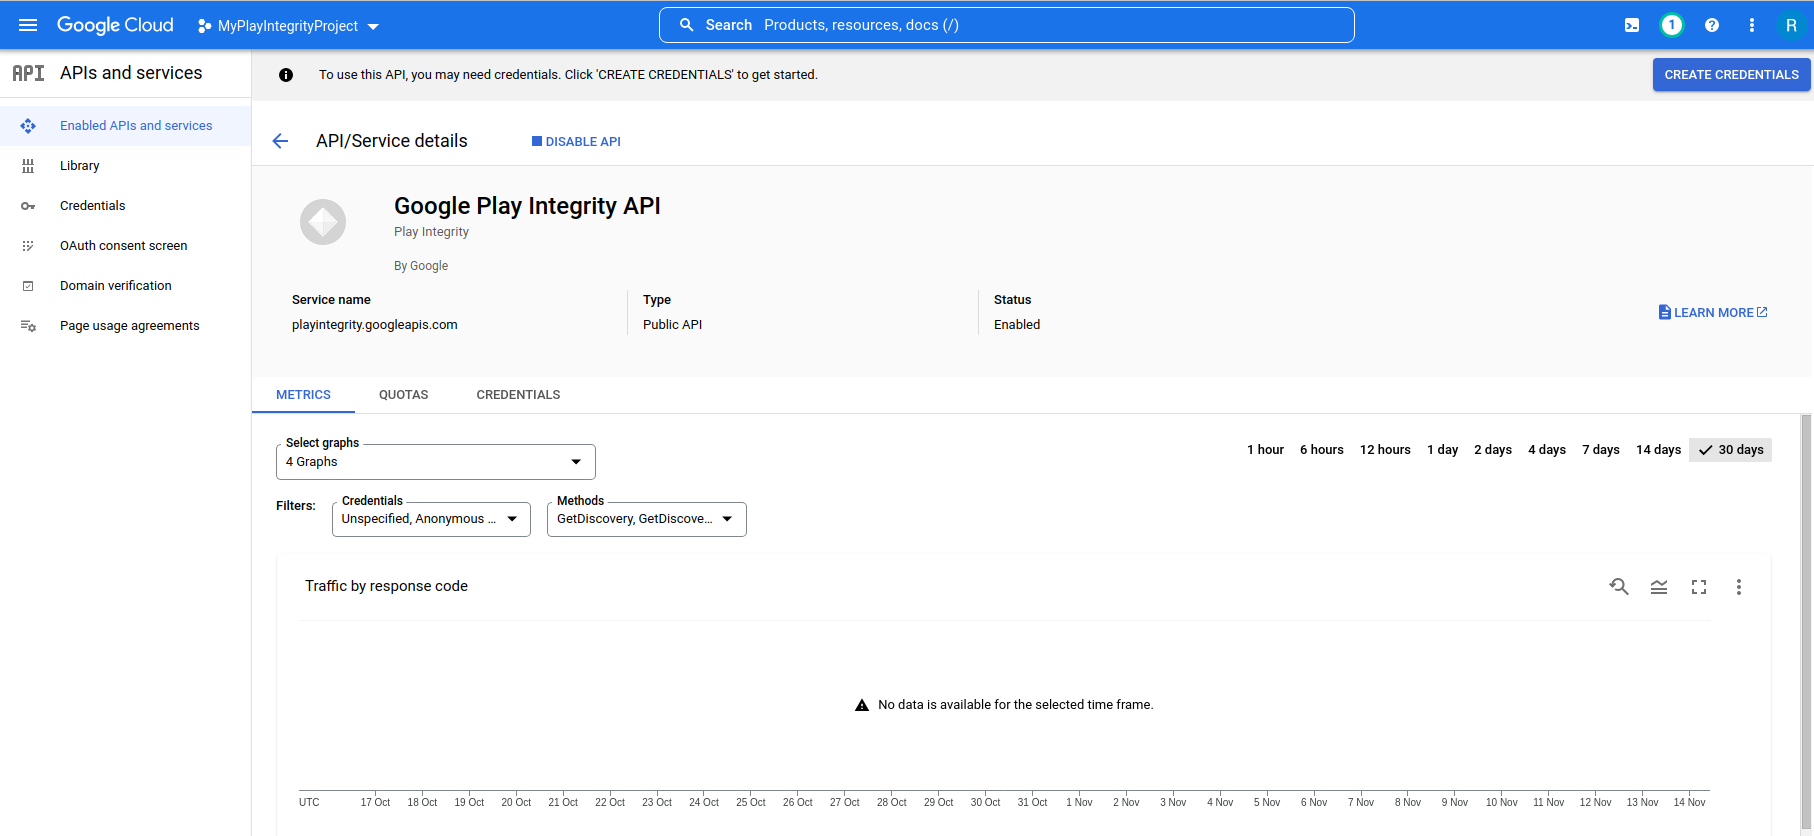
This will of course be empty, but you can view this again later once the integration with Approov is working to see the history of Play Integrity requests being made by your apps.
Enable Play Integrity Responses
Once you have a Google Cloud project with the Play Integrity API enabled, you need to enable the use of the Integrity API from your Google Play console. Log into your app in the Google Play console, selecting ‘Test and release’ and ‘App integrity’ of the left hand side menu as follows:
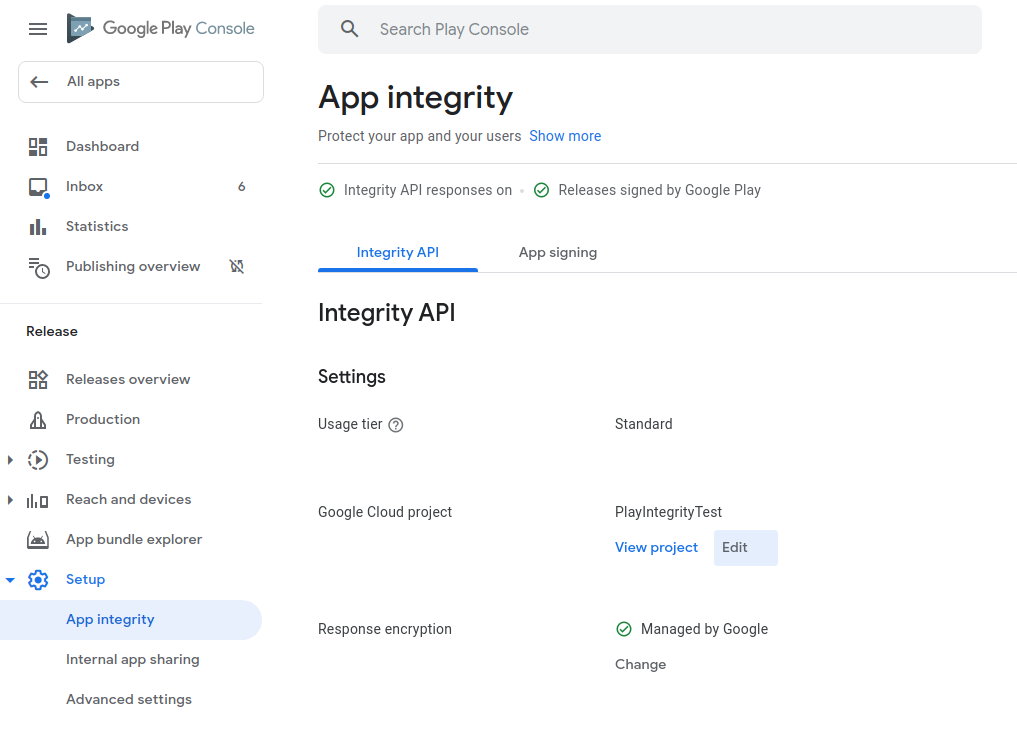
Where ‘Play Integrity API’ is shown press, the Settings button to its right and you will see a page like the following:
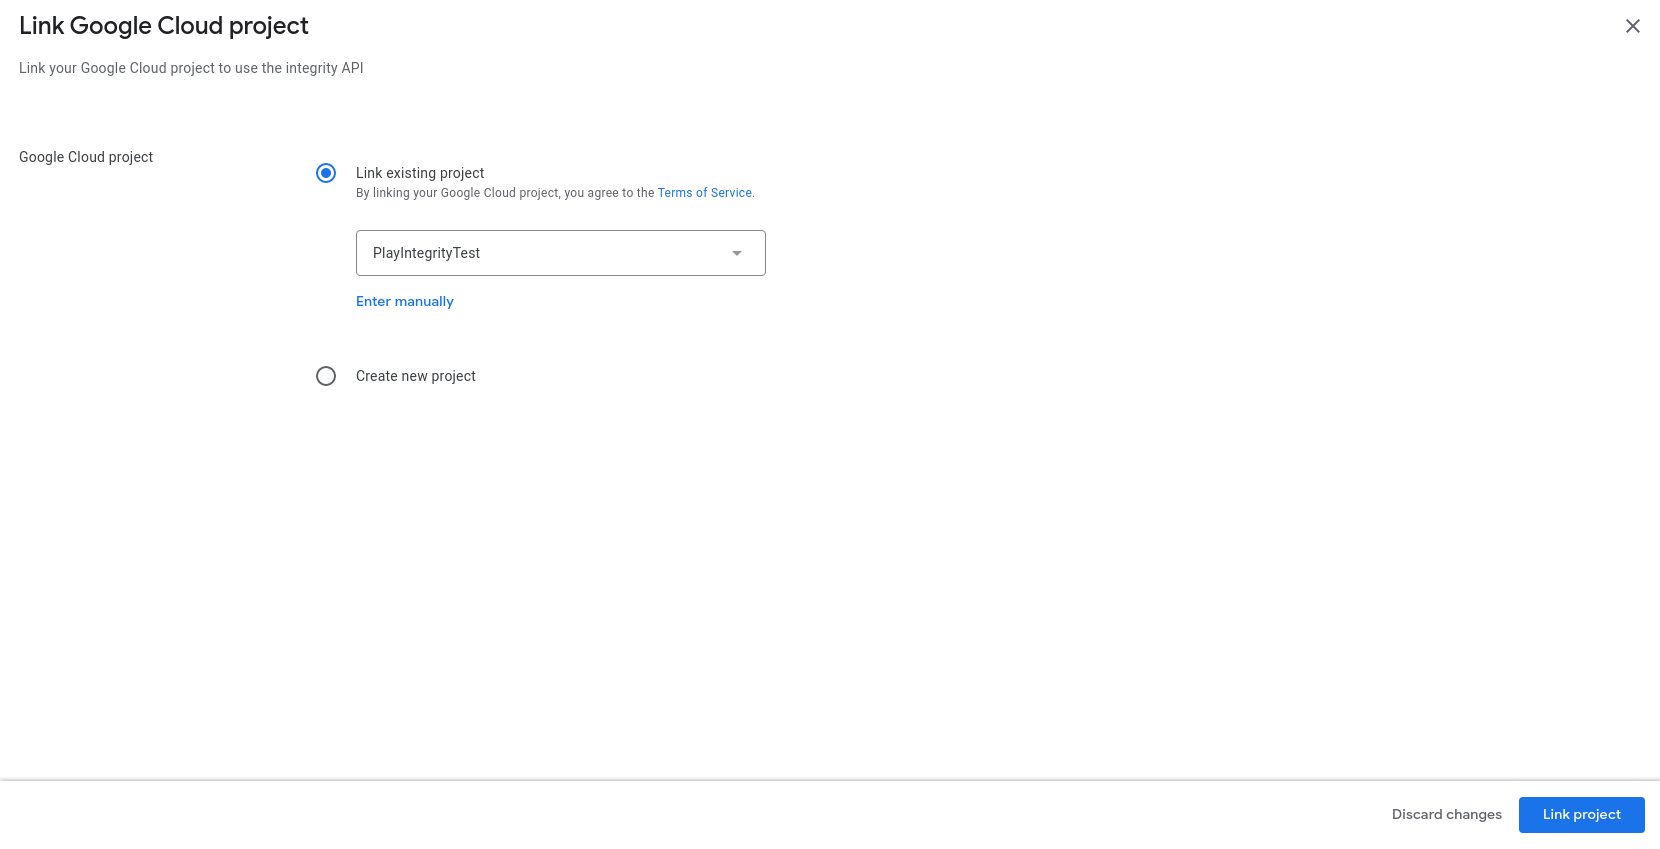
You can then link the appropriate Google Cloud project using the pull down menu and pressing Link Project.
Creating a Service Account
A service account is a special type of Google account intended to represent a non-human user that needs to authenticate and be authorized to access data in Google APIs. You need to add such a service account to your Google cloud project to allow Approov to make calls to the Play Integrity API associated with your Google Cloud project. This is necessary in order to decode the encrypted Google Play integrity tokens that will be collected by your apps. If you already have a suitable service account in your Google Cloud project then you do not need to follow these steps.
First you should select Enabled APIs and services to see the full list of APIs enabled in your project:
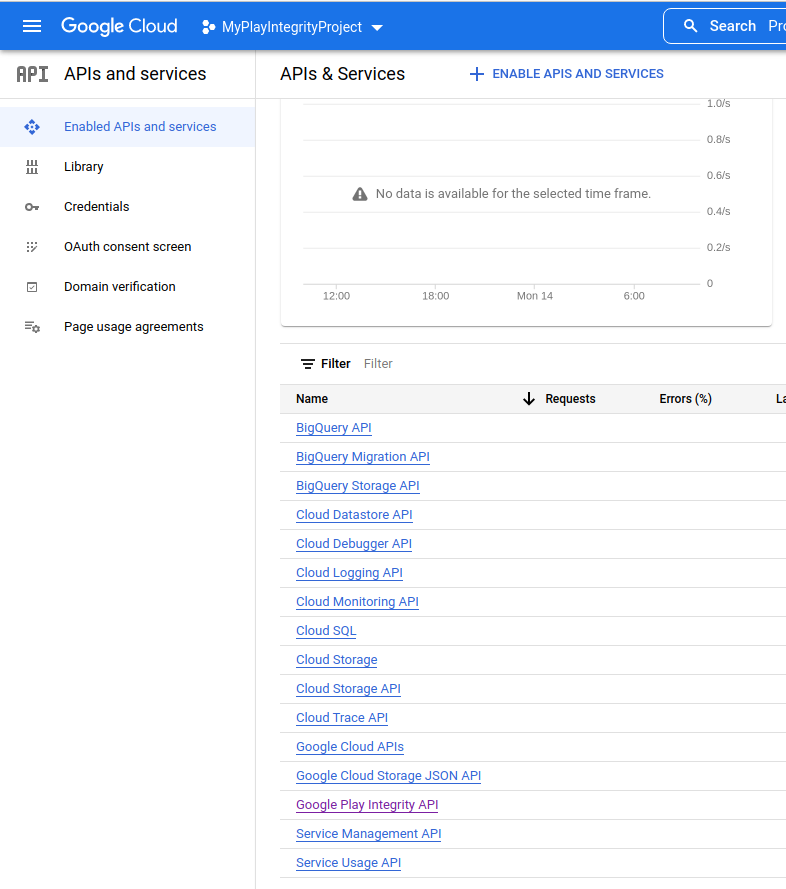
Find and click on Google Play Integrity API to provide it’s specific settings:
Then click on CREATE CREDENTIALS on the top right-hand side to enter the dialog to create credentials for a service account role:
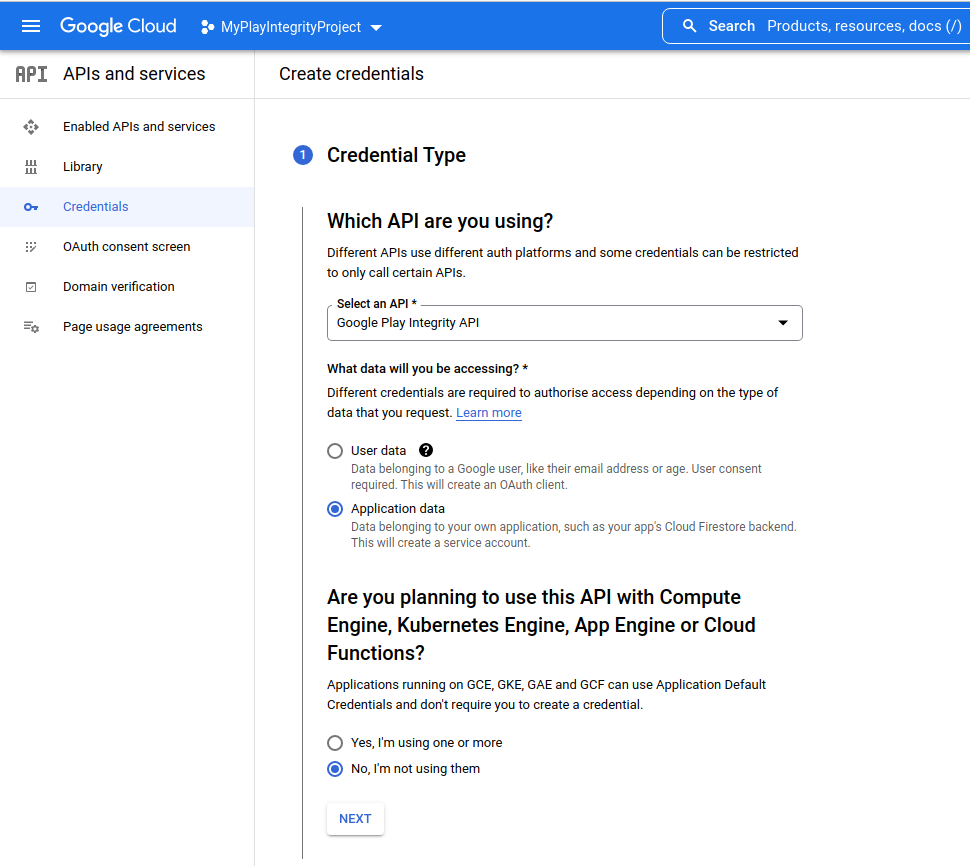
Select Application data for the type of API (ensuring the Google Play Integrity API is selected). Click ‘Create and continue’ and you should see the following:

You will need to give the service account a name, in this case it has been given the name PlayIntegrityAccess to indicate its purpose. Click DONE to move onto the next step:
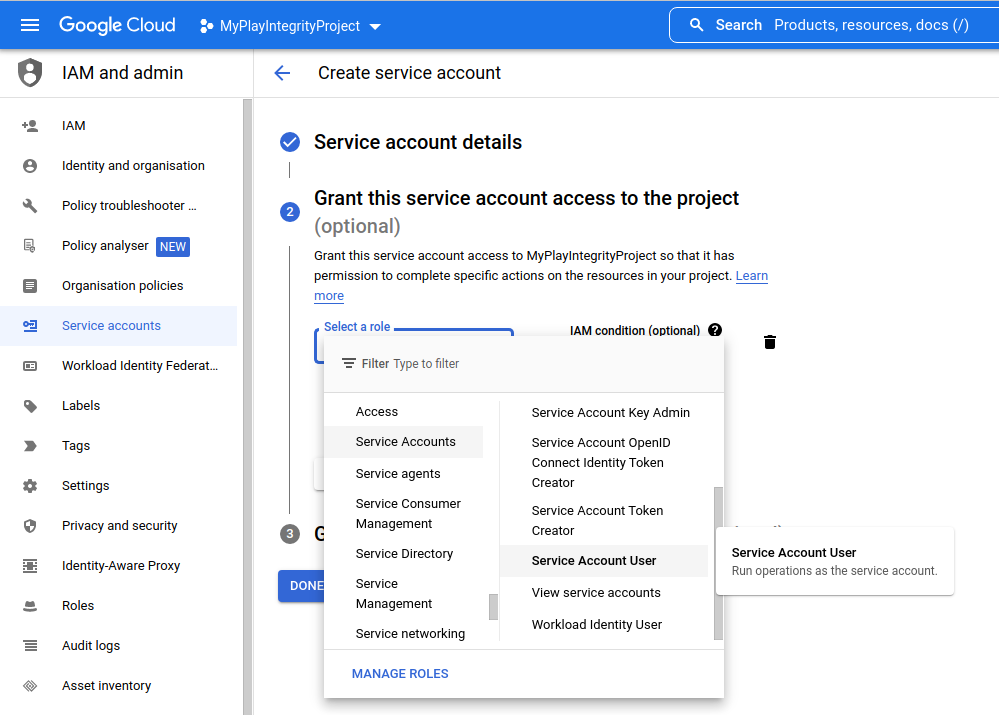
You must then grant service account access to the project. Select from the role, finding Service Accounts as the main type of role and then Service Account User as the subrole. Then click to move to the next step of the menu wizard selection:
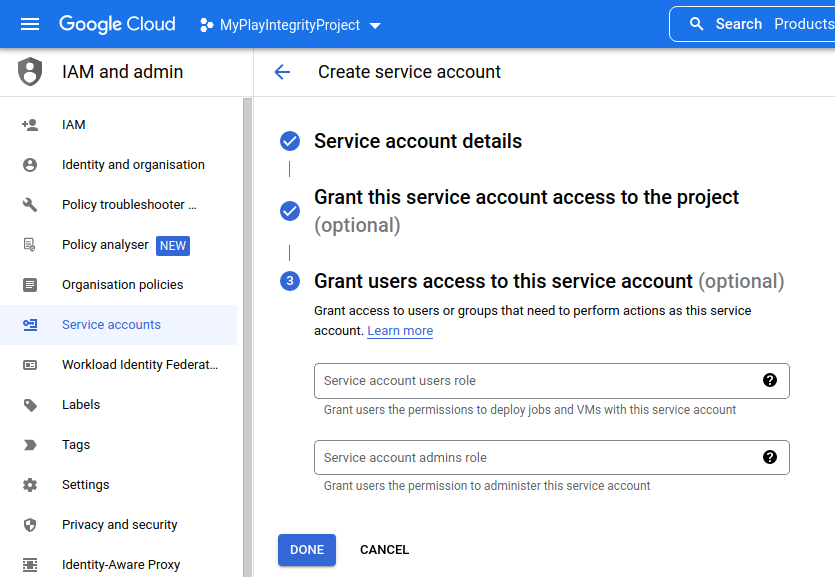
You are now ready to click DONE and a suitable service account has been created.
Enabling Play Integrity Using a Service Account Key
In order to allow Approov to access your Google Cloud project to decode Play Integrity tokens, you must create a credentials in order to enable the access. In your Google Cloud project select Credentials on the left hand side, and then select the Service Account created earlier for the purposes of accessing the Google Play API:
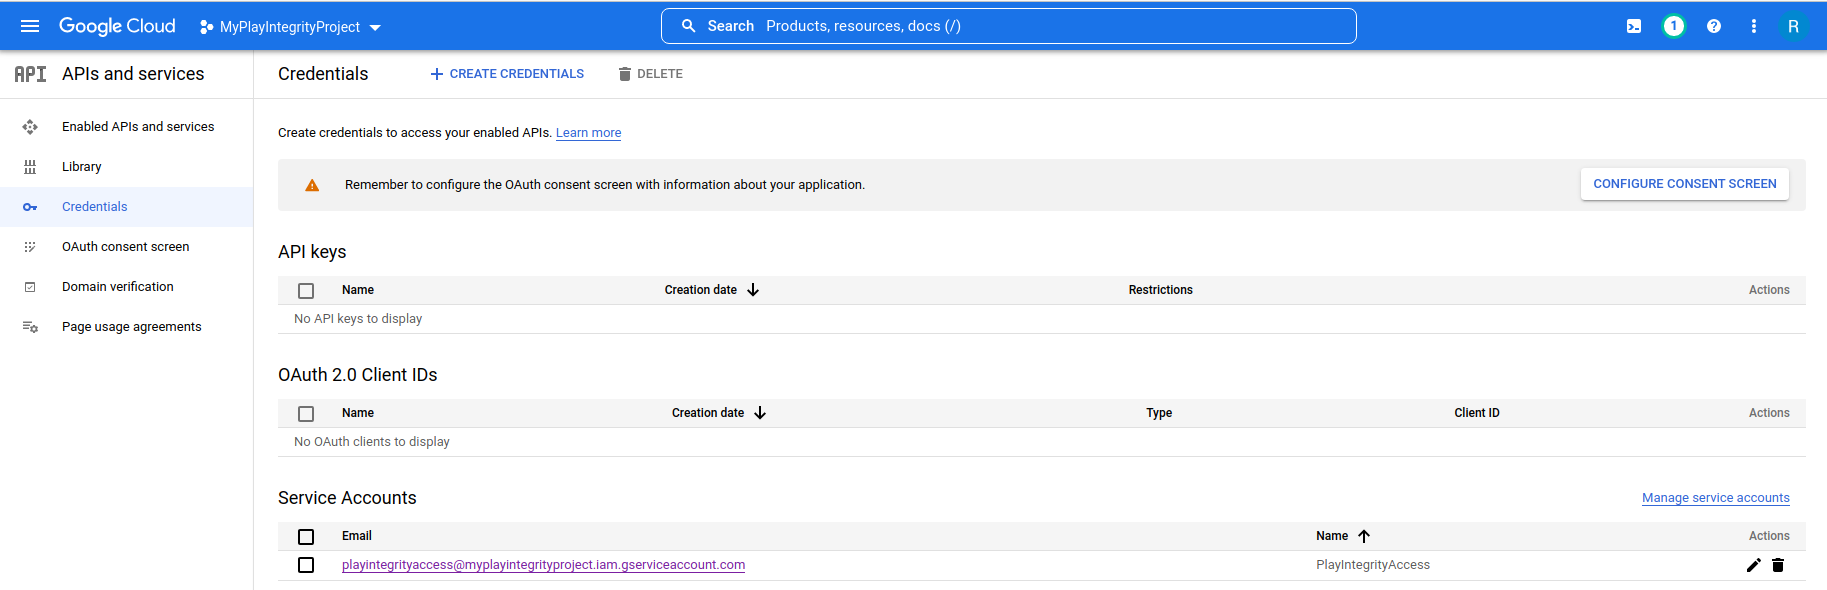
The select the Keys tab:
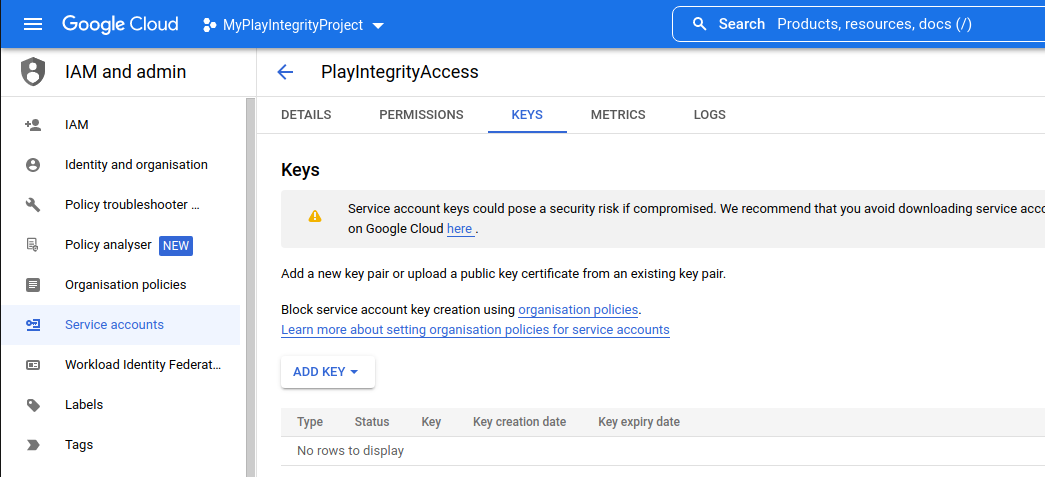
Press the ADD KEY button to create a new key for external service account access:
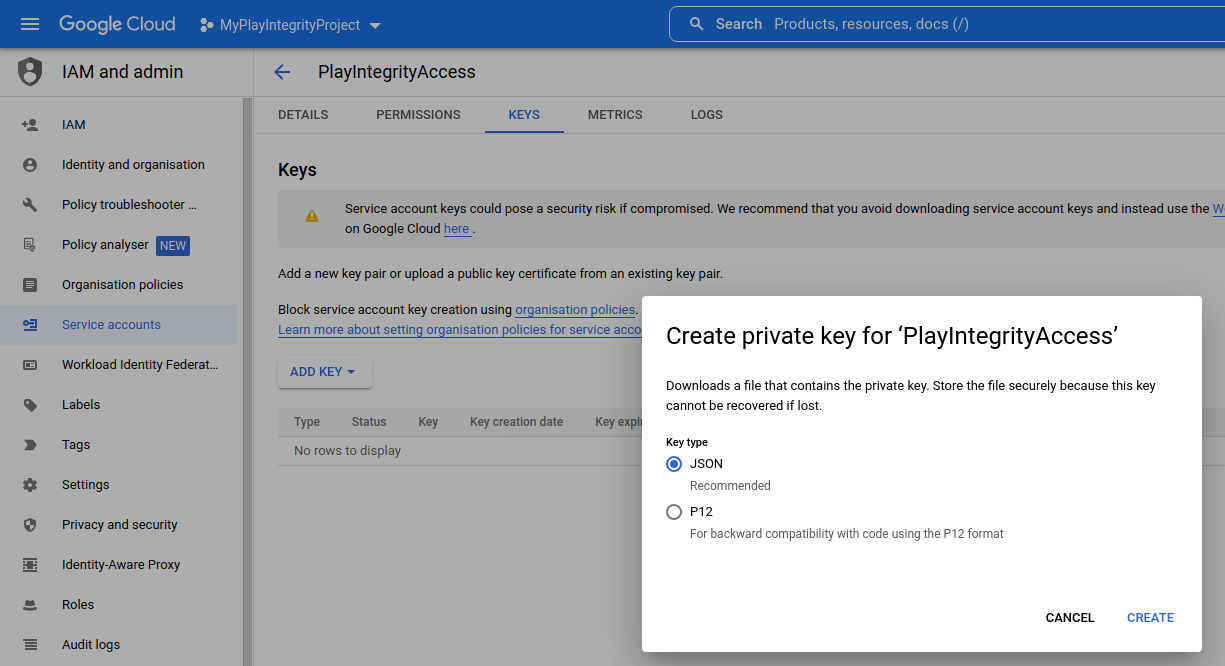
This initiates the process of creating the key. Select JSON format and then CREATE in order to create the key:
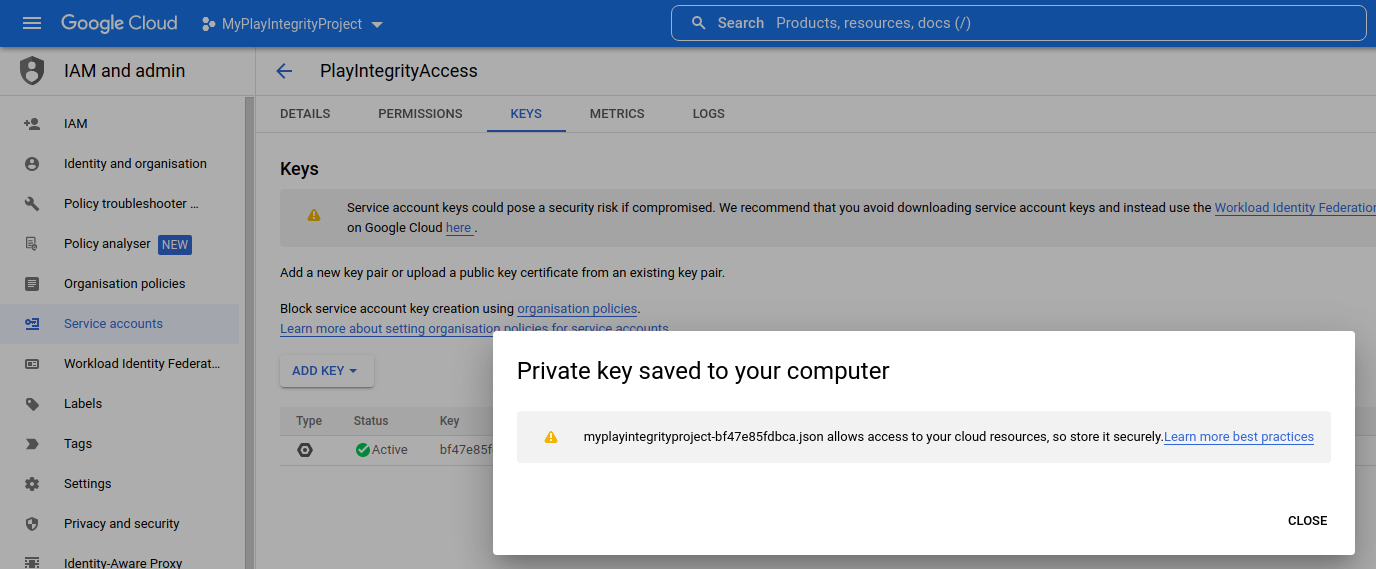
The key will then be downloaded to your computer in the form of a JSON file that includes the private key needed for access. Treat this file carefully since it contains this private key. You might want to delete it after adding it to Approov. You cannot download it again, but you can always delete the key and create a new one.
Next you need to provide this file to Approov as follows (the exact filename will be different depending on your project name and the key generated):
approov playintegrity -addCredentials myplayintegrityproject-bf47e85fdbca.json
You will need an admin or delegate role and confirmation to do this:
WARNING: this will have an immediate impact on your apps in production
ATTENTION: If you wish to continue then please type YES and return: YES
Play Integrity API access credentials added
Once this is set, Android devices will immediately try and perform Play Integrity attestations when they next connect to the Approov service. Note that this includes all existing users of your app and so consider this when thinking about the initial load against your Play Integrity API usage tier.
By default, the Approov Play Integrity integration causes a rejection if the app integrity verdict is not PLAY_RECOGNIZED or the device integrity verdict is not MEETS_DEVICE_INTEGRITY. No check is made on the app licensing verdict. You can easily change these default settings as covered in subsequent sections.
If your app is not on Google Play then you must also set a Google Cloud project number or else your app will not be able to obtain Play Integrity tokens.
Setting Google Cloud Project Number
If your app is not available on Google Play (e.g. if it is still in development) or you do not intend to distribute it exclusively on Google Play, then you must set the Google Cloud project number for the linked project. If you log into your Google Cloud account and select the appropriate project you can see the Project number in the overall dashboard for the project, such as the following:
Set the Cloud project number as follows, providing your project number value:
approov playintegrity -setCloudProjectNumber 243059109286
You will need an admin or delegate role and confirmation to do this:
WARNING: this will have an immediate impact on your apps in production
ATTENTION: If you wish to continue then please type YES and return: YES
Play Integrity cloud project number set
If you receive the device property flag playintegrity-need-cpn then this indicates that the Approov SDK has received an error consistent with the Google cloud project number not being set when it may need to be.
Obtaining Play Integrity State
You can always retrieve the configured Play Integrity settings with the following:
approov playintegrity -get
This will generate output such as the following:
KeyID: d4dd9548372f47cad0f464a0c1ae96d2fd5c54df
CloudProjectNumber: 733523093046
RequireAppCert: on
RequireAppIntegrity: PLAY_RECOGNIZED
RequireDeviceIntegrity: MEETS_DEVICE_INTEGRITY
RateLimit: unlimited
RecheckPeriod: never
It shows if Play Integrity integration has been enabled and the integrity verdicts that are required. It will also show the private key ID being used for access to your Google Cloud account. It is not possible to obtain the private key again once it is set. It is held securely by the Approov cloud service.
Disabling Play Integrity
The Play Integrity integration can be disabled using:
approov playintegrity -remove
You will need an admin or delegate role and confirmation to do this:
WARNING: this will have an immediate impact on your apps in production
ATTENTION: If you wish to continue then please type YES and return: YES
Play Integrity disabled
This will immediately stop any usage of Play Integrity by your apps. It will also prevent any further attestation rejections as a consequence of Play Integrity results.
Setting App Integrity Requirement
You can specify the set of app integrity verdicts that are acceptable as follows:
approov playintegrity -setRequireAppIntegrity PLAY_RECOGNIZED
You will need an admin or delegate role and confirmation to do this:
WARNING: this will have an immediate impact on your apps in production
ATTENTION: If you wish to continue then please type YES and return: YES
Play Integrity app integrity required verdicts set
This causes the Approov attestation to be rejected unless the app integrity is determined as PLAY_RECOGNIZED. Changes impact apps that have previously performed a Play Integrity attestation, as well as for new Play Integrity attestations. Note that you may specify multiple acceptable verdicts separated by |, but you should surround the parameter in double quotes for it to be accepted as single parameter.
You can clear any required verdicts by using this command, so that any verdict is considered acceptable:
approov playintegrity -clearRequireAppIntegrity
Setting App Certificate Integrity
The Play Integrity token may include an certificateSha256Digest field that provides the SHA256 hashes of the certificates used to sign the application. This claim might not be present if the device does not meet even basic integrity requirements. This is in contrast to the Approov app signature analysis which operates even if a device is rooted.
If you want Approov to use this information then enable it using:
approov playintegrity -setRequireAppCert on
You will need an admin or delegate role and confirmation to do this:
WARNING: this will have an immediate impact on your apps in production
ATTENTION: If you wish to continue then please type YES and return: YES
Play Integrity app certificate check state set
If this is enabled, and the valid signing certificates have been added to the Approov account using approov appsigncert, then a comparison is made as an additional check to ensure that the Play Integrity token is consistent with the identity of the calling app. This may cause failures if Play Integrity is not able to provide a certificate because it has not been evaluated. Changes impact apps that have previously performed a Play Integrity attestation, as well as for new Play Integrity attestations.
You can always disable this feature with:
approov playintegrity -setRequireAppCert off
Setting Device Integrity Requirement
You can specify the set of device integrity verdicts that are acceptable as follows:
approov playintegrity -setRequireDeviceIntegrity MEETS_DEVICE_INTEGRITY
You will need an admin or delegate role and confirmation to do this:
WARNING: this will have an immediate impact on your apps in production
ATTENTION: If you wish to continue then please type YES and return: YES
Play Integrity app integrity required verdicts set
Changes to the device integrity policy impacts apps that have previously performed a Play Integrity attestation, as well as for new Play Integrity attestations. Note that you may specify multiple acceptable verdicts separated by |, but you should surround the parameter in double quotes for it to be accepted as single parameter.
You can also opt in (via the Google Play console) to receive additional labels in the integrity verdict. You could then upgrade the required verdict to MEETS_STRONG_INTEGRITY, for instance.
You can clear any required verdicts by using this command, so that any verdict is considered acceptable:
approov playintegrity -clearRequireDeviceIntegrity
Setting App Licensing Requirement
You can specify the set of app licensing verdicts that are acceptable as follows:
approov playintegrity -setRequireAppLicensing LICENSED
You will need an admin or delegate role and confirmation to do this:
WARNING: this will have an immediate impact on your apps in production
ATTENTION: If you wish to continue then please type YES and return: YES
Play Integrity app licensing required verdicts set
Changes to the app licensing policy impacts apps that have previously performed a Play Integrity attestation, as well as for new Play Integrity attestations. Note that you may specify multiple acceptable verdicts separated by |, but you should surround the parameter in double quotes for it to be accepted as single parameter.
You can clear any required verdicts by using this command, so that any verdict is considered acceptable:
approov playintegrity -clearRequireAppLicensing
Rate Limiting Play Integrity Attestations
Performing a Play Integrity attestation causes the device to call a Google API. The standard API usage tier provides a maximum of 10,000 requests per day across all apps using the same Google cloud project ID.
Approov will only perform a Play Integrity attestation the first time an app is launched after installation (or after adding the Play Integrity credentials, if there is already an installed base of app users). The Play Integrity verdicts are persisted to avoid having to use Play Integrity more frequently. Thus if your typical increase in new users for your app is less than 10,000 per day you can use the standard usage tier. If you expect higher traffic than this then you must request a raised usage tier from Google. The Approov integration already takes the appropriate measures to minimize the usage of the Play Integrity service.
If you exceed your quota then some devices will not be able to perform a Play Integrity attestation. This is not a problem (unless you are using the require-playintegrity option flag) as the Play Integrity attestation will be performed the next time the app is restarted and connects to the Approov service. This should help smooth the consumption of your quota. It is only problematic if you are continually exceeding your quota on a day-to-day basis.
Note there is also a attestation renewal feature which allows you to force a new Play Integrity attestation after a period, and this will increase your usage depending upon the size of your app user base.
It is also possible to constrain the number of Play Integrity attestations performed from your account using:
approov playintegrity -setRateLimit 400
You will need an admin or delegate role and confirmation to do this:
WARNING: this will have an immediate impact on your apps in production
ATTENTION: If you wish to continue then please type YES and return: YES
Play Integrity rate limit set
The value provided is the maximum number of attestations per hour. The value 400 roughly corresponds to the maximum hourly amount for 10,000 requests per day, the default limit. If an app needs to make a Play Integrity attestation and the limit for the hour is exceeded then it is delayed until the next time the app is started, when there is some available quota. Note that if you are using the require-playintegrity option flag then this will cause the app attestation to be rejected.
You can always reset the maximum rate to be unlimited with:
approov playintegrity -setRateLimit unlimited
Controlling Play Integrity Attestation Renewals
By default, an app only performs a Play Integrity attestation when it is launched for the first time. The integrity verdicts are then securely held for the device by Approov. This approach avoids the high latency and usage overhead caused by using Play Integrity on every Approov token fetch. You can, however, opt to reattest using Play Integrity when the app uses the Approov service again when the prior Play Integrity attestation is more than a certain number of hours old. Use the command:
approov playintegrity -setRecheckPeriod 720
You will need an admin or delegate role and confirmation to do this:
WARNING: this will have an immediate impact on your apps in production
ATTENTION: If you wish to continue then please type YES and return: YES
Play Integrity recheck period set
The value provided is the number of hours before a recheck is needed. The value of 720 corresponds to the approximate number of hours in a month, so this requires a new Play Integrity attestation for each app instance every month. You need to consider how the additional Play Integrity attestations might impact your API usage tier.
Note that a given launch of an app will only ever make a single Play Integrity attestation, so if the app is not relaunched within the recheck period then the re-attestation will be delayed until it is.
You can always remove the recheck period with:
approov playintegrity -setRecheckPeriod never
Secure Strings
This is the underlying SDK feature that implements Approov Runtime Secrets Protection. It provides a secure storage capability for secrets or access tokens held by an app. A facility is also provided to predefine secure string values using the Approov CLI. These values are only made available to running apps that pass the selected rejection policy. This provides the usual protections provided by Approov so that only apps passing the attestation process can obtain access to the secrets.
The feature provides an alternative to the use of Approov tokens when Backend Integration is not possible for whatever reason, perhaps because the backend API is not controlled by the same organization as the frontend app. The two approaches can be used together if required, protecting some backend APIs with Approov tokens and using secure string secret storage for other purposes. In general we suggest you use Approov tokens wherever possible, because they are short lived ephemeral tokens that provide excellent security characteristics. However, secure secret storage provides a viable alternative in other cases that can leverage all of the same Approov app integrity checking capabilities.
The typical use cases are as follows:
-
Predefined Secure String: Some APIs might require an API key or secret in order to access the services. If this value is shipped in the app then it is easily possible to extract it using reverse engineering tools. Moreover, even if the value is obfuscated using an app hardening process it can still be extracted by a Man-in-the-Middle (MitM) proxy between the app and the backend. Predefined secure strings provide an easy solution to remove such secrets from the shipped app code. Instead, the API keys are added as predefined secure strings to your Approov account using the Approov CLI and with key names of your choosing. At runtime the app can then try and retrieve the secured values from the Approov SDK, by requesting the values associated with your chosen key names. This causes the Approov SDK to contact the Approov cloud service and perform the required attestation checks. It is only if these attestation checks pass that the secure strings are delivered to the app. These secrets remain protected at rest by Approov, and accessing them is subject to further attestation checks after a short time interval. Secrets, such as API keys, that need to be transmitted to a backend API need to be protected in transit using either pinning or managed trust roots to ensure they cannot be intercepted at that point. Note that a further advantage of this approach is that the secrets can be updated dynamically without any need to reissue a new app version through the app store.
-
App Instance Secure Strings: The feature also allows secure storage of app specific secret strings. These values are never transmitted to the Approov cloud. Instead they are encrypted at rest in app specific persistent storage using a device specific encryption key. This encryption key is only made available to the app at runtime after passing the Approov attestation checks. Thus these values are secured against extraction when the app is not active, and the temporary decryption of the values when the app is running is subject to passing the Approov attestation. A typical use case is the secure storage of access and refresh tokens obtained from an account login event. These need to be presented on API requests, but need to be protected at rest and in transit to prevent an attacker capturing them to script accesses against API endpoints. The app specific strings can can be protected in transit using either pinning or managed trust roots to ensure they cannot be intercepted at that point.
You should not use the secure strings feature for general storage in your app as accessing entries will sometimes be subject to delay. For example, the initial use of the feature requires a full attestation with its associated network access to Approov servers adding latency and the possibility of failure due to the lack of network connectivity. Once access has been granted, secure strings can normally be accessed without further network activity for a period of about 5 minutes. However, once the temporary access expires another full attestation will be required. You should really only use the feature for holding secrets that need to be presented upon backend API accesses. This way any Approov cloud network accesses will be correlated with the need for network accesses anyway.
You should never cache a secure string in your own app code. Always make a call to fetch the value prior to using it in an API request that needs it. The Approov SDK automatically caches the values in a protected form and only performs a network request if a refresh is required. Moreover, the SDK performs additional fast checks on app integrity every time the secure string is fetched even if it is cached in memory.
Enabling Secure Strings
Secure strings are enabled by default for new Approov accounts.
If you have an Approov account created prior to version 3.2 it will not be enabled by default and any attempt to fetch them from the SDK will result in a DISABLED / disabled error. Enable the feature using:
approov secstrings -setEnabled
You will need an admin role and to provide confirmation to do this:
WARNING: this will have an immediate impact on your apps in production
ATTENTION: If you wish to continue then please type YES and return: YES
secure strings enablement updated
Once enabled it is possible to use app instance secure strings but there will be no predefined strings by default.
The feature can be disabled using:
approov secstrings -setDisabled
Again, this will need an admin role and for confirmation to be provided. Note that this will discard all predefined secure string values.
Managing Predefined Secure Strings
You can add predefined secure string values using the Approov CLI. Imagine you wish to protect a secret-value. This might be some sort of API key or client secret that needs to be presented on an API call, but you don’t wish to hard code the value in your app. To access the value it needs to be assigned a key. This is secret-name in this case. Issue the following command:
approov secstrings -addKey secret-name -predefinedValue secret-value
You will need an admin role and to provide confirmation to do this.
WARNING: this will have an immediate impact on your apps in production
ATTENTION: If you wish to continue then please type YES and return: YES
secure strings updated
The secret-value will then be available to any running apps that look it up using the key name secret-name and have passed the Approov attestation checks.
You may define up to 16 different secure string values. The key names are limited to a maximum of 64 characters. There is no limit on the length of individual values. However, the complete size of all key names and values is limited to approximately 8KB.
You can retrieve the status of the secure strings at any point with:
approov secstrings -get
This shows if the feature is enabled or not, and provides a list of all of the key and value pairings if it is enabled:
secure strings feature is enabled
1 predefined string:
  secret-name: secret-value
Finally, the predefined secure string with the key secret-name can be removed as follows:
approov secstrings -removeKey secret-name
You will need an admin role and to provide confirmation to do this:
WARNING: this will have an immediate impact on your apps in production
ATTENTION: If you wish to continue then please type YES and return: YES
secure strings updated
Any apps that look up this value will start to receive an UNKNOWN_KEY / unknownKey error status from the SDK, which will result in an empty value from a Quickstart integration.
Fetching Predefined Secure Strings
The Mobile App Quickstarts provide a method to fetch a secure string, given a parameter of the key. In this case you should provide an empty newDef since you only wish to lookup predefined values.
The integrations allow secrets in headers or URL query parameters to be automatically inserted. Typically this means that an existing secret in the app just needs to be changed to a placeholder value and the actual secret can be inserted, for valid app instances, just in time as the network request is being made. Follow the instructions for your particular quickstart.
If the app fails its integrity check then a REJECTED / rejected status is provided and the secure string is not available (this differs from the behavior of Approov tokens, which would provide an incorrectly signed JWT in this case). Your app implementation will need to handle this gracefully and provide feedback to the user. This may include a retry option, but most rejection causes will likely persist. You should consider the use of Attestation Response Code or Rejection Reasons in order to provide feedback. An Attestation Response Code will provide an alphanumeric code that can only be decoded if it is given to your app support team (and they are setup to decode it). Rejection Reasons will provide a direct indication of the cause of the problem.
The fetch might also fail due to network connectivity issues, in which case you should provide a user initiated retry option.
Secure strings are only supported in version 3.0.0 and later SDKs.
App Instance Secure Strings
Predefined Secure Strings have their values set using the Approov CLI and those same values are accessible to all of your registered Apps. It is also possible to securely store strings for the app instance. This uses the same SDK methods as reading, but uses the newDef parameter for the call to define a new value for the given key name.
For example, suppose your app has received an accessTokenValue and you wish to store that securely in persistent storage for your app. In this case you might store it under the key value access_token. The newDef value should be assigned to accessTokenValue. Executing the fetchSecureString will then store this value in a protected and encrypted form on the device.
Note that the store only succeeds if the operation returns the value back again. If there is an error of any sort then the value will not have been saved and your code will need to deal with such a situation.
If you store a value with the same key name as one used for a predefined secure string then subsequent accesses to that value will retrieve the local value. That is, the predefined value will be unavailable until the local value is removed.
The Approov SDK stores the string in SharedPreferences, using MODE_PRIVATE for Android and NSUserDefaults for iOS. This persists the secure strings between app restarts. The secure string values are stored in an encrypted form to protect them at rest from analysis tools. The decryption key is only provided to the app from the Approov cloud service if the attestation is passed. Note that the string values are never transmitted to or stored by the Approov cloud service itself, which only manages the encryption key and not the data.
If you try and retrieve a secure string for a value that is not defined at all then you will get an empty value (such as null) returned. Normally this shouldn’t happen because your program logic will ensure that the value is defined before it is used. But be aware that it is possible for the user to manually clear the properties persisted for an app and in that case this status will be returned, so you will need to deal with it gracefully.
Custom JWTs
This feature provides a facility to fetch custom JWTs via the SDK, where most of the payload claims are defined by the app. This is provided for very specific circumstances where it is not possible to use the claim structure of Approov tokens.
One particular use case is for the creation of software statement JWTs for OAuth2 Dynamic Client Registration. Such a JWT needs particular claims that can be provided by the app regarding the properties of that app. This allows a particular app instance to prove that it is a true and valid instance of the particular app type, in order to register itself with an Authorization provider and obtain a per-app instance client secret. This client secret can then be stored securely in the app instance using the Secure Strings feature.
The payload claims that are required are provided to the custom JWT fetch request in the form of a marshaled JSON object. These claim values are included verbatim within the generated custom JWT, except with the following claims added (or usurping the same claim provided in the payload):
exp: The expiry time of the JWT. This is set to the same expiry time period as Approov tokens, which is normally 5 minutes but may be shorter for some risky devices.iat: The time that the JWT was issued.did: The base64 encoding of the device ID that requested the custom JWT.
A valid custom JWT is only provided if the app passes the attestation checks. The same choice of signing algorithms is provided for custom JWTs as for Approov token JWTs.
The information in the payload claims must be sent to the Approov servers for the Custom JWT to be signed. Note that the Approov servers only hold this data temporarily in memory and no long term copy of the data is made. You must consider this with respect to Personal Identifiable Information (PII) compliance. It is typically best if the payload contents do not directly identify individual users, but only provide abstract identity information.
Enabling Custom JWTs
Custom JWTs are not enabled by default, and any attempt to fetch them from the SDK will result in a DISABLED / disabled status error. Enable the feature using:
approov customjwt -setEnabled
You will need an admin role and to provide confirmation to do this.
WARNING: this will have an immediate impact on your apps in production
ATTENTION: If you wish to continue then please type YES and return: YES
custom JWT enablement updated
By default custom JWTs will be signed using the HS256 algorithm and the standard account secret key.
You can obtain the status of the custom JWT feature at any point using:
approov customjwt -get
Finally, the custom JWT can be disabled if you have an admin role:
approov customjwt -setDisabled
You will need an admin role and to provide confirmation to do this:
WARNING: this will have an immediate impact on your apps in production
ATTENTION: If you wish to continue then please type YES and return: YES
custom JWT enablement updated
Fetching Custom JWTs
The Mobile App Quickstarts provide a method to fetch a custom JWT, given a parameter of a payload to be included within it.
If the app fails its integrity check then a REJECTED / rejected status is provided and the custom JWT is not available (this differs from the behavior of Approov tokens, which would provide an incorrectly signed JWT in this case). Your app implementation will need to handle this gracefully and provide feedback to the user. This may include a retry option, but most rejection causes will likely persist. You should consider the use of Attestation Response Code or Rejection Reasons in order to provide feedback. An Attestation Response Code will provide an alphanumeric code that can only be decoded if it is given to your app support team (and they are setup to decode it). Rejection Reasons will provide a direct indication of the cause of the problem.
The fetch might also fail due to network connectivity issues, in which case you should provide a user initiated retry option.
Custom JWTs are only supported in version 3.0.0 and later SDKs.
Custom JWT Key Set Usage
When the feature is first enabled the HS256 signing algorithm is used for the custom JWT using the account secret. However, it is possible to use Key Sets to select different keys and signing algorithms. This also allows the use of an imported private key if desired.
Assuming the addition of a new key called your-key, you can select this as follows:
approov customjwt -keySetKID your-key
An admin role and confirmation is required:
WARNING: this will have an immediate impact on your apps in production
ATTENTION: If you wish to continue then please type YES and return: YES
custom JWT keyset KID changed
The kid claim in the JWT header will be populated with the selected key identifier, and the appropriate signing algorithm and secret is used for subsequently generated custom JWTs.
It is possible to revert back to HS256 and the account secret with the following:
approov customjwt -clearKeySetKID
Again, an admin role and confirmation is required.
WARNING: this will have an immediate impact on your apps in production
ATTENTION: If you wish to continue then please type YES and return: YES
custom JWT keyset KID changed
Managing Key Sets
When an Approov account is created it is allocated a random secret key that is used by default for Approov token signing or encryption. This provides Approov tokens signed using the HS256 algorithm (or A256GCMKW if an encrypted JWE is selected). The HS256 verification uses the symmetric 512-bit account secret key, which needs to be made available to the backend API, to check the validity of the token.
Key sets allow additional keys to be added to an Approov account, which can then be used to sign or encrypt Approov tokens for specific API domains. This allows the use of different keys for different API domains if required. Moreover, key sets also allow access to a much richer set of signing algorithms. In particular, asymmetric signing algorithms (such as RS256) allow the validity of a token to be verified using only the public key. This avoids the security risks associated with needing to add a symmetric key to the API backend (such as with HS256), which could allow valid Approov tokens to be generated if it were to be compromised.
Key sets may also be used by the Custom JWTs feature too.
Adding a New Key
A new, randomly generated, keyset key can be added as follows. You can specify the name which you wish to give the key and the algorithm used for signing and encryption, as follows:
approov keyset -kid your-key -add RS256
In this case a new key named your-key is generated for use with the RS256 signing algorithm. A random RSA private key is generated by Approov and added to your account.
The following signing algorithm are available:
HS256,HS384,HS512: These HMAC signing methods use a symmetric key, with differing hashing algorithms. If you use these then you must be careful to secure the symmetric key used to verify them, since it can also be used to create fresh valid tokens.RS256,RS384,RS512: These useRSASSA-PKCS1-v1_5asymmetric cryptography, with differing hashing algorithms. The Approov tokens are signed with the private key which can be verified in the backend API using the associated public key.PS256,PS384,PS512: These useRSASSA-PSSasymmetric cryptography, with differing hashing algorithms. The Approov tokens are signed with the private key which can be verified in the backend API using the associated public key. The difference fromRSASSA-PKCS1-v1_5is that there is a random element to the signature, which may be advantageous to differentiate Approov tokens if many are being generated with the same expiry timestamp.ES256,ES384,ES512: These useECDSAasymmetric cryptography, with differing hashing algorithms.ES256uses curveP-256(secp256r1),ES384usesP-384(secp384r1), andES512usesP-521(secp521r1). The Approov tokens are signed with the private key which can be verified in the backend API using the associated public key.A256GCMKW: This is the only supported encryption algorithm to generate aJWErather than aJWS. This uses a symmetric key, so if you use this then you must be careful to secure the symmetric key since not only can it be used to decrypt and verify tokens, it can also be used to encrypt fresh valid tokens.
This article provides a good overview of the different options.
Once a new keyset key has been added, it can be referenced by the -keySetKID option for Keyset Key API Addition.
It is also possible to specify a key length override parameter when specifying an algorithm that uses RSA (RS256, RS384, RS512, PS256, PS384, PS512) or symmetric keys (HS256, HS384, HS512, A256GCMKW).
approov keyset -add RS256 -keyLength 4096
The default length for an RSA key is 2048 bits, but it may be overridden to 1024 or 4096 bits. The default length for a symmetric key is 256 bits, but may be overridden to 128 or 512 bits.
Note also that in this case no kid parameter was specified. If this is not provided then the key is named using a simple incrementing counter for the account.
The Backend API Quickstarts are written assuming the default signing algorithm of HS256 and that the account secret key is being used. You will need to make small alterations to these to support different algorithms and the different manner in which public keys are obtained for keyset keys.
It is only possible to have a maximum of 10 keyset keys at any one time.
Listing Keys
The current keys in the keyset can be listed as follows:
approov keyset -list
The algorithm associated with each key is provided, along with a list of any apis that the key is currently associated with for token signing.
1 key:
 your-key  alg:RS256  apis:your.domain
A given key may be associated with multiple different API domains.
Removing Keys
A keyset key can be removed as follows:
approov keyset -kid your-key -remove
Note that you need an admin role to remove a key from the keyset and you will need to provide confirmation. Furthermore, you can only remove a key if it is not in use on a particular API domain. If it is in use, you first need to Remove the API Domains or change them to use a different key before the key can be deleted. This needs to be done with care as it may have an immediate impact on your production apps.
Getting Public Key PEM
It is possible to obtain the PEM file for a specific key within the keyset. This is the encoded form of the public key specified by the -kid option, in PKIX ASN.1 DER format. The encoded public key is a SubjectPublicKeyInfo structure, as defined in RFC5280, section 4.1. Obtain the PEM as follows:
approov keyset -kid your-key -getPEM your-key.pem
The contents of the your-key.pem file will be something like the following:
-----BEGIN PUBLIC KEY-----
MIGfMA0GCSqGSIb3DQEBAQU...
-----END PUBLIC KEY-----
Various external tools and API gateways support this format to allow the checking of Approov tokens.
It is only possible to obtain a PEM for RSA and ECDSA key types, that use asymmetric cryptography. The command generates a PEM containing only the public key. This enables token verification but not token creation which means public disclosure of the PEM file does not enable a path to unauthenticated access to your API. It does however mean that external parties can determine the validity of Approov tokens which is undesirable. Depending on your security posture and if this does happen, you may still want to change the token secret for the associated APIs.
Getting Keyset JWKS
It is possible to obtain the JSON Web Key Set for all keys in the keyset as follows:
approov keyset -getJWKS keys.jwks
The contents of the keys.jwks will be something like the following:
{
  "keys": [
    {
      "alg": "RS256",
      "e": "AQAB",
      "kid": "your-key",
      "kty": "RSA",
      "n": "4NhUHZSl5ws8...",
      "use": "sig"
    }
  ]
}
Note that you need an admin role to get the JWKS for the key set. This is because this will also obtain any symmetric keys in the key set, and these require rigorous security since they allow creation as well as verification of Approov tokens. For asymmetric RSA and ECDSA keys, only the public key is obtained.
Remember that the keys encoded in a JWKS are in base64url rather than base64 encoding. The provided JWKS keys do not include the optional x5c and x5t claims.
Using JWKS URI Endpoint
It is possible to make the public keys in a keyset available as a JSON Web Key Set file on a URI. This public key material can then accessed and cached by your verifying server without the need to import a fixed set of public keys. This has the advantage that key rotations can be handled automatically. Note that only public keys, never symmetric keys, are provided on this endpoint.
By default the JWKS URI is not enabled. You can enable it as follows:
approov keyset -setJWKSURI on
Note that you need an admin role and will need to make a confirmation. This will output something like the following:
WARNING: updating the JWKS URI policy will have an immediate impact on your apps in production
ATTENTION: If you wish to continue then please type YES and return: YES
JWKS URI policy was updated successfully
JWKS URI: https://admin-something.approovr.io/keyset/your-account/jwks.json
You can provide this URI to configure your Approov token verification. There will be a short propagation delay of up to 30 seconds before keyset changes are reflected in the URI version. Note that only public keys are made available, so it is not possible to use this if you are using a symmetric key for signing tokens. Thus you cannot use this for the default HS256 signing algorithm.
You can always obtain the JWKS URI status and URI with:
approov keyset -getJWKSURI
Remember that the keys encoded in a JWKS are in base64url rather than base64 encoding. The provided JWKS keys do not include the optional x5c and x5t claims.
If you wish to rotate the keys being used for signing then you can do this by adding a new keyset key and setting the relevant API domains to use this new key. Keep the previous key in keyset (and therefore available by the JWKS URI) for some time until all Approov tokens using that key will have expired.
Importing Keys
It is possible to import a JSON Web Key into the keyset as follows. Imagine you have a file byok.jwk with the following content:
{
  "alg": "RS256",
  "use": "sig",
  "d": "FumDxNCs...",
  "dp": "mUxVEADBN...",
  "dq": "Yv9xjIj5vOo...",
  "e": "AQAB",
  "kid": "byok",
  "kty": "RSA",
  "n": "05yGbvzgIobbtaeJ...",
  "p": "9_NNlMTz_S5jcxORGz...",
  "q": "2ns2LBc5-1f3m7iI...",
  "qi": "TxLIVbqDsTvmhTgmR..."
}
Import it as follows:
approov keyset -import byok.jwk
A kid claim must be present and not be the same as any existing key in the key set. The alg and use claims must also be present and be consistent with algorithms supported by Approov, or else the import request will be rejected.
Note that you need an admin role to import a private key. For an asymmetric key, once the private key is imported it is not possible to export it again. Only the corresponding public key may be exported. Extreme care must be taken to secure the file holding the JWK since it contains the private key and can thus be used to create valid Approov tokens.
If you have multiple Approov accounts, then the importing feature allows you to Bring Your Own Key (BYOK) and share them between multiple accounts. This allows Approov tokens generated by different accounts to use the same Approov protected backend API using a common key. In this case the private key should be generated externally to Approov and then imported into the required accounts. Alternatively, you could make the backend API compatible with multiple different key IDs that it can lookup from the token header.
Installation Message Signing
This is an advanced option that enables a method in the SDK to sign arbitrary messages using an app installation specific key. A key pair is generated automatically when the SDK is first initialized. The public key is transmitted to Approov servers and may be included in Approov tokens in the ipk claim. The private key, however, never leaves the device itself. The keys will be held in secure hardware (TEE/Secure Enclave) to prevent the key material being exfiltrated from the device. During Approov attestations the device must prove it has possession of the key by signing one-time (nonce) data provided by the Approov servers. Installation keys are always asymmetric key pairs generated using Elliptic Curve Cryptography.
The feature ensures strict message integrity between the client app and the backend API. Message integrity is also assured by Managing Dynamic Pinning, which we strongly recommend that you implement (all of our frontend integration quickstarts do this). We provide installation message signing as an advanced option for certain situations where an additional level of integrity assurance is required.
Installation message signing is only available in 3.4.0 and later SDKs.
As well as installation specific message signing, Approov also offers Account Message Signing where requests are signed using an account specific key. Both methods can be employed together, but we would advise the use of this installation message signing before employing the account message signing option.
Key Attestation
On Android the generated key pairs are subject to a key attestation process. This provides confidence that the keys have indeed been generated on a real Android device and are being actively protected in a TEE.
All SDKs from 3.4.0 will generate key pairs automatically. However, you may have apps running with older Approov SDKs in your account. If you enable the option flag require-install-key then this ensures that all app installations have keys, or else they will be rejected with failed-requirement.
By default there is no requirement for the key pair that is generated to be attested. It is possible to opt into this using the option flag require-android-tee. If this is enabled then all key pairs on Android must be attested to be secure in a Trusted Execution Environment (TEE) or StrongBox. Any device not able to do this will be rejected with failed-requirement. Note that Android 6.0 devices do not have this capability so will not be able to receive valid Approov tokens.
Furthermore, by default the key attestation will accept keys attested by various TEE implementations. The root certificate in the chain provided by the attestation shows the root authority. If the option flag require-certified-key-attest if enabled then only root certificates from Google and certain other trusted hardware manufacturers will be accepted, and other attestations will be rejected with failed-requirement.
Key pairs on iOS are not subject to key attestation because this feature is not provided directly in iOS. The keys will be held securely in the key chain, but this is not subject to the same level of rigourous verification as is possible in Android. However, you can enable AppAttest which provides some additional security guarantees regarding the attestation of key material on a real iOS device.
Enabling Installation Message Signing
Checking of installation message signing on the backend is signalled by including the installation’s public key in Approov tokens in the ipk claim. The claim is base64 DER encoded ASN.1 public key information. If the public key is included then this is used to indicate to the backend that it should expect a valid installation message signature. The feature can be enabled as follows:
approov policy -setInstallPubKey on
An admin role and confirmation is required to make the policy change:
WARNING: updating the subject policy will have an immediate impact on your apps in production
ATTENTION: If you wish to continue then please type YES and return: YES
installation public key policy was set successfully
Simply use off as a parameter to disable this again if required.
The current policy can always be retrieved as follows:
approov policy -getInstallPubKey
Implementing Installation Message Signing
The Mobile App Quickstarts support installation message signing as a configuration option. The configuration options also specify the set of headers that should be included in the signatures. All headers that are intended to reach the backend server and influence its behaviour should be included. The request HTTP verb, URL and body are always included.
When enabled, the quickstart integration concatenates the relevant parts of a request into a single string. This is then passed to the installation signing method in the SDK to obtain the signature. This signature is then itself added to the request as an additional header. This is provided in addition to the Approov token header, which is included in the message integrity calculation. Moreover, you should always include the Approov token itself as part of the string submitted for signing as this prevents replay attacks (since the Approov token has a short expiration time).
Various of the Backend API Quickstarts also support installation message signing checking. The backend API will first check the validity of the Approov token in the normal way. If the installation public key ipk claim is present in the token then it will also check the installation message signing integrity. It is able to gather the components of the request and build the same single string as the client and verify the expected signature against the public key provided. A failure indicates that the request has been tampered with in some way during transit or the originator of the message did not have access to private key corresponding to the public key provided.
It is not necessary to enforce signature checking on all API endpoints. You may wish to only apply it on particularly security sensitive ones. Of course, there must be consistency between the app and the backend API in these choices.
Account Message Signing
This is an advanced option that enables a method in the SDK to sign arbitrary messages, using HMAC with the SHA-256 algorithm. The HMAC key is account specific, so that the same key is used for all devices using the same account. Each Approov account uses a distinct signing key.
As well as account specific message signing, Approov also offers Installation Message Signing where requests are signed using an installation specific signing key. Both methods can be employed together, but we would advise the use of installation message signing before employing this account message signing option.
The feature ensures strict message integrity between the client app and the backend API, and is also an additional proof that the requests are truly emananting from an app that has passed the Approov attestation process. Message integrity is also assured by Managing Dynamic Pinning, which we strongly recommend that you implement (all of our frontend integration quickstarts do this). We provide account message signing as an advanced option for certain situations where an additional level of integrity assurance is required.
When account message signing is enabled the Approov account is assigned a random 512-bit secret that is used for the signing process. This secret key is only transmitted to the SDK if it passes attestation and is provided with a valid Approov token. If the attestation fails, and an incorrectly signed Approov token is sent, then an incorrect message signing secret is provided so that the app’s message signatures will be incorrect.
Enabling Account Message Signing
Account message signing can be enabled on the account as follows:
approov secret -messageSigningKey change
An admin role and confirmation is required:
WARNING: changing the message signing key will have an immediate impact on your apps in production
ATTENTION: If you wish to continue then please type YES and return: YES
key ID: EXTnGx
encoding: base64
RVhUbkd4b01iQ1N3R3Y2cGM4dVdsTEU1UG14S3VOTVhkVDk1dWstb0xPVFZtSEZkdVRueW1lYmRUZWFmR1U3SQ==
All further Approov fetches will also transmit the signing secret to the SDK and the key ID for it will appear in the mskid claim in Approov tokens. The generated message signing secret is provided in base64 format. It can also be obtained in other formats.
The command can also be used to change the message signing secret to a new random value if required. Remember that the new secret must be made available to backend systems to do the signature verification.
Getting the Account Message Signing Key
The current account message siging key can be obtained as follows:
approov secret -messageSigningKey get-raw
An admin role is required and the output will be something like the following:
key ID: EXTnGx
encoding: raw
EXTnGxoMbCSwGv6pc8uWlLE5PmxKuNMXdT95uk-oLOTVmHFduTnymebdTeafGU7I
This example uses get-raw to get the raw secret value which is always 64 characters long. The generated secret only consists of printable characters, to support this.
Note that the key ID, which is included in the mskid claim of Approov tokens, is composed of the first few characters of the raw secret.
You can also obtain a base64 or base64url encoded form of the secret key with get-base64 or get-base64url.
Disabling Account Message Signing
Account message signing can be disabled on the account as follows:
approov secret -messageSigningKey clear
An admin role and confirmation is required:
WARNING: changing the message signing key will have an immediate impact on your apps in production
ATTENTION: If you wish to continue then please type YES and return: YES
message signing key cleared
Once disabled, the Approov cloud service will stop adding the mskid claim to new Approov tokens. Furthermore, once running apps receive their next token, the signing secret will be cleared and the message signing method in the SDK will no longer generate signatures.
Prior to going into production you may wish to check the impact of clearing the message signing key, and that this continues to allow backend API operation as expected. This emulates the behavior expected should the Approov cloud system automatically transition to failover operation.
Implementing Account Message Signing
The Mobile App Quickstarts support account message signing as a configuration option. The configuration options also specify the set of headers that should be included in the signatures. All headers that are intended to reach the backend server and influence its behaviour should be included. The request HTTP verb, URL and body are always included.
When enabled, the quickstart integration concatenates the relevant parts of a request into a single string. This is then passed to the device signing method in the SDK to obtain the signature. This signature is then itself added to the request as an additional header. This is provided in addition to the Approov token header, which is included in the message integrity calculation. Moreover, you should always include the Approov token itself as part of the string submitted for signing as this prevents replay attacks (since the Approov token has a short expiration time).
Various of the Backend API Quickstarts also support account message signing checking. To do this they need to be provided with the secret account message signing key. The backend integration will first check the validity of the Approov token in the normal way. If the account message key ID mskid claim is present in the token (and matches the expected key ID) then it will also check the account message signing integrity. It is able to gather the components of the request and build the same single string as the client and verify the expected signature using the provided secret key. A failure indicates that the request has been tampered with in some way during transit or the originator of the message did not have access to private key corresponding to the public key provided.
It is not necessary to enforce signature checking on all API endpoints. You may wish to only apply it on particularly security sensitive ones. Of course, there must be consistency between the app and the backend API in these choices.
Android Automated Launch Detection
Approov for Android provides a facility to detect if the app is being launched in an automated way, rather than via the standard launch icon on the device. For instance, this detects if the app is being launched from Android Studio, via an adb shell am start sequence or via monkeyrunner. Typically you would not expect these launches from a production app, and therefore such an automated launch may well be associated with activity that you wish to block. Automated ad clicking commonly uses farms of devices launched and controlled in an automated fashion.
Devices on which automated launching is detected still receive valid Approov tokens (assuming there are no other detected causes for rejection). This is because they still represent untampered instances of the real app running in a standard environment. However, you may optionally select the Annotation Policy of info to force automated launch properties to appear in the annotation of the Approov token.
In order to detect an automated launch it is necessary to provide the Approov SDK with a reference to the Activity. This should be done in the onCreate method of any starting activity for the app. Starting activities are denoted in the AndroidManifest.xml with the appropriate intent filters, for example:
<activity android:name=".MainActivity">
    <intent-filter>
        <action android:name="android.intent.action.MAIN" />
        <category android:name="android.intent.category.LAUNCHER" />
    </intent-filter>
</activity>
A simple call to the Approov SDK as follows notifies it of the Activity. It performs analysis on it to determine if there is evidence of an automated activity start. Note that setActivity cannot be called until after the Approov SDK is initialized, but it is assumed that this will be done in the onCreate method of the Application so it will have been completed first.
public class MainActivity extends Activity {

    @Override
    protected void onCreate(Bundle savedInstanceState) {
        super.onCreate(savedInstanceState);
        Approov.setActivity(this);
Your backend integration can detect the presence of the properties in the anno claim and react accordingly to requests from the device. The possible properties are as follows:
non-standard-launch: Indicates that an Android app is being launched in some non standard way. This might simply be due to the use of a custom launcher app on a consumer’s device, but may be used as a risk indicator along with other factors for automated usage.automated-launch: Indicates that an Android app is being launched in some automated way rather than from the standard launcher. For a production app this is a strong indicator of automation that may be associated with some nefarious use of the app.
Metrics Graphs
Metrics graphs provide both live and longer term summary information about your account usage. They can be used to see the total number of devices that have requested Approov tokens over a time period (and therefore what the usage related costs will be) and also show the failures where particular devices have been denied valid Approov tokens. The graphs provide information about the reasons for any such failures.
There are two ways that you can reach the metrics graphs:
(1) Directly via the link that may have been provided in your onboarding email.
(2) The metrics portal can also be reached via an approov command. This automatically opens the metrics information in your browser:
approov metrics
The URL being opened is shown in the command line and a new browser window is opened with the relevant information. If the browser does not open for some reason (perhaps because there is no default browser is setup) then the given URL can be pasted in another browser window to view the information.
Note that the browser request or onboarding link contains an access token to authorize viewing of the information. Since this is pasted into a browser, it should be handled with care. It is a specially constructed token that provides read-only access to the metrics information and no other aspects of the account. If you are ever concerned that this link may have been compromised then you can use the command approov monitoring -refreshMetricsLink and all previous links will be revoked and a new one generated. Note that this same link is shared between all users of the account.
Grafana
The metrics graphs are rendered using Grafana. Please refer to Grafana Getting Started to understand how to use the basic features of Grafana. Note that you will be provided with a fixed set of dashboards showing information from your account and you will not be able to edit these dashboards or add new data sources.
A number of different individual dashboards are available for your account, each showing different information and described in later sections. Each dashboard may contain a number of different graphs that show different types of activity from your account. The available dashboards can be listed using the menu on the top left hand side of the screen:
![]()
Graphs are rendered over a timescale defined in the text box at the top right of the screen. If you click on this then various timescale options are provided. Moreover you can click the refresh button to the right of this to cause to show the latest data from the selected time range. Options for automatic refresh are also available. Note that times are always shown in UTC, regardless of your local timezone setting. The timescale settings impact all graphs shown on the same dashboard. It is possible to zoom into an area of interest in a graph using the mouse: click, drag and release to highlight and zoom into the region of interest.
Each graph shows a number of time series, depending upon the graph and the exact circumstances of your account. On many graphs there are numerous time series so it may be difficult to see an individual one. You can restrict the graph to only show a single time series by clicking on it in the legend on the right hand side of the graph. Clicking on it again enables all time series. You can use the Control key to perform a multi-select to show an arbitrary set of time series together.
The legend shows the maximum value in the time range being shown and for some graphs an average is also shown. Hovering over the graph allows the values to be seen on each selected time series at an arbitrary time.
The authentication method used for Approov Grafana dashboards complicates the use of the “Share” options. If you wish to share dashboards you must make sure that the user has first stored the credentials cookie in the browser before clicking on a link generated by Grafana. You can do this by also sharing the URL generated by the approov metrics command, or the one present in your onboarding email. If you ask the recipient of the shared links to click on the Approov generated authorization link before using the shared dashboard link the pages will then work as expected.
The graphs provide access to a Configuration button which lists available Plugins. Note that these are not available for use in your account.
Metrics Naming
The Approov cloud service generates a number of metrics for your account. These capture frequency measurements for various types of activity which can give valuable insight into its usage and any potential issues. The different types of metrics are described in the following sections.
Mobile Attestation Result Overview Metrics
Mobile Overview metrics are used to provide a high level summary of the status of attestation requests received from a mobile app associated with your Approov account.
| Metric Name | Description |
pass |
Indicates that a valid Approov token was issued in response to a mobile attestation. |
fail |
Indicates that an invalid Approov token was issued in response to a mobile attestation because a criteria was not met. The precise causes for failure depend on the rejection policy that has been selected. Other metrics provide more information about the causes for rejections. |
fail-bad-request |
Indicates that a request was rejected outright in response to a mobile attestation because it was incorrectly formed. Under normal circumstances this should not occur, but could indicate a failed attempt to spoof requests for the account to the Approov servers. |
Mobile Device Properties Metrics
Mobile Device Properties metrics provide information about the presence of particular characteristics of devices attesting using your account. These correspond to device properties that have been determined from the running device. All the properties have either a pass-flag- or fail-flag- prefix to indicate that it is reporting on a mobile device property and whether the associated attestation passed or failed.
Whether a given request is rejected or not will depend on the Rejection Policy associated with the account or requesting device. This means that if the security policy is changed then flags previously associated with passes may become fails (or vice versa). Additionally, if a specific property is not responsible for causing an attestation to fail then it may appear in the metrics for both passing and failing attestations.
Mobile App Metrics
These are metrics generated depending on the mobile app making the request. This allows an easy assessment of the population of apps, or those associated with a particular problematic behavior. Whenever these metrics are shown they are either prefixed with pass- or fail- depending on whether the overall request was passed or failed. Whether a given request is rejected or not will depend on the Rejection Policy associated with the account or requesting device. Note that app version metrics are only available in the live metrics.
| Metric Name | Description |
app-<os>-<name>
|
The package name of the app that is requesting an Approov token. The app is running on the given os, either ios or and for Android.
|
appver-<os>-<name>-<version>
|
The package name of the app with its corresponding app version that is requesting an Approov token. The app is running on the given os, either ios or and for Android. This allows tracking of specific versions and the transition to a new version when it is pushed out into the app store. Note that the version specific activity of apps with [Temporary Registrations](#temporary-registrations) are not recorded, although all other metrics are gathered as normal.
|
Mobile SDK Metrics
These are metrics generated from statistics collected in each running Approov Mobile SDK, which are then aggregated across your entire account. These allow an assessment to be made of the rate of usage of the SDK methods and the prevalence of any errors generated.
| Metric Name | Description |
sdk-calls-fetch-sync
|
The number of calls to the synchronous fetchApproovTokenAndWait method in the SDK.
|
sdk-calls-fetch-async
|
The number of calls to the asynchronous fetchApproovToken method in the SDK.
|
sdk-calls-fetch-sec-string-sync
|
The number of calls to the synchronous fetchSecureStringAndWait method in the SDK.
|
sdk-calls-fetch-sec-string-async
|
The number of calls to the asynchronous fetchSecureString method in the SDK.
|
sdk-calls-fetch-custom-jwt-sync
|
The number of calls to the synchronous fetchCustomJWTAndWait method in the SDK.
|
sdk-calls-fetch-custom-jwt-async
|
The number of calls to the asynchronous fetchCustomJWT method in the SDK.
|
sdk-calls-fetch-config
|
The number of calls to the fetchConfig method in the SDK.
|
sdk-calls-get-pins
|
The number of calls to the getPins or getPinsJSON methods in the SDK.
|
sdk-calls-set-data-hash
|
The number of calls to the setDataHashInToken binding method in the SDK.
|
sdk-calls-set-install-attrs
|
The number of calls to the setInstallAttrsInToken method in the SDK.
|
sdk-calls-integrity-proof
|
The number of calls to the getIntegrityMeasurementProof method in the SDK.
|
sdk-calls-device-proof
|
The number of calls to the getDeviceMeasurementProof method in the SDK.
|
sdk-calls-account-message-signature
|
The number of calls to the getAccountMessageSignature method in the SDK.
|
sdk-calls-install-message-signature
|
The number of calls to the getInstallMessageSignature method in the SDK.
|
sdk-calls-set-dev-key
|
The number of calls to the setDevKey method in the SDK.
|
sdk-result-success
|
The number of fetch calls resulting in a SUCCESS / success status.
|
sdk-result-no-network
|
The number of fetch calls resulting in a NO_NETWORK / noNetwork status (assuming the app could subsequently get network access to report this).
|
sdk-result-poor-network
|
The number of fetch calls resulting in a POOR_NETWORK / poorNetwork status.
|
sdk-result-mitm-detected
|
The number of fetch calls resulting in a MITM_DETECTED / mitmDetected status.
|
sdk-id-<value>
|
The number of fetch calls made from the Approov SDK with given value ID.
|
sdk-arch-<platform>-<processor>
|
The number of fetch calls made from a device with a given processor architecture. The platform may be either ios or android. The processor provides the type of processor used, allowing differentiation between 32-bit and 64-bit systems. Intel architectures for iOS are for the simulator only, whereas Android supports native Intel processor instruction sets.
|
sdk-version-<value>
|
The number of fetch calls made from the Approov SDK with the reported value version number.
|
Mobile Rejection Policy Metric
The policy metric is prefixed policy- with the remainder of the metric name providing the name of the rejection policy that is being applied to the device. This will typically be the default policy for the account, but may be a device specific policy.
Mobile Device Filter Metrics
Filter metrics are prefixed filter- with the remainder of the metric name as defined using the approov filter -add command. Thus these are user defined labels reporting the associated filter matches. Please see the Device Filters section for a complete explanation as well as instructions to add, modify, and remove filters using the Approov CLI.
Web Protection Metrics
Web protection metrics are generated after integrating a web protection service with one of your web apps; see Web Protection Integration. The metrics are prefixed pass-web-, fail-web-, or error-web as appropriate. The metrics summarise the activity and failure reasons for your integrated web-protections.
| Metric Name | Description |
pass-web |
Indicates that a valid Approov token was issued in response to a web protection request. This reports the sum total of passing web protection requests across all web-protection integrations. Note that, if a single request contains more than one integrated web protection result, then all those results will need to pass in order to obtain valid Approov tokens and to add one to this metric. |
fail-web |
Indicates that an invalid Approov token was issued in response to a web protection request because a criteria was not met, depending on the configuration for your web protection services. If a single request contains more than one integrated web protection result, then only one such result needs to fail to cause the issuance of invalid approov tokens and to add one to this metric. |
error-web |
Indicates that an error was issued in response to a web protection request. This may indicate genuine errors received by your web app or a failed attempt to spoof requests. Error details are not available from Grafana, see the Troubleshooting Web Protection Errors section if this represents responses to legitimate requests. |
pass-web-fpjs |
A valid Approov token was issued for a web protection request requiring a FingerprintJS check |
pass-web-hcap |
A valid Approov token was issued for a web protection request requiring an hCaptcha check |
pass-web-recap |
A valid Approov token was issued for a web protection request requiring a Google reCAPTCHA check |
fail-web-aprv-rate-limit-exhausted |
An invalid Approov token was issued because a rate limit was triggered for one or more of the integrated web protections |
fail-web-fpjs-vis-or-rqst-id-unknown |
An invalid Approov token was issued because the FingerprintJS lookup failed to recognise the specified VisitorID or RequestID |
fail-web-fpjs-timestamp-too-old |
An invalid Approov token was issued because the timestamp for the FingerprintJS request happened too far into the past. This may indicate a malicious attempt to reuse RequestIDs or that the current Max Elapsed Time setting for the Subscription is too short. See the section on FingerprintJS configuration. |
fail-web-fpjs-bot-probability |
An invalid Approov token was issued because the BotProbability score returned by the FingerprintJS lookup was higher than the configured maximum for the subscription. See the section on FingerprintJS configuration. |
fail-web-hcap-request-invalid |
An invalid Approov token was issued because the hCaptcha lookup responded with the Success property set to false |
fail-web-hcap-domain-not-found |
An invalid Approov token was issued because the hCaptcha lookup responded with a domain that is not in the configured set of acceptable domains. This only triggers if the hCaptcha site in Approov has been configured with a set of domains to check. See the section on hCaptcha configuration. |
fail-web-hcap-bad-score |
An invalid Approov token was issued because the hCaptcha lookup responded with a score that was below the minimum configured for the site. See the section on hCaptcha configuration. |
fail-web-recap-request-invalid |
An invalid Approov token was issued because the reCAPTCHA lookup responded with the Success property set to false |
fail-web-recap-action-not-found |
An invalid Approov token was issued because the reCAPTCHA lookup responded with an action that is not in the configured set of acceptable actions. This only triggers if the reCAPTCHA site in Approov has been configured with a set of actions to check. See the section on reCAPTCHA configuration. |
fail-web-recap-domain-not-found |
An invalid Approov token was issued because the reCAPTCHA lookup responded with a domain that is not in the configured set of acceptable domains. This only triggers if the reCAPTCHA site in Approov has been configured with a set of domains to check. See the section on reCAPTCHA configuration. |
fail-web-recap-bad-score |
An invalid Approov token was issued because the reCAPTCHA lookup responded with a score that was below the minimum configured for the site. See the section on reCAPTCHA configuration. |
error-web |
An invalid web protection request was made and the Approov service generated an error response. The generated response includes more detail on the cause of the error which is not reported in the metrics. See the section on Troubleshooting Web Protection Errors. |
Grafana Dashboards
Different collections of metrics are presented by different Grafana dashboards with each one presenting related data on a single page. The dashboards collectively cover 3 different categories: Live Metrics, Summary Metrics, and Billing Usage. The list below describes the categories and the associated dashboards with links to sections that provide more details:
-
Live Metrics Dashboards. The Live metrics dashboards allow you to view the current activity in your account in near real time. The metrics are accumulated for a minute by the Approov backend service before the caluclated data points are added to the time-series database that holds the raw data behind the metrics views. After a short propagation delay the metrics will be viewable from the dashboards; in total a delay of less than 2 minutes.
Live metrics dashboards automatically accumulate data from multiple per-minute data points as the queried time range grows. For maximized browser windows displayed at typical modern resolutions, the default time-range of 1 hour will present the raw per-minute point values. As the time range grows the accumulation period will also grow to keep the total number of displayed points roughly consistent. For example, with a 3-hour time range the accumulation period will be 2 minutes meaning that each point displays the mean of two adjacent per-minute metric values. The titles of the individual graph panels in the live metrics dashboards all display the active Accumulation Period in use in that panel.
The data that backs the live metrics dashboards is kept for at least 14 days, although an absolute time range limit of 7 days is applied to any request. Requests for greater time ranges will be rejected to help prevent overloading the metrics server backend Similarly, requests that specify time ranges that include times outside the limit of stored data are also rejected. If this happens, the graph panels will be drawn blank but with a warning trinagle in the top left corner. Clicking the triangle will display the available error information. If you would like to view longer time ranges, then we suggest that you use the summary metrics dashboards described below, identify the behavior of interest, and then use the live-metrics views to get more detailed insight within a smaller time range.
Four dashboards present live data:
- Live: Mobile App Attestations Presents metrics that describe the mobile app attestation activity and results. It includes metrics gathered from mobile apps of the following types: Mobile Result Overview, Mobile Device Properties, and unversioned Mobile App metrics.
- Live: Mobile App Version Activity Presents the attestation activity partitioned by different mobile app versions. It includes the versioned Mobile App metrics.
- Live: Mobile SDK Activity Presents the metrics captured on device and then reported by the mobile SDK as it contacts the primary service to perform an attestation. This dashboard includes Mobile SDK Metrics.
- Live: Web App Activity Presents the metrics that describe the activity of the Approov web protection integration and the 3rd party services that it calls. This dashboard includes Web Protection Metrics.
-
Summary Metrics Dashboards. The summary dashboards present account activity accumulated over different time periods. All the dashboards present Mobile Result Overview, Mobile Flag, unversioned Mobile App and Web Protection metrics.
Summary dashboards always present the data points at the raw summary data capture period of 1 hour; unlike live metrics, there is no accumulation period controlled by the Grafana layer. The side-effect of this is that if the time range is such that Grafana cannot display all points in the selected time range then it will elect to exclude certain points from the rendered graph. Be aware of this if you are looking at graphs that plot time ranges with more points than there are pixels across the display area. There is no explicit notification from Grafana when this has happened although the labels on the time axis should give you some hint. You can also tell by hovering the mouse over adjacent points in the graph; hovering the mouse over a point will cause a pop-up to be displayed which includes the associated time.
The data that backs the summary metrics dahsboards (and also billing usage) is kept for at least 3 months. No access to metrics data is available outside this period. When viewing summary metrics, you can request a time range up to 3 months. Larger time ranges, or ranges that include periods beyond the range of recorded data, may be rejected by the metrics server backend resulting in blank graphs with a warning triangle in the top left corner. Clicking the triangle will display the available error information.
Three dashboards (and the separate Billing Usage dashboard) present summary data:
- Summary: Hourly Activity Summary metrics allowing assessment of the counts of different devices or web protection requests from hour to hour.
- Summary: Daily Activity Summary metrics allowing assessment of the counts of different devices or web protection requests from day to day.
- Summary: Monthly Activity Summary metrics allowing assessment of the counts of different devices or web protection requests from month to month.
-
Billing Usage. This is a single dashboard category. It presents the metrics that summarise billable activity in your account. The presented metrics are a subset of the monthly summary metrics and the same time range and boundary restrictions apply.
Live: Mobile App Attestations
The Live: Mobile App Attestations dashboard reports on mobile app attestation success and failure with the associated causes in your account. It also presents the result of any device filters you have configured. Information shown in the graphs is updated within 2 minutes of the event occurring. New accumulated data is recorded and viewable every minute. The following image shows the central section of the dashboard:

The metrics are shown across four graphs:
- Passes: This shows Mobile Result Overview, Mobile Device Properties, and unversioned Mobile App metrics from requests that pass and for which a valid Approov token was issued. Metrics are prefixed with
pass-indicating this status. Thepassmetric shows the total number of mobile app attestation passes. - Fails: This shows Mobile Result Overview, Mobile Device Properties, and unversioned Mobile App metrics from requests that fail and for which an invalid Approov token was issued. Metrics are prefixed with
fail-indicating this status. They may be prefixedfail-dev-if the failure is related to a development build that is failing. Thefailmetric shows the total number of mobile app attestation failures. It is important to understand that this shows the properties of the failing device, but these are not necessarily the properties that caused it to fail. Those are shown in the Rejections graph. - Rejections: Shows the Mobile Device Properties Metrics that caused attestation failures. In this graph, the device properties that caused the failures have their
fail-prefix changed to arejection-prefix to indicate this status. The prefixrejection-dev-is used to mark reasons for rejections in development builds. This graph also shows the Mobile Rejection Policy Metric which is being applied. - Filter Matches: Shows the Mobile Device Filter Metrics for any matches being made because of defined Device Filters.
The y axis for the graphs are in terms of the volume of requests (requests per minute). The same device making multiple requests within a time period will be counted multiple times.
During initial development, when there is data coming from a very low number of devices, this dashboard provides the quickest way to determine if requests are reaching the Approov servers and evaluating the responses that are made.
Live: Mobile App Version Activity
The Live: Mobile App Version Activity dashboard reports on attestation success and failure results across the different versions of apps you have deployed. Note that the version specific activity of apps with Temporary Registrations are not recorded, although all other metrics from those apps are gathered as normal. Information shown in the graphs is updated within 2 minutes of the event occurring. New accumulated data is recorded and viewable every minute.
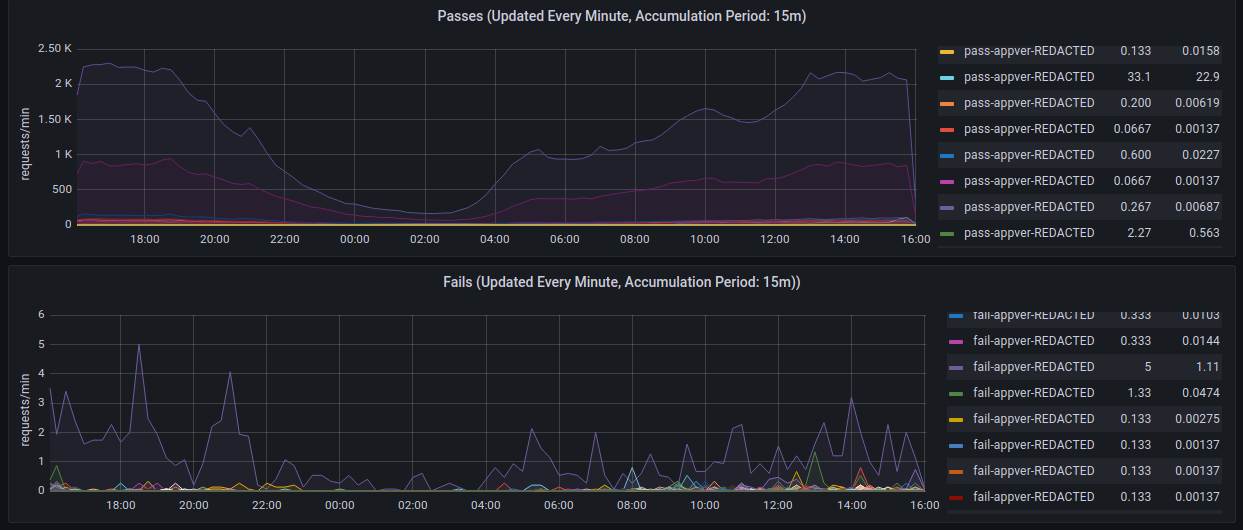
The metrics are shown across two graphs:
- Passes: This shows versioned Mobile App metrics from requests that pass and for which a valid Approov token was issued. Metrics are prefixed with
pass-indicating this status. - Fails: This shows versioned Mobile App metrics from requests that fail and for which an invalid Approov token was issued. Metrics are prefixed with
fail-indicating this status.
The y axis for the graphs are in terms of the volume of requests (requests per minute). The same device making multiple requests in a time period will be counted multiple times.
Live: Mobile SDK Activity
This dashboard shows live Mobile SDK metrics that are being collated from running Approov SDKs in apps associated with the account. These are aggregated across all SDKs with a new sample being generated every minute. These metrics are not directly associated with a pass or fail.
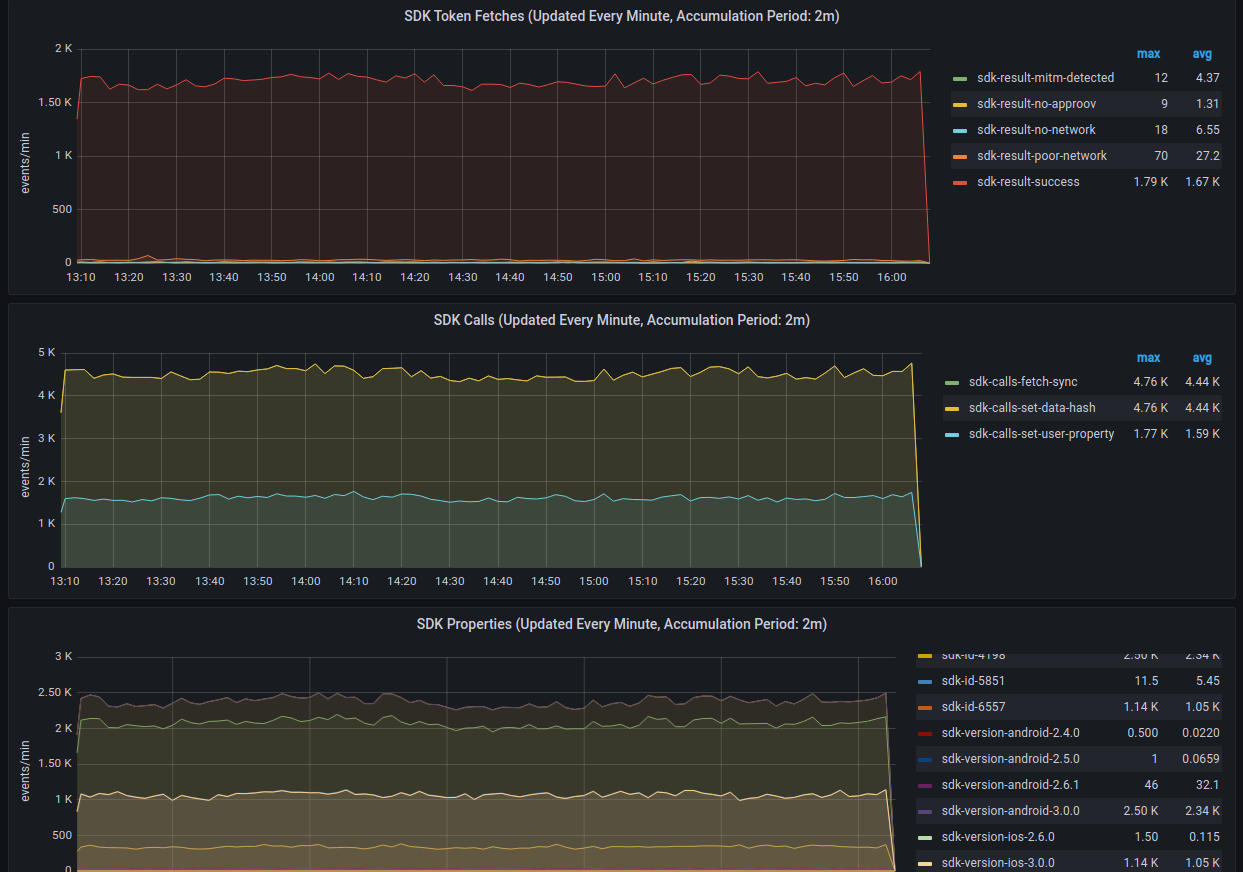
The metrics are shown across three graphs:
- SDK Fetches: Shows the
sdk-resultmetrics. These are helpful to determine if there are any widespread issues affecting running SDKs. The vertical scale is of succeeding or attempted fetches. Note that if a particular SDK instance is without network for an extended period while trying to perform fetches then when it reconnects the count of attempts made is associated with that connection time, which may cause a spike in the graph forsdk-result-no-networkorsdk-result-poor-networkresults. - SDK Calls: Shows the
sdk-callsmetrics. These are related to counted calls made in the SDK, and will typically be larger than the number of actual Approov fetches. For instance, calls to get an Approov token when one is already cached are counted here. - SDK Libraries: Shows the
sdk-archandsdk-idmetrics. This shows the particular architectures and library IDs that are in use.
Live: Web App Activity
The Live: Web App Activity dashboard reports on web app attestation success and failure and the associated causes in your account.Information shown in the graphs is updated within 2 minutes of the event occurring. New accumulated data is recorded and viewable every minute.
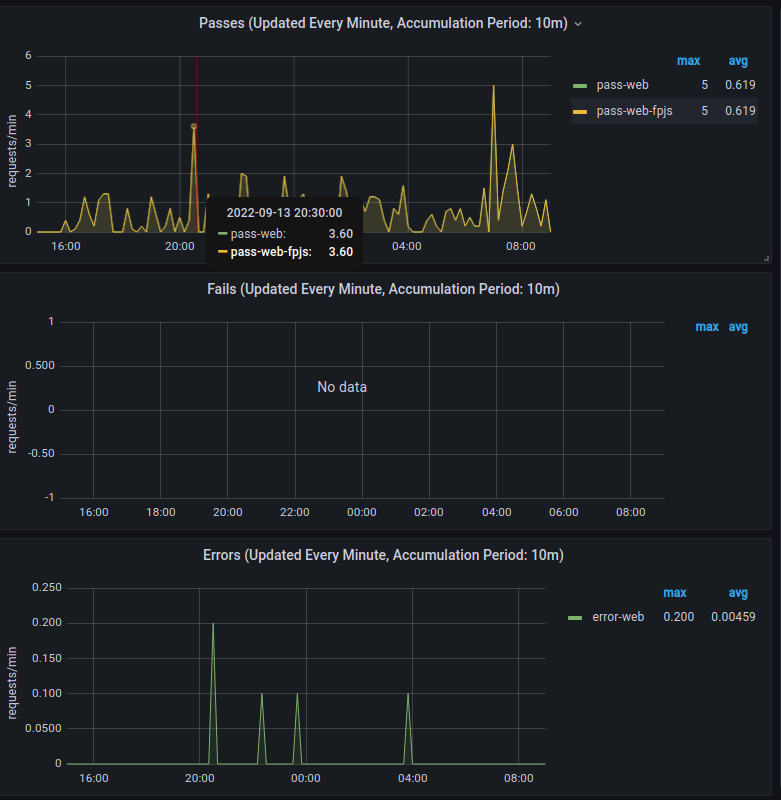
The metrics are shown across three graphs:
- Passes: This shows Web Protection metrics from requests that pass and for which a valid Approov token was issued. Metrics are prefixed with
pass-web-indicating this status. Thepass-webmetric shows the total number of web protection passes across all integrated web protections. - Fails: This shows Web Protection metrics from requests that fail and for which an invalid Approov token was issued. Metrics are prefixed with
fail-web-indicating this status. Thefail-webmetric shows the total number of web protection fails across all integrated web protections. - Errors: This shows occurences of the
error-webmetric listed with the other Web Protection metrics. It is caused by requests for web protection that resulted in an error response. There is no record of the type of error in the graph but this information is sent back to the browser making the request. See the section on Troubleshooting Web Protection Errors to get more pointers on diagnosing and fixing these errors.
The y axis for the graphs are in terms of the volume of requests (requests per minute). The same browser making multiple requests in a time period will be counted multiple times.
During initial development, when there are no deployed web apps also providing data, the graph can be used for quickly determining if requests are reaching the Approov servers and assessing the response made.
Summary: Hourly Activity
This dashboard provides an overview of the hourly usage of the account in terms of the number of different device IDs that used the account in an hour period and the total number of mobile app attestation and web protection requests that were made. A new sample is output every hour. It shows Mobile Result Overview, Mobile Device Properties, Mobile App and Web Protection metrics. This allows assessment on the level of account usage from hour to hour in terms of the count of different devices or mobile attestation and web protection requests. The upper two graphs show device related metrics and the lower two show request metrics.
Device Metrics

The upper graph shows devices that passed in the last hour and were therefore issued with at least one valid Approov token. The metrics are prefixed with hourly-pass. Pass metrics are restricted to a total and per-app package breakdown.
The lower graph shows the devices that failed in the last hour and were therefore issued with at least one invalid Approov token. The metrics are prefixed with hourly-fail. Fail metrics also show the flags that caused failures (i.e. those shown with the rejection- prefix in the Live: Mobile App Attestations dashboard).
Note that if a device both passes and fails in the same day then it will be counted in both graphs.
Request Metrics
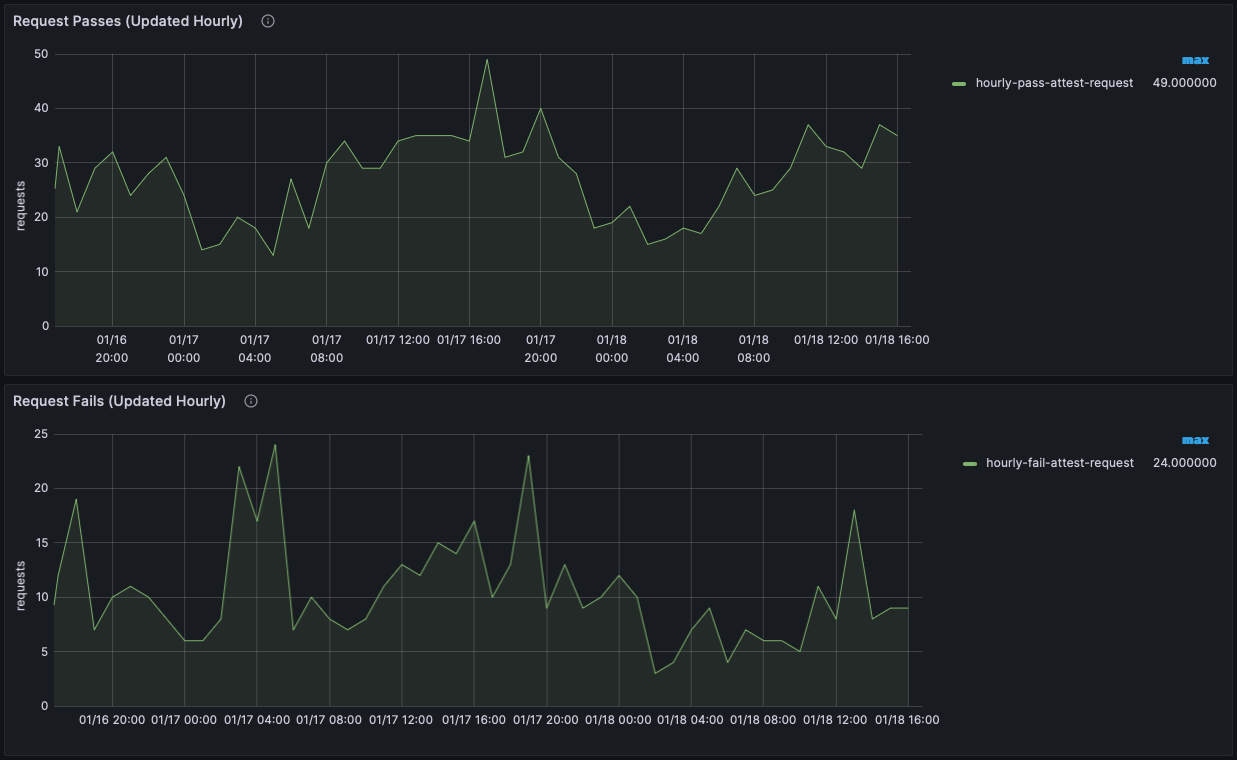
The upper graph shows the mobile attestation and web protection requests that passed in the last hour and therefore resulted in a valid Approov token. The metrics are prefixed with hourly-pass.
The lower graph shows the mobile attestation and web protection requests that failed in the last hour and therefore resulted in an invalid Approov token. The metrics are prefixed with hourly-fail.
Summary: Daily Activity
This dashboard provides an overview of the daily usage of the account. The number of devices as well as mobile attestation and web protection requests are counted throughout the day, until reset at midnight UTC. A new sample is output every hour. It shows Mobile Result Overview, Mobile Device Properties, Mobile App and Web Protection metrics. This allows assessment on the level of account usage from day to day in terms of the count of different devices or mobile attestation and web protection requests. The upper two graphs show device related metrics and the lower two show request metrics.
Device Metrics
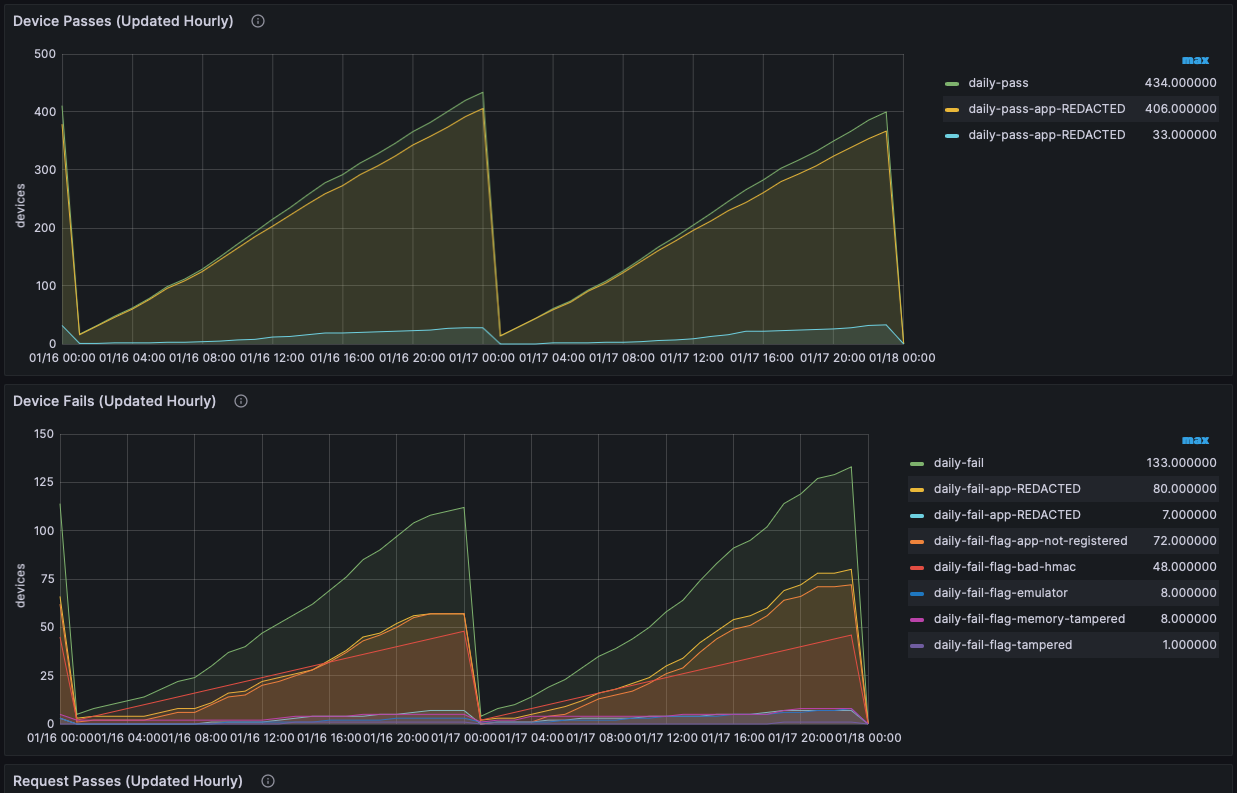
The upper graph shows devices that passed in the last day and were therefore issued with at least one valid Approov token. The metrics are prefixed with daily-pass. Pass metrics are restricted to a total and per-app package breakdown.
The lower graph shows the devices that failed in the last day and were therefore issued with at least one invalid Approov token. The metrics are prefixed with daily-fail. Fail metrics also show the flags that caused failures (i.e. those shown with the rejection- prefix in the Live: Mobile App Attestations dashboard).
Note that if a device both passes and fails in the same day then it will be counted in both graphs.
Request Metrics
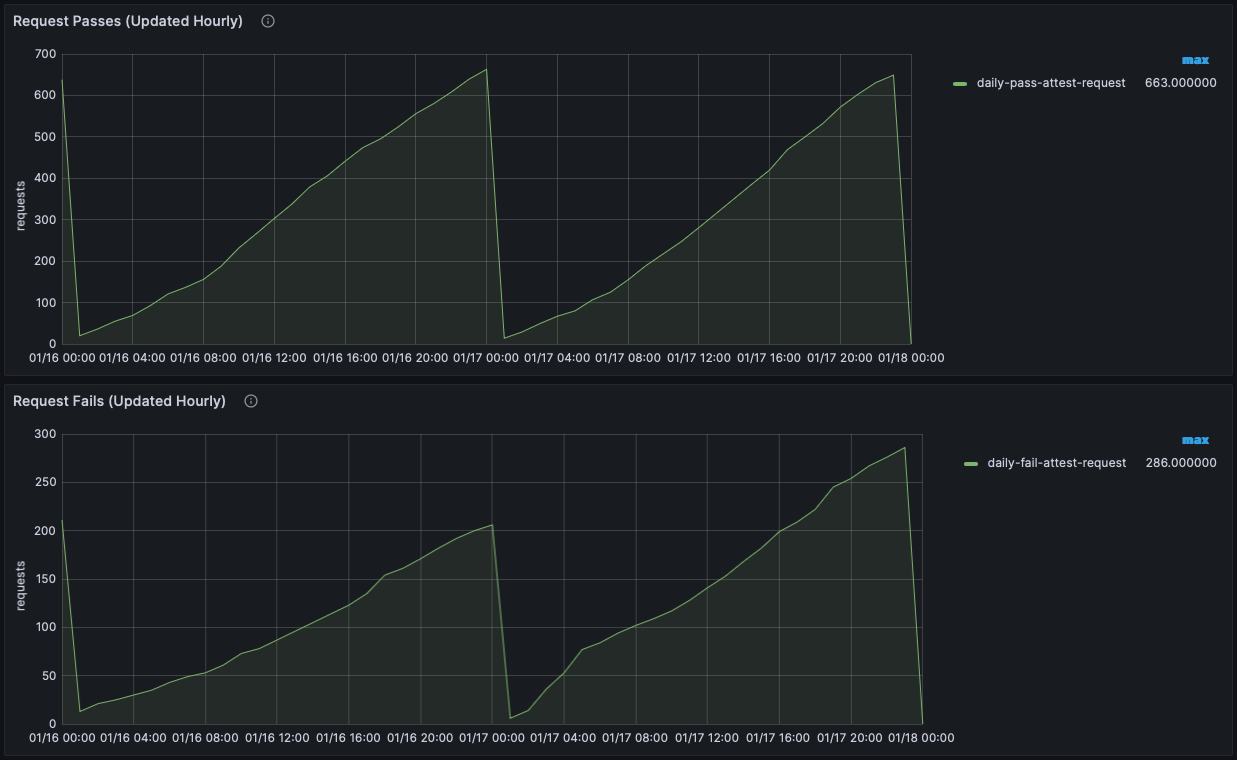
The upper graph shows the mobile attestation and web protection requests that passed in the last day and therefore resulted in a valid Approov token. The metrics are prefixed with daily-pass.
The lower graph shows the mobile attestation and web protection requests that failed in the last day and therefore resulted in an invalid Approov token. The metrics are prefixed with daily-fail.
Summary: Monthly Activity
This dashboard provids an overview of the monthly usage of the account. The number of devices as well as mobile attestation and web protection requests are counted throughout the month, until reset at midnight UTC on the billing day of the account. A new sample is output every hour. It shows Mobile Result Overview, Mobile Device Properties, Mobile App and Web Protection metrics. The upper two graphs show device related metrics and the lower two show request metrics.
Device Metrics
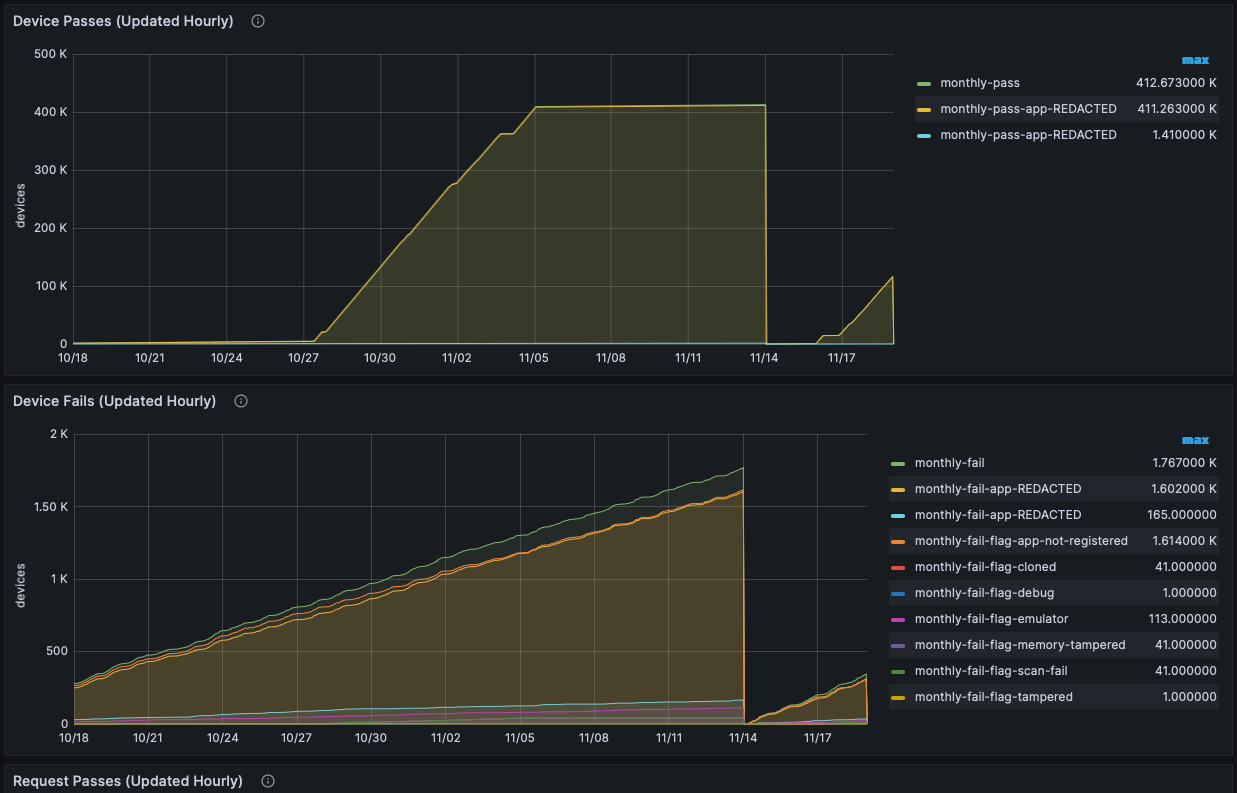
The upper graph shows devices that passed in the last month and were therefore issued with at least one valid Approov token. The metrics are prefixed with monthly-pass. Pass metrics are restricted to a total and per-app package breakdown.
The lower graph shows the devices that failed in the last month and were therefore issued with at least one invalid Approov token. The metrics are prefixed with monthly-fail. Fail metrics also show the flags that caused failures (i.e. those shown with the rejection- prefix in the Live: Mobile App Attestations dashboard).
Note that if a device both passes and fails in the same month then it will be counted in both graphs.
Request Metrics
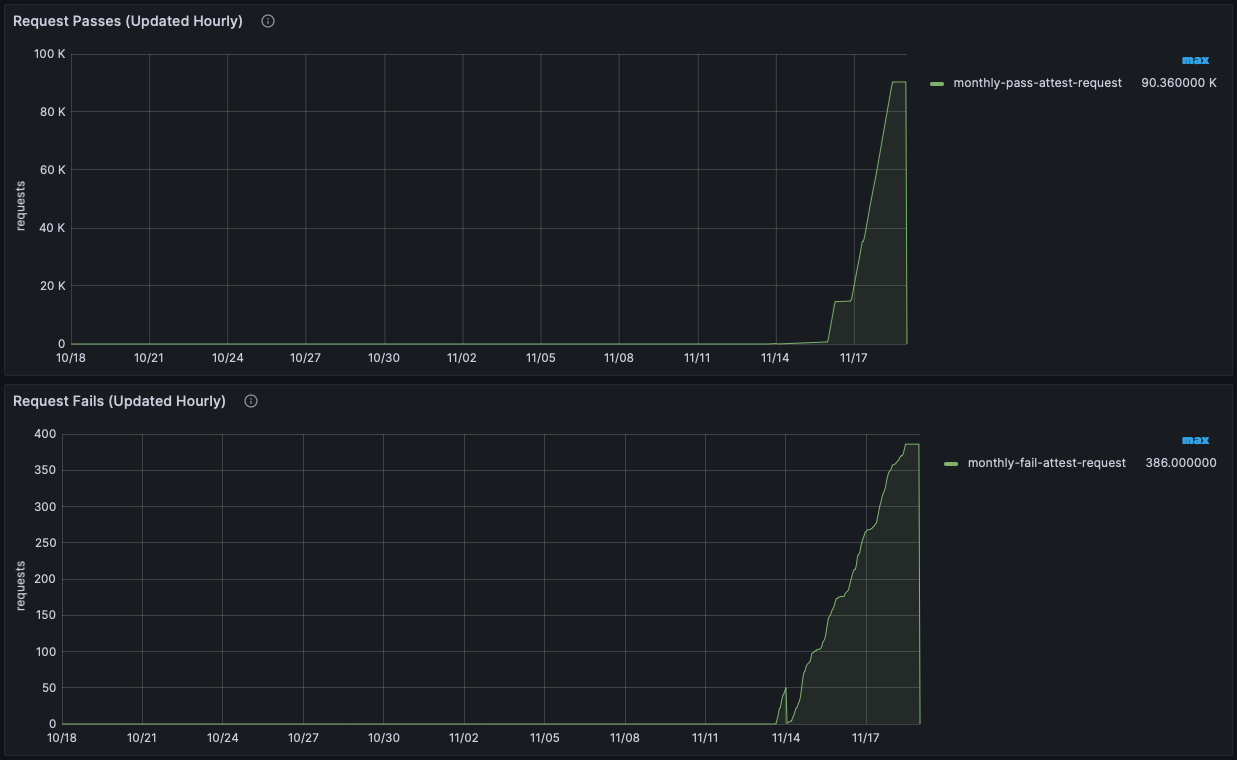
The upper graph shows the mobile attestation and web protection requests that passed in the last month and therefore resulted in a valid Approov token. The metrics are prefixed with monthly-pass.
The lower graph shows the mobile attestation and web protection requests that failed in the last month and therefore resulted in an invalid Approov token. The metrics are prefixed with monthly-fail.
Billing Usage
This dashboard provides an overview of the usage of an account over time showing Mobile Result Overview Pass and non-versioned Mobile App metrics. A new entry is generated on each hour. For mobile attestation billing, the y axis scale is based on the number of unique device IDs that have been seen since the start of your account’s billing period in the month. For web protection integrations, the y axis shows the accumulated number of web protection requests resulting in valid Approov tokens.
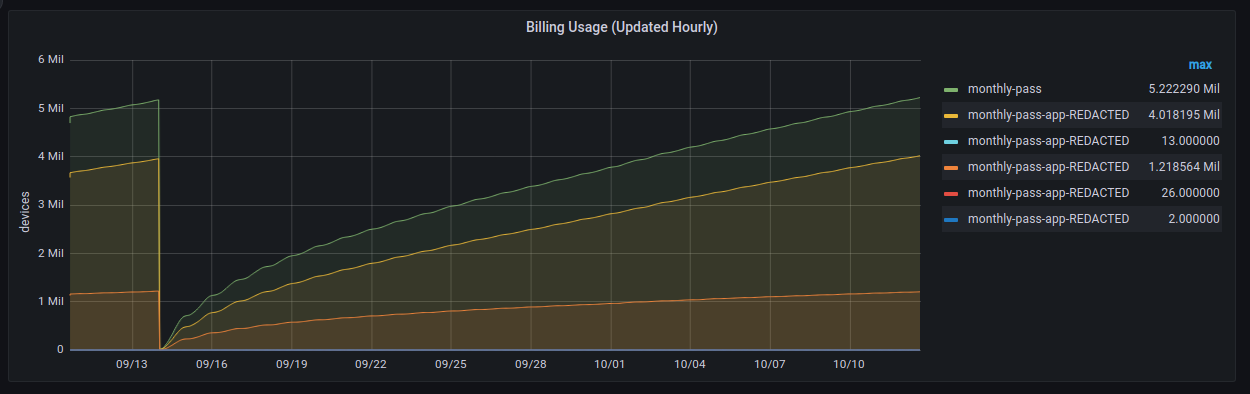
This figure will grow over the month until it is reset on the “billing day” anniversary each month. The maximum value that the monthly-pass and monthly-pass-web figures reach during the month is used to calculate the account’s usage invoice for the month. Since billing is calculated only on the basis of passing attestation and web protection requests all metrics shown are in fact prefixed monthly-pass.
In addition to the overall figure, mobile app attestation metrics are also provided for each app package name that has been successfully used on the account. This allows an assessment to be made between iOS and Android usage, or for different apps associated with the account.
Exporting Data
It is possible to export raw graph data into a CSV file using the menu available on the right click button on each graph, as follows:
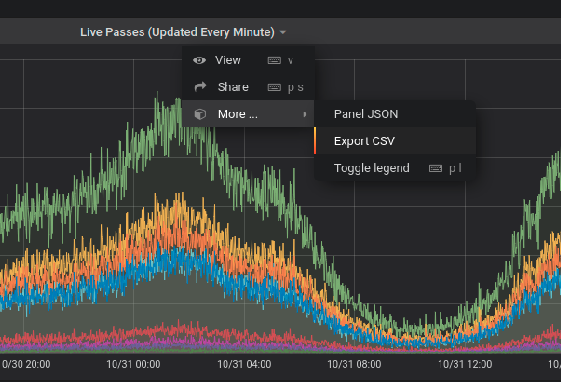
Service Monitoring
Approov provides facilities that allows monitoring of the status of your account. A healthcheck API endpoint is supported, along with monthly or even daily summaries of usage and notification emails if there is a certificate problem with one of your endpoints.
Summary Emails
Summary emails can be sent automatically at the end of each billing month. This is typically on the anniversary day within the month of your signup to the Approov service. Typical emails are of this form:
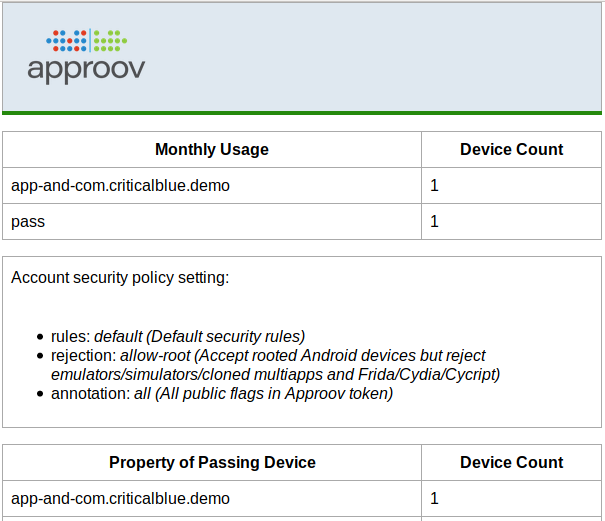
Information provided is as follows:
- Monthly Usage: Provides an overview of the usage of the account in the last month, based ont he monthly endpoint of the information in Billing Usage
- Security Policy: A reminder of the Security Policy that is currently set for your account. This directly impacts which devices are passed and which are failed.
- Passing Devices: Provides an overview of the properties of the devices which were passed during the month, based on the monthly summary of the information in Monthly Metrics.
- Failing Devices: Provides an overview of the properties of the devices which failed during the month, based on the monthly summary of the information in Monthly Metrics.
- Rejection Policy: Provides a list of all of the device properties, a short description of each, and whether they will cause a rejection if detected.
- Option Flags: Provides a list of all of the option flags, a short description of each, and whether they are enabled for the account or not.
- Metered Metrics: Provides information about usage for any web protection integration.
The email should be received shortly after midnight UTC on your billing day. The email is copied to all those on the recipient list. The Managing Email Recipients shows how you may update this. Shortly after receiving the summary email you will also receive an invoice or automated credit card charge reflecting the usage shown in the summary email.
API Monitoring
The Approov cloud service is able to monitor your API endpoints to ensure that they are both accessible and that the certificates presented match one or more of the pins you have set in your account. The endpoints are checked every 15 minutes, and a notification email is sent if a problem is detected. This will list each of the monitored API domains that are experiencing an issue.
When you add an API domain, monitoring for it will be activated automatically, unless no pin was added or one was added via local access (implying the API endpoint is not generally visible on the Internet). Note that notifications can only be sent if your account’s alert email or email recipients list has been set up. API monitoring alerts are sent to all these email addresses.
You can always set a new API for monitoring as follows:
approov monitoring -addAPI your.domain
An admin role is required. If the API is not accessible on the standard port of 443 you can use the -port option to select monitoring on a different port.
If an email is sent then, by default, no further ones will be sent for 24 hours. However, you can override this behavior by issuing the following command:
approov monitoring -resumeAPINotifications
You will then receive an email again if there is a further problem after the APIs are checked on the next (or a subsequent) 15 minute cycle.
Monitoring for a specific API domain can be removed as follows:
approov monitoring -removeAPI your.domain
This might be required if the API domain is not accessible from the Approov cloud service, or is not part of your production system and you don’t wish to monitor it continuously.
Managing Alert Email
It is possible to set an email address for receiving API monitoring alerts as follows:
approov monitoring -addAlert ops-alert@your.domain
An admin role is required. Be careful with the addition of email addresses as these are not verified at the time of addition. There can only be a single alert email address.
This email will only be sent API monitoring emails, not any summary emails. Thus an email address can be used that will generate an internal alert within your systems to provide immediate notification that there is a problem with your API domains.
You can retrieve the current settings as follows:
approov monitoring -get
Producing a response such as:
monitoring emails will be sent to:
  you@your.domain
summary frequency: monthly
alert recipient: ops-alert@your.domain
The alert email can be removed with:
approov monitoring -removeAlert
If it is not possible to deliver email to the alert recipient on a continual basis then it may be automatically removed by Approov.
Managing Email Recipients
When your account is first created your email will be setup to receive summary emails and API monitoring alerts. You may add new recipients as follows:
approov monitoring -add another@your.domain
An admin role is required. Be careful with the addition of email addresses as these are not verified at the time of addition. It is possible to have up to 10 different monitoring email recipients.
You can retrieve the current settings as follows:
approov monitoring -get
Producing a response such as:
monitoring emails will be sent to:
  you@your.domain
  another@your.domain
summary frequency: monthly
Email recipients can be removed with:
approov monitoring -remove another@your.domain
If it is not possible to deliver email to a particular recipient on a continual basis then the recipient may be automatically removed by Approov.
Sending Test Email
It is possible to send a test email to all monitoring (and any alert) recipient with:
approov monitoring -sendTestEmail
This can be used to verify that the email addresses have been setup correctly and can be received correctly.
Setting Summary Frequency
By default only a monthly summary email will be sent. However, it is also possible to opt into a daily summary email that is also sent soon after midnight UTC. It provides a summary of the passing and failing devices from the day, representing the daily endpoint of the data in Daily Metrics.
Opt into daily emails as follows:
approov monitoring -selectDailySummary
You may always return to monthly emails only with:
approov monitoring -selectMonthlySummary
Emergency Contact
A facility is provided to allow you to set an emergency contact. This will allow Approov to contact your operations team in an exceptional circumstance, such as a major Approov outage or if we detect a serious problem with your account. Ideally therefore you should provide some mechanism to allow us to contact your operations team out of hours.
You can specify a string containing contact information with:
approov monitoring -setEmergencyContact "Email at ops@your.domain, out of hours cell +1 23456789"
Remember you can always contact our operations team using the technical support email support@approov.io.
Healthcheck Endpoint
The Approov cloud service incorporates an always-on health monitoring system which actively monitors the state of various internal cloud server components, reporting the overall health state and operational readiness of the primary service. This has an externally accessible API for determining the system health for your account. You can retrieve the URL for this endpoint as follows:
approov monitoring -getHealthCheckURL
This provides the URL that you should use for checking your particular account health, e.g.
https://healthcheck.approovr.io/healthcheck/att-your-account
Note that it is common for account names to be prefixed with att-, as shown here. You can query this endpoint to determine the system health as follows:
curl -X GET https://healthcheck.approovr.io/healthcheck/att-your-account
This endpoint will return a “200 OK” HTTP response with a JSON body including a HealthState key with value initializing, passed or failed. You would normally expect:
{
  "HealthState": "passed"
}
You can regularly poll this endpoint if you wish to determine the system heath. We do not recommended that you poll more than once a minute. The possible states are as follows:
initializing: Appears temporarily after a service restarts one or more components and indicates that the system is gathering data to determine the health status. When this operation is complete, the health monitor will report apassedorfailedhealth state as appropriate.passed: Indicates that the system is up and running correctly. All operations can be used as normal.failed: Indicates that the system has encountered a fault in one or more of its components. The administration APIs may be down which means the service cannot be administered using theapproovcommand line tool. In the unlikely event that the service is unhealthy, the health monitoring system will report apassedstate as soon as the system becomes healthy again.
Note that the endpoint only returns the health of the primary service. If there is a problem with the primary service then the failover system is automatically enabled, as described in Cloud Server Redundancy. This means that even if the primary system is being reported as being unhealthy then it is highly likely that Approov tokens will still be being served by the system. Note that if the health endpoint itself is down then it is not possible to determine the system state. However, since this endpoint is not itself served by the primary system and is independent of it, the likelihood is that it remains fully operational.
User Management
It is possible to provide access to your Approov account (via the approov CLI) to other members of your team.
Best Practice
When a new account is created the account holder is issued with dev and admin roles. One the capabilities of the admin role is the ability to add new users, with specific roles.
In a larger organization where multiple personnel need to interact with the Approov service, we expect that there will be some internal control of the access to Approov. We recommend that only a single individual, or small restricted group, should have access to the admin role. We suggest that dev roles are created for each of the individuals that are involved in the development of the apps that use the Approov service. These tokens allow access to all of the facilities required for app development, without more dangerous privileges that might impact apps that are live in production. The dev user roles can be issued to named individuals, preferably for a timescale that represents their likely involvement. Access can be revoked by the administrator at any time.
For larger and more complex teams and projects we recommend having multiple Approov accounts to provide enhanced insulation between development and production operations. If this is a requirement then please contact Approov support.
User Roles
There are five different types of role may be used with the approov command line tool. These are dev, admin, delegate, pentest and automation.
Admin Role
An admin role has additional privileges that are not available for the dev role as follows:
- Removing app registrations that do not have an expiry date. Typically, this type of registration should be reserved for apps in production and so the removal of such registrations is protected.
- Removing multiple app registrations in single command invocation using the
-removeMatchingoption. - Modifying the security policy applied to the whole account. If this is changed then it could cause invalid Approov tokens to be sent to a range of different users that might cause a partial outage event.
- Removing or modifying the set of API domains and pins for the account. If these are changed incorrectly then connection may be denied in production apps via an incorrect pin, or if an active API domain is accidentally removed then it will no longer receive valid tokens. All these actions could result in an outage event. Note that new API domains can be added with a
devrole as this does not carry a risk of outage. - The creation, revocation and listing of user roles as discussed in this section.
- Creating long lived Approov tokens for server-to-server communication or testing.
- The extraction and update of the account secret key. This secret must be considered to be extremely sensitive since its possession allows arbitrary valid Approov tokens to be generated.
- Removing Android app signing certificates.
- Adding or removing Apple credentials for DeviceCheck usage.
- Removing or importing keys in the keyset.
- Exporting the JWKS for the keyset.
Delegate Role
The delegate role has a more limited set of rights, and it will only ever be required in special circumstances. It is used when a 3rd party (who also has their own Approov account) is responsible for developing and registering the app that will be used to access endpoints controlled by this account. The privileges of the role are as follows:
- Being the destination account for registration cloning using the
registrationcommand with the-cloneTo,-cloneToAccountsor-cloneToAllDelegateAccountsoptions. - Obtaining the SDK config using the
approov sdk -getConfigStringorapproov sdk -getConfigcommands. - Managing the app signing certificates with the
approov appsigncertcommands. - Managing any DeviceCheck configuration with the
approov devicecheckcommands. - Managing any AppAttest configuration with the
approov appattestcommands. - Managing any Play Integrity configuration with the
approov playintegritycommands. - Checking the validity of tokens, and generating example ones, with
approov tokencommands. - Viewing metrics for the account, either with a link in the onboarding email, or via
approov metrics.
Note that the delegate role provides no rights to get the account secret key, or keyset keys, associated with the account.
Pentest Role
The pentest role has a very limited set of rights. It is designed to allow an independent pentester of the app to modify the security policy applied to a device. This, for example, allows pinning to be disabled or an Annotation Policy to be set showing the reason for a rejection on a device. The privileges of the role are as follows:
- Adding and removing custom devices. Note that only the devices added using a pentest role can be seen or removed.
- Obtain the current security policy using
approov policy -get. - Generate an example Approov token witrh the
approov token -genExamplecommand, for testing the backend API.
Automation Role
The automation role has a very limited set of rights. It is intended to support automated scripted use of the approov CLI, especially for Continuous Integration (CI) build systems (see Automated Approov CLI Usage.
- Downloading the SDK itself using the
approov sdk -getLibrarycommand. - Obtaining the SDK config using the
approov sdk -getConfigStringorapproov sdk -getConfigcommands. - Creating new app registrations with
approov registration -add. - Getting the current set of APIs and their pins with
approov apis -getAll, and associatedapiandpincommands that only read the API and pinning state. This also includesapproov api -check.
Note if there are any other operations you would like to perform from your build and other automation scripts using an automation role, then please contact Approov support.
Adding New User Roles
Additional user roles may only be issued if you have access to an admin role. Here is an example of issuing Approov access to a new user with dev role privileges:
approov users -add bob@your.domain
This will require confirmation:
WARNING: you are adding dev role access to account your-account for bob@your.domain (bob)
ATTENTION: If you wish to continue then please type YES and return: YES
onboarding email has been sent to bob@your.domain
The -add option has a parameter of the user email. By default the new user role will have the same duration as the admin role used to create it. Moreover the new user role will be password protected (unless overridden with the -noPassword option). The user will receive an Approov Onboarding email with instructions of how to initialize access and they will be invited to set their password.
By default a dev user role will be created. This has limited privileges as discussed in the previous section. A new admin role may be created as follows, in this case with a shortened validity period of one week.
approov users -add boss@your.domain -admin -expireAfter 7d
This will require confirmation:
WARNING: you are adding admin role access to account your-account for boss@your.domain (boss)
ATTENTION: If you wish to continue then please type YES and return: YES
onboarding email has been sent to boss@your.domain
The -expireAfter parameter will normally be specified in terms of the number of days that access will be available for, but years (y) or hours (h) may also be used. Note that it is not possible to generate a user role that has an expiry time after that of the admin role used to create it.
A user name can also be associated with the role. By default this is derived from the part of the email address before the @. You can override this using the -userName option. Quotes must be used around the parameter if you wish to use spaces in the user name.
A new delegate user role may be created as follows:
approov users -add appdev@theirdomain.com -delegate
The delegate role can be provided to an independent app developer, who will then be able to use it to clone registrations from their own Approov account.
A new pentest user role may be created as follows:
approov users -add pentester@theirdomain.com -pentest
The pentest role can be provided to an independent pentester, which will enable them to control security policies for specific devices only, and to generate example Approov tokens for testing.
Note that there is currently a maximum limit of 25 user roles that may be live for any individual Approov account. If this limit is reached then old unused user roles should be revoked to allow the creation of new ones. Please contact Approov support if you need this limit to be increased. See Enabled Features and Limits for how to view the limit configured in your account.
Access Expiry Reminders
Approov will send access expiry reminder emails to the holder of the user role. These are sent soon after midnight UTC daily for the few days prior to the expiry to remind the user that their access is about to expire. No further messages are sent if access is revoked or reaches its expiration.
Note that you will also receive expiration reminders about your primary user roles provided when you first initialized access to your Approov account. If you have a paid plan then you should receive a new onboarding email from Approov shortly after the reminder emails are issued.
Listing User Roles
The available user roles can be listed as follows:
approov users -list
This command output provides the information about the active user roles with a unique ID for each:
3 user roles:
  admin-5794 you@your.domain, A N Other, expires 2029-05-08 15:01:05
  dev-0639   you@your.domain, A N Other, expires 2029-05-08 15:01:05
  dev-1234   bob@your.domain, bob, expires 2029-05-08 15:01:05, password protected
The first part of the ID is the role, which may be dev, admin or delegate. Other information includes the email addresses, user name, expiry date and if password protection is enabled.
Revoking User Access
In some cases it is desirable to be able to revoke the use of a specific user role before its expiry time. This may be necessary if there is a concern that the access has been compromised or the individual that was provided access has left the project. A user role can be revoked as follows:
approov users -revoke dev-1234
This will require confirmation:
WARNING: you are revoking dev-1234 for bob@your.domain, bob, expires 2029-05-08 15:01:05
ATTENTION: If you wish to continue then please type YES and return: YES
user access dev-1234 revoked
The user role ID provided as the parameter can be obtained using the -list option. Revocation can take up to 30s. After revocation completes, attempts to use the role will result in an authorization error, e.g.
approov registration -list
Will produce an output such as:
ERROR: access is revoked
error: Forbidden, while getting management token status
Note that it is not possible to revoke the user roles issued by Approov when you first signed up. If you feel that your access may have been compromised, then please contact Approov support who are able to revoke these roles and then provide new ones.
Resending Onboarding Emails
It is possible to send another onboarding email to an existing user. This is may be desirable if the user is has lost access to Approov for whatever reason, or they wish to access Approov from a different machine and their original onboarding email has expired. You must select an email address that is associated with one or more roles, and use the following command:
approov users -sendOnboardingTo bob@your.domain
An onboarding email is sent to the user which will give them 24 hours to install access to Approov on to the machine(s) of their choosing.
Automated Approov CLI Usage
You may wish to use the Approov CLI from within automated scripts, perhaps on remote runner machines for Continuous Integration (CI) systems. In this case the interative approov role mechanism may not be appropriate, since it requires a user to type in the password and the session only lasts for one hour. Thus a mechanism is provided whereby an automation role management token can be defined in a local environment variable to provide Approov account access. This will not be password protected.
An automation role management token has limited rights, but should be sufficient for the operations required in a build environment.
Management tokens must be considered to be sensitive secrets since they allow access to your Approov account. Take care with security when setting these up. Never log them and never commit them to source code repositories.
Creating an Automation Management Token
You should create an automation management token for the purposes of the scripted access. An email address must be provided, for the user that is the custodian of the management token. We suggest you override the user name with information about the intended purpose, or the machine that the management token is going to be used on. For instance:
approov users -add you@your.domain -userName "CI Machine" -automation
Confirmation is required and the output will be like the following:
WARNING: you are adding automation role access to account your-account for you@your.domain (CI Machine)
ATTENTION: If you wish to continue then please type YES and return: YES
automation management token written to automation-1234.tok
set this in an APPROOV_MANAGEMENT_TOKEN environment variable on the machine that requires it
This writes the automation management token to the file automation-1234.tok, in this case. Follow the instructions for Linux, MacOS or Windows to set the APPROOV_MANAGEMENT_TOKEN environment variable.
If you have multiple different build machines then you could consider having a differently named automation managament token for each one. They can then be independently revoked if required. Moreover, any app registrations made will be tagged with the management token name.
If you have also performed an approov init for the same user that is using an automation management token set with APPROOV_MANAGEMENT_TOKEN then you will get a warning on approov CLI command invocations. This reminds you that the APPROOV_MANAGEMENT_TOKEN is usurping the role that would normally be selected. We generally encourage you to not issue approov init for users or machines that will only be using an automation token. You can remove initialized roles by removing the .approov file in the user’s home directory.
Automation Setup on Linux
You can do this easily with the following command:
read -r APPROOV_MANAGEMENT_TOKEN < automation-1234.tok; export APPROOV_MANAGEMENT_TOKEN
The parameter automation-1234.tok should point to the file containing the development management token that you received on signup. You can test the environment variable was set by issuing an approov whomai command.
Note that the environment variable APPROOV_MANAGEMENT_TOKEN will only be set while this shell is running. If you want to make the setting more permanent then you can edit your ~/.bashrc file (or equivalent for other shells) and add the line:
APPROOV_MANAGEMENT_TOKEN=eyJhbGciOiJIUzI1NiI…
The string for your development token should be copied from the automation-1234.tok file. Alternatively you can run the read command above in the context of your shell startup. Now any newly created shells have the management token available in the environment so that it is not necessary to make it available on each approov command invocation.
Automation Setup on MacOS
You can do this easily with the following command:
read -r APPROOV_MANAGEMENT_TOKEN < automation-1234.tok; export APPROOV_MANAGEMENT_TOKEN
The parameter automation-1234.tok should point to the file containing the development management token that you received on signup. You can test the environment variable was set correctly by issuing an approov whoami command.
Note that the environment variable APPROOV_MANAGEMENT_TOKEN will only be set while this shell is running. If you want to make the setting more permanent then you need to edit your shell initialization file. This is ~/.bashrc for versions prior to Catalina, or ~/.zshrc since Catalina which uses the zsh by default. If you are using a non-standard shell then you will need to consult its documentation. Add the line:
export APPROOV_MANAGEMENT_TOKEN=eyJhbGciOiJIUzI1NiI…
The string for your development token should be copied from the automation-1234.tok file. Alternatively you can run the read command above in the context of your shell startup. Now any newly created shells have the management token available in the environment so that it is not necessary to make it available on each approov command invocation.
Automation Setup on Windows
Open the advanced settings page:
Then click on the “Environment Variables” button. This opens up another dialog where you can click on the New for user variables to add a new environment variable. The token should be put in the user, rather than system, variables so that it is not accessible to other users of the same machine.
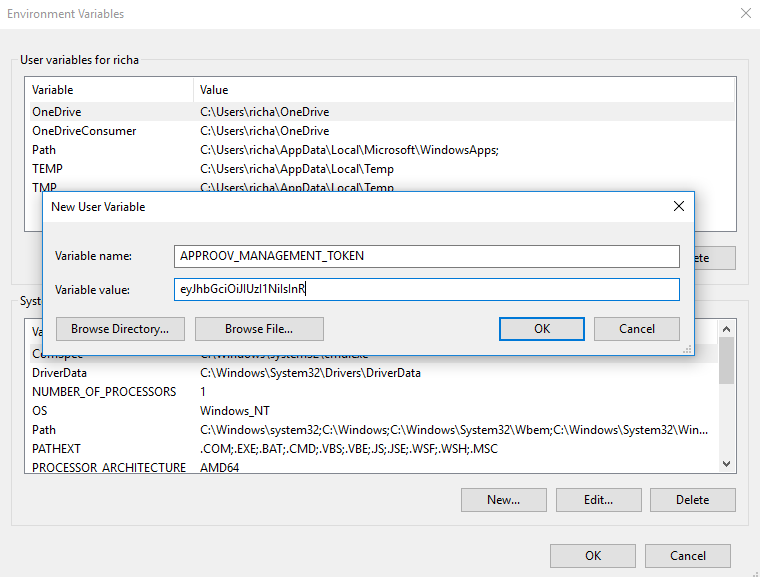
The development token string should be copied from the automation-1234.tok file.
Command shells created after setting the value and closing the dialog will have the management token available in the environment so that it is not necessary to make it available on each approov command invocation. You can test that this is correctly setup with an approov whoami command.
Retrieving an Existing Automation Management Token
If you have previously created an automation role management token then you can retrieve its value again as follows. Firstly, list the user roles to find the role ID value (on the left hand side of the listing):
approov users -list
This will output something like the following:
automation-1234 you@your.domain, CI Machine, expires 2021-12-04 11:47:11
You can then obtain the management token itself using the role ID:
approov users -getManagementToken automation-1234
Enabled Features and Limits
Depending on your Approov subscription, some account features may not be enabled for your account and certain properties managed in an account have a limit on the number of items that can be added. You can view the enablement status of these features and any limits applied to your account as follows:
approov account -getInfo
These features and limits are not user configurable. Please contact Approov support if you need any of the features to be enabled or disabled or would like to request for any limits to be changed. The listed features and limits are:
| Features | ||
|---|---|---|
| AppAttest | Shows whether the account is enabled to use the integration with Apple's AppAttest. | |
| JWE Tokens | Shows whether the account permits the use of JWE tokens. | |
| Key Sets | Shows whether the account allows users to manage keys using key sets. | |
| Measurements | Shows whether Offline Security Mode has been enabled for the account. | |
| Play Integrity | Shows whether the account is enabled to use the integration with Google's Play Integrity. | |
| Proxied Attestations | Shows whether the account has been configured to work when attestation requests are routed through a proxy. | |
| Secure Strings | Shows whether the secure strings feature is enabled in the account. | |
| Token Lifetime | The lifetime in seconds given to Approov tokens obtained from the Approov service. | |
| Web Protection | Shows whether the Web Enabled API feature is enabled in the account. | Limits |
| API Count | Maximum number of APIs that may be used in the account. | |
| App Signing Certificate Count | Maximum number of app signing certificates that may be added to the account. | |
| Attestations per Minute | The maximum permitted number of attestations per minute and per attester for the account, which can be unlimited. If a limit is set, only the attestations within that limit return Approov tokens that are based on proper attestations performed by the Approov service. Any attestation requests beyond the limit return a valid Approov token by default. | |
| Attestations per Month | The maximum permitted number of attestations per month for the account, which can be unlimited. If a limit is set, only the attestations within that limit return Approov tokens that are based on proper attestations performed by the Approov service. Any attestation requests beyond the limit return a valid Approov token by default. | |
| Custom Devices Count | Limit for the number of custom devices for the account. | |
| Devices per Month | The maximum permitted number of unique devices per month for the account, which can be unlimited. If a limit is set, only unique devices within that limit receive Approov tokens that are based on proper attestation results performed by the Approov service. Any devices beyond the limit get valid Approov tokens by default. | |
| Force Fail App Count | Limit for the number of app versions that can be added to the account to be forced to fail. | |
| Force Fail Device Count | Limit for the number of devices that can be added to the account to be forced to fail. | |
| Force Pass Device Count | Limit for the number of devices that can be added to the account to be forced to pass. | |
| Key Set Size | If key sets are permitted, then this is the limit for the number of keys that can be added to a key set in the account. | |
| Predefined Secret Count | Limit for the number of predefined secure strings in the account. | |
| Registration Count | Limit of the number of app registrations for the account. App registrations using app signing certificates do not count towards this limit. | |
| Throttle Attestations at Load | Shows whether attester load is used to limit the number of attestations for this account. | |
| User Role Count | Limit for the number of user roles for the account. |